Theme editor

Scale Model Shop

Ron's Winter G.B Sniper..."Flush 'im out, now!"... A 1/72 diorama.

Status
Not open for further replies.
Thread owner
Thanks John and Colin for your enthusiastic posts!lol Good stuff.....

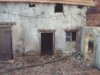
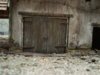
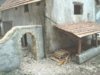
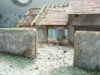
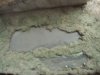
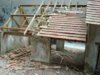
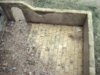
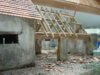
I have finally decided what to do with the yard walls, also I have found a place for the wood shed.

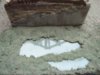
I have made a start adding some detail, logs for the shed and started on the rubble and grass.

Still loads to do and who knows, perhaps some more ideas or alterations? I'm really enjoying my first steps into this different side to our hobby.....

Thanks for looking.

Cheers,

Ron

View attachment 39435

View attachment 39436

View attachment 152461

View attachment 152462
 

Attachments

  • Winter G.B...Sniper 027.jpg
    Winter G.B...Sniper 027.jpg
    2.8 KB · Views: 0
  • Winter G.B...Sniper 031.jpg
    Winter G.B...Sniper 031.jpg
    2.8 KB · Views: 0
Genuinely taken aback by how good this looks, Ron. The attention to detail is amazing. You've really got this pizza-base technique down to a tee, it couldn't look better.
 
Thread owner
Thanks chaps for all your posts on my build. I'm well pleased you approve of my efforts....

I have now made a start on the pond, well not so much a pond as a shallow depression!lol It sort of breaks the grass up a bit and gives the opportunity for reflections in the water.

It is made from a couple of pieces of thin clear plastic from a shirt collar stiffener, embedded in tile adhesive and then dabbed with green shed paint. I will finish around the edges nearer the completion of the diorama, when I get a better feel for how I want it to look.

Cheers all,

Ron................................Pizza for tea!!!!!!!

View attachment 39491

View attachment 39492

View attachment 152517

View attachment 152518
 

Attachments

  • Winter G.B...Sniper 070.jpg
    Winter G.B...Sniper 070.jpg
    2.3 KB · Views: 0
  • Winter G.B...Sniper 071.jpg
    Winter G.B...Sniper 071.jpg
    2.5 KB · Views: 0
\ said:
It is made from a couple of pieces of thin clear plastic from a shirt collar stiffener, embedded in tile adhesive and then dabbed with green shed paint.
And it looks brilliant! You more than get the best out of your materials don't you. 11/10 for inventivness.

Cheers

Steve
 
Thread owner
Thanks for that Steve, and can I give you 12/10 for repairingness?!

O.K., here's a little update:-

I am finally happy with the layout so I am starting to add rubble and the like...

Last night I came up with an idea for a paved area/ courtyard, so I have scribed the slabs on a bit of card from the back of a receipt book, and here and there dug a bit deeper with my knife and then gently prised up the slab edges to make it look uneven. I then sprinkled some garage sweepings over the whole thing.

For the barn debris, I again used card for the fallen, bent roof battens and the tiles. Then added some balsa off cuts and bits from the work bench. Finally, yet more sweepings just sprinkled at the model.

We're getting there slowly and I'm starting to get a real feel for the decay and dereliction around the place as I add more bits, so I await my next idea to come from this usually dormant organ sat on my neck!!

I hope you like the progress thus far, thanks for looking and posting such encouraging comments.

Cheers,

Ron

View attachment 39497

View attachment 39498

View attachment 39499

View attachment 152523

View attachment 152524

View attachment 152525
 

Attachments

  • Winter G.B...Sniper 030.jpg
    Winter G.B...Sniper 030.jpg
    3.3 KB · Views: 0
  • Winter G.B...Sniper 072.jpg
    Winter G.B...Sniper 072.jpg
    2.7 KB · Views: 0
  • Winter G.B...Sniper 034.jpg
    Winter G.B...Sniper 034.jpg
    3.1 KB · Views: 0
Ron it looks like you have just taken a photo of an old barn its that good VERY WELL DONE when the reveal comes its just going to be AWESOME i can feel it
 
I keep showing the missus these photos (plus went and had a shifty around your gallery for her to look at) ..

As much as she's not into modeling in the slightest she does like to look at some of the finished models from all the members on here.

She says your attention to detail (especially in your water scenes) is "absolutely amazing"...

Nice comments for you there although it'll be a bad thing for me coz all i'm gonna get from now on is ....

"that's not how that Ron guy would have done it!!" :) :)
 
Outstanding Ron, love it to bit's, i'll be happy bunny if mines half as good.

John.
 
Jeez Ron! Your 'garage sweepings' look better than the stuff we poor mortals pay a fortune for from the likes of Verlinden! It just keeps on getting better.

Gern
 
Thread owner
Thank you all so much for the very complimentary and humourous posts, they make for great reading.

It must be the ultimate accolade for us modellers when someone with no interest in the hobby ventures forth with positive comments......especially when they come from a lady!lol

Colin, please pass on my thanks to your missus for her very kind observations...

Thanks again,

Ron
 
Ron, this dio would be fantastic just as it is.

Can't wait to see how it turns out when it's finished.

Tony.
 
Outstanding work Ron, really impressive, detailing is quite exceptional.

Love the texturing.
 
Thread owner
Thanks Tony and Darren for your very nice comments, I'm glad you like the progress so far.

Like our Good buddy Mr. Huggins, I have been having a 'play'. Whilst doing so I realised I had made a big basic ommision...No roof spars to the house! Which like the barn you should be able to see under the first row of tiles. So I made some short ends of 1/16 balsa and, because the walls are polystyrene, I gently shoved them up under the roof edge and into the soft 'poly'.

Then my brain clicked a bit to let me consider the following....

Gutters! So I made a couple of lengths of these and laid them on the yard directly below the two roofs, I also made a couple of down spouts out of fuse wire and fixed these just hanging on for grim death...Rather than having to make loads of gutter brackets, they've been nicked by the farmer next door!

It was my intention to leave all the window openings empty, but I have decided to put one window frame in place by the front door (1/16" balsa) with the sash window on the yard along with a few bits of broken glass.

In keeping with rural activities the world over, I have slung a power cable (Sewing cotton) very roughly along the wall, supported here and there by brackets fixed to the render. This runs right around the house.

I have also added yet more rubble to the barn.

Nearly there now....It needs a bit of wayward greenery me thinks, don't know yet...

Cheers,

Ron

View attachment 39584

View attachment 39585

View attachment 39586

View attachment 39587

View attachment 152610

View attachment 152611

View attachment 152612

View attachment 152613
 

Attachments

  • Winter G.B...Sniper.jpg
    Winter G.B...Sniper.jpg
    2.4 KB · Views: 0
  • Winter G.B...Sniper 073.jpg
    Winter G.B...Sniper 073.jpg
    2.7 KB · Views: 0
  • Winter G.B...Sniper 041.jpg
    Winter G.B...Sniper 041.jpg
    2.7 KB · Views: 0
  • Winter G.B...Sniper 039.jpg
    Winter G.B...Sniper 039.jpg
    3.2 KB · Views: 0
Hey Ron.

What you doing taking pictures of real buildings and passing them off as all your own work.

Just joshing, but honestly if you did take pictures of real buildings and put them side by side with these I'm sure there would be confusion as to which was which.

This is something to inspire any diorama builder.

Tony.

p.s. sorry if I seem over the top but it is rather good.
 
Status
Not open for further replies.
Back
Top