Rorke's Drift - The Hospital surroundings, 24th. Jan. 1879 "Sir, the Zulus 'ave scarpered!"
I've turned my attention to the hospital grounds. I'm trying to model what it might have been like in this area the day after the battle.
Sorry, no Zulus!
Let's start.
During a recent trip (Scrounge) to our local skip, I came across a couple of chipboard shelves from an old kitchen unit. This is one of them.
So this morning I set to.
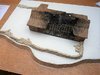
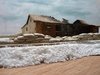
I placed the building on the base and marked roughly what is to go where.
The diagonal lines are mealie bags, the squiggle is a small escarpment and the line in the foreground is a wall. I've loosely copied a sketch plan of the defences made just after the battle.
View attachment 325405
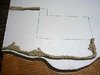
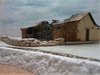
Holding a jig saw at an angle I roughly cut out the line of the escarpment. More about those rectangle thingies later....
View attachment 325406
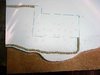
After slinging the off-cut I glued a strip of 1/4" plywood to the underside of the chipboard. This gave me the initial 6ft. drop down formed by the escarpment to the ground below.
View attachment 325407
I've been beavering away at this in my workshop/s*** heap, but the light is starting to go now, so I'll give it best in here for today.
It's a start anyway..... :thumb2:
Cheers.
Ron
I've turned my attention to the hospital grounds. I'm trying to model what it might have been like in this area the day after the battle.
Sorry, no Zulus!
Let's start.
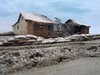
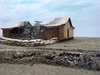
During a recent trip (Scrounge) to our local skip, I came across a couple of chipboard shelves from an old kitchen unit. This is one of them.
So this morning I set to.
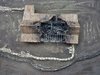
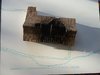
I placed the building on the base and marked roughly what is to go where.
The diagonal lines are mealie bags, the squiggle is a small escarpment and the line in the foreground is a wall. I've loosely copied a sketch plan of the defences made just after the battle.
View attachment 325405
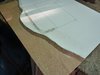
Holding a jig saw at an angle I roughly cut out the line of the escarpment. More about those rectangle thingies later....
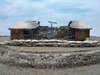
View attachment 325406
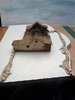
After slinging the off-cut I glued a strip of 1/4" plywood to the underside of the chipboard. This gave me the initial 6ft. drop down formed by the escarpment to the ground below.
View attachment 325407
I've been beavering away at this in my workshop/s*** heap, but the light is starting to go now, so I'll give it best in here for today.
It's a start anyway..... :thumb2:
Cheers.
Ron
 :thumb2: