I had this tutorial on the other site, which can't be mentioned. Hopefully it will inspire some of you to have a go at carving.
Most sculpting is done with the vast array of putties that we have these days, but you can also create by carving away material as the Old Masters did. Here's a brief description on how to do it.
My best friend is Adrian Bay, who is a Master Modeller himself. He has asked me for accessories in the past, mainly for some of his fantasy figures. He used to post me bits from Games Workshop and ask me if I could make one for a larger scale figure that he was creating.
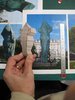
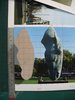
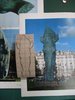
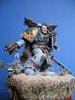
This request was for a pair of wolf's heads which decorated the top of the figure's backpack. (I'm not into this sort of fantasy so don't know all the technical names for it). Here is a photo of Adrian's completed figure with the wolf's heads and frostblade sword that I made for him.
View attachment 301509
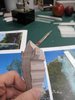
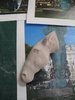
First stage for me was to stick the small pack on a photocopier and enlarge it to the scale that Adrian wanted. I then cut a lump of polyurethane to the rough dimension and drew the side profile with pencil. I kept a substantial lump to act as a handle while I carved it. I have access to a lot of power tools so I cut round the profile with a bandsaw. A hobbyist could do it with a coping saw or piercing saw if you have one.
View attachment 301510
View attachment 301511
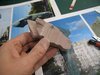
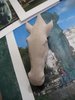
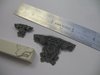
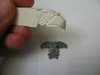
The next stage was to draw a centre line through the top profile as it was symmetrical. I then drew the profile to from the sides. See pencil lines on top.
Having bandsawed off the unwanted bits on both sides, I added some of the pencil marking again.
View attachment 301512
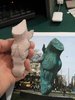
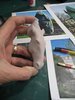
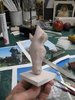
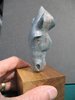
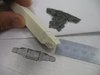
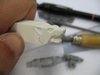
In the next stage I have carved away some more of the detail and rounded the sharp edges. This can be done with a chisel, scalpel or Dremmel.
View attachment 301513
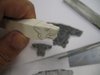
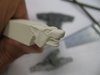
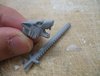
This next photo shows that I gradually removed the unwanted bits little by little, always referring to the original for reference. I also smoothed out rough edges with sandpaper and files
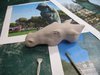
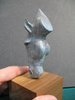
Having got the basic form I cut it off the handle to sort the ears out. (My wife is a Dermatology Nurse and would be disgusted at my dry fingers!)
View attachment 301515
View attachment 301516
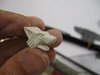
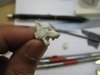
This just shows how the ears are developed and a bit more detail.
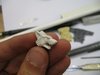
Having discussion with Adrian, I opened the mouth by cutting it off and gluing it back on, to make him look fiercer. I also cheated by adding some filler around his mouth and made the brow more pronounced.
View attachment 301517
View attachment 301518
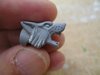
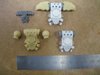
When I was satisfied I gave it a coat of primer. This showed that it needed sanding. I've also mounted it onto discs that fix it to the backpack. I made a silicone mould to cast a second head, rather than trying to make 2 identical heads.
View attachment 301519
View attachment 301520
This is an eagle head sculpted the same way and the pack that I scatchbuilt for them to fit onto.
View attachment 301521
View attachment 301522
Most sculpting is done with the vast array of putties that we have these days, but you can also create by carving away material as the Old Masters did. Here's a brief description on how to do it.
My best friend is Adrian Bay, who is a Master Modeller himself. He has asked me for accessories in the past, mainly for some of his fantasy figures. He used to post me bits from Games Workshop and ask me if I could make one for a larger scale figure that he was creating.
This request was for a pair of wolf's heads which decorated the top of the figure's backpack. (I'm not into this sort of fantasy so don't know all the technical names for it). Here is a photo of Adrian's completed figure with the wolf's heads and frostblade sword that I made for him.
View attachment 301509
First stage for me was to stick the small pack on a photocopier and enlarge it to the scale that Adrian wanted. I then cut a lump of polyurethane to the rough dimension and drew the side profile with pencil. I kept a substantial lump to act as a handle while I carved it. I have access to a lot of power tools so I cut round the profile with a bandsaw. A hobbyist could do it with a coping saw or piercing saw if you have one.
View attachment 301510
View attachment 301511
The next stage was to draw a centre line through the top profile as it was symmetrical. I then drew the profile to from the sides. See pencil lines on top.
Having bandsawed off the unwanted bits on both sides, I added some of the pencil marking again.
View attachment 301512
In the next stage I have carved away some more of the detail and rounded the sharp edges. This can be done with a chisel, scalpel or Dremmel.
View attachment 301513
This next photo shows that I gradually removed the unwanted bits little by little, always referring to the original for reference. I also smoothed out rough edges with sandpaper and files
Having got the basic form I cut it off the handle to sort the ears out. (My wife is a Dermatology Nurse and would be disgusted at my dry fingers!)
View attachment 301515
View attachment 301516
This just shows how the ears are developed and a bit more detail.
Having discussion with Adrian, I opened the mouth by cutting it off and gluing it back on, to make him look fiercer. I also cheated by adding some filler around his mouth and made the brow more pronounced.
View attachment 301517
View attachment 301518
When I was satisfied I gave it a coat of primer. This showed that it needed sanding. I've also mounted it onto discs that fix it to the backpack. I made a silicone mould to cast a second head, rather than trying to make 2 identical heads.
View attachment 301519
View attachment 301520
This is an eagle head sculpted the same way and the pack that I scatchbuilt for them to fit onto.
View attachment 301521
View attachment 301522
Attachments
-
 643250.jpg3.1 KB · Views: 0
 -
 643251.jpg1.8 KB · Views: 0
 -
 643252.jpg2 KB · Views: 0
 -
 643253.jpg2.2 KB · Views: 0
 -
 643254.jpg2.1 KB · Views: 0
 -
 643254.jpg2.1 KB · Views: 0
 -
 643255.jpg2 KB · Views: 0
 -
 643256.jpg2.1 KB · Views: 0
 -
 643257.jpg2.4 KB · Views: 0
 -
 643258.jpg2.4 KB · Views: 0
 -
 643259.jpg2 KB · Views: 0
 -
 643260.jpg2.3 KB · Views: 0
 -
 643248.jpg1.6 KB · Views: 0
 -
 643249.jpg2.2 KB · Views: 0