
You are using an out of date browser. It may not display this or other websites correctly.
You should upgrade or use an alternative browser.
You should upgrade or use an alternative browser.
Somewhere in North Africa
- Thread starter Alan 45
- Start date
- Status
- Not open for further replies.
G
Guest
Guest
That's looking nice so far
Thanks dougie I'm glad you like it ")
Skirts are now weathered View attachment 111751
View attachment 111752
View attachment 224774
View attachment 224775
Skirts are now weathered View attachment 111751
View attachment 111752
View attachment 224774
View attachment 224775
Attachments
G
Guest
Guest
I've got that kit I assume its the airfix 1/32nd kit,I find airfix interesting but dated check out my picture on the 1/72 nd dio I've almost completed.\ said:I've decided to put this in the under construction section as there will be a lot of stuff in this dio but I won't be doing under construction threads for the vehicles as they are old kits and if your into armour then there's a good chance you've built one I will however mention any horror stories that happen
I've decided to do a British scene this time as I've got hold of quite a bit of British equipment from the North African campaign
The picsView attachment 121203View attachment 121204View attachment 121205View attachment 121206View attachment 121207View attachment 121208 weathering will be added once I know what colour the base will be
Next up is the building , it's the old airfix desert outpost , it will be filled and painted , I cut out the hatch to the roof so I could put the ladder there it seemed silly having it on the outside of the building when there is stairs already there, it's got great detail inside and out but the walls are way to thin in reality , there will be tables , chairs, sand bags , Bren guns and hopefully if I can find it in my bits box a 30 cal browning , it will also have Jerry cans from British , American and German to show the spoils of war might even throw in a MG 34 ,
The pics View attachment 121235View attachment 121236 View attachment 121237View attachment 121238
Thanks for looking if you want to know anything just ask
Yes it is the 1/32 , I was going to leave it as is and just paint it but I've decided to thicken the walls to make it look better
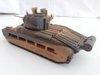
I've now finished the weathering on the Tilly just got to decal and do the crew oh and weather the decals View attachment 111824
View attachment 111825
View attachment 111826
View attachment 111827
View attachment 111829
View attachment 111828
View attachment 224847
View attachment 224848
View attachment 224849
View attachment 224850
View attachment 224851
View attachment 224852
Attachments
Hi Alan this is looking really well done so far , I'm really impressed with your weathering, I have a few small tubes of umbers from Windsor and Newton water colours set ( I'm still doing my armour but am womdering if they could work with mine ( they are acrylics )
Looking forward to seeing more
Robert
Looking forward to seeing more
Robert
Cheers Robert , I don't know if the water colours will work although I must admit I've never tried, mine are oils but give if it a go see it does\ said:Hi Alan this is looking really well done so far , I'm really impressed with your weathering, I have a few small tubes of umbers from Windsor and Newton water colours set ( I'm still doing my armour but am womdering if they could work with mine ( they are acrylics )
Looking forward to seeing more
Robert
Cheers guys I appreciate that
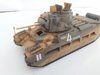
Decals and some bits I left off so I didn't break them while weathering are now on just waiting for them to dry so I can weather them so they don't look out of place
Just figures and some extra equipment to go on now and it's done View attachment 111905
as you can see one of the decals tore , I don't know whether to leave it as wear and tear or paint it back on View attachment 111906
View attachment 111907
View attachment 111908
View attachment 111909
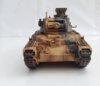
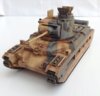
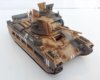
I have only just noticed that I got the camo wrong due to the awful instructions, it's not like tamiya to do bad instructions and I did struggle with some areas in them as it's not quite clear and you only find out their wrong when your into the next step
View attachment 224928
View attachment 224929
View attachment 224930
View attachment 224931
View attachment 224932
Decals and some bits I left off so I didn't break them while weathering are now on just waiting for them to dry so I can weather them so they don't look out of place
Just figures and some extra equipment to go on now and it's done View attachment 111905
as you can see one of the decals tore , I don't know whether to leave it as wear and tear or paint it back on View attachment 111906
View attachment 111907
View attachment 111908
View attachment 111909
I have only just noticed that I got the camo wrong due to the awful instructions, it's not like tamiya to do bad instructions and I did struggle with some areas in them as it's not quite clear and you only find out their wrong when your into the next step
View attachment 224928
View attachment 224929
View attachment 224930
View attachment 224931
View attachment 224932
Attachments
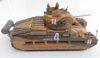
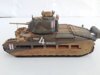
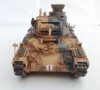
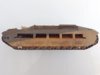
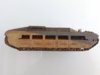
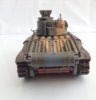
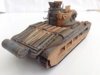
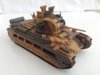
I'm calling this done , I put it in a box with some crushed up kitty litter
This was a throughly enjoyable build although for tamiya it's one of the worst but that still makes it better than most
The kit goes together well enough but it's not spot on there are some areas that do take some time to get right , the skirts are one and the cupola doesn't fit you will have to file this to make it fit properly , the plastic tracks are pretty good but they don't fit 100% my advice if anyone has a crack at it is build from bottom up that way the gap in the top is covered by the skirts
Now I've always thought that tamiya instructions are amongst the best but this has a few little errors , the hatches on the cupola , it tells you to make three without actually telling you why and seeing as the first two are opposit to one another you fit them then you realise that the third one it tells you to build sold go on it and not the one you did
Paint instructions are iffy you have to be very careful you don't mix the camo up , I did in one area and it through it all out but it still looks ok and only a rivet counter would pick you up on it
Over all it's a great kit and turns out looking good with some great detail View attachment 111915
View attachment 111916
View attachment 111917
View attachment 111918
View attachment 111919
View attachment 111920
View attachment 111921
View attachment 111922
View attachment 111923
View attachment 111924
View attachment 111925
View attachment 111926
View attachment 224938
View attachment 224939
View attachment 224940
View attachment 224941
View attachment 224942
View attachment 224943
View attachment 224944
View attachment 224945
View attachment 224946
View attachment 224947
View attachment 224948
View attachment 224949
This was a throughly enjoyable build although for tamiya it's one of the worst but that still makes it better than most
The kit goes together well enough but it's not spot on there are some areas that do take some time to get right , the skirts are one and the cupola doesn't fit you will have to file this to make it fit properly , the plastic tracks are pretty good but they don't fit 100% my advice if anyone has a crack at it is build from bottom up that way the gap in the top is covered by the skirts
Now I've always thought that tamiya instructions are amongst the best but this has a few little errors , the hatches on the cupola , it tells you to make three without actually telling you why and seeing as the first two are opposit to one another you fit them then you realise that the third one it tells you to build sold go on it and not the one you did
Paint instructions are iffy you have to be very careful you don't mix the camo up , I did in one area and it through it all out but it still looks ok and only a rivet counter would pick you up on it
Over all it's a great kit and turns out looking good with some great detail
View attachment 111915View attachment 111916
View attachment 111917
View attachment 111918
View attachment 111919
View attachment 111920
View attachment 111921
View attachment 111922
View attachment 111923
View attachment 111924
View attachment 111925
View attachment 111926
View attachment 224938
View attachment 224939
View attachment 224940
View attachment 224941
View attachment 224942
View attachment 224943
View attachment 224944
View attachment 224945
View attachment 224946
View attachment 224947
View attachment 224948
View attachment 224949
Attachments
-
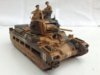 image.jpg2.4 KB · Views: 0
 -
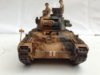 image.jpg2.3 KB · Views: 0
 -
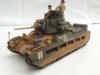 image.jpg2.4 KB · Views: 0
 -
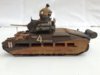 image.jpg2.2 KB · Views: 0
 -
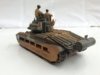 image.jpg2.1 KB · Views: 0
 -
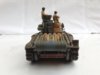 image.jpg1.9 KB · Views: 0
 -
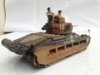 image.jpg2.3 KB · Views: 0
 -
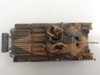 image.jpg1.9 KB · Views: 0
 -
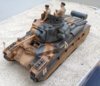 image.jpg3.2 KB · Views: 0
 -
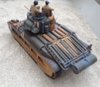 image.jpg3.1 KB · Views: 0
 -
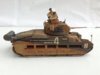 image.jpg2.1 KB · Views: 0
 -
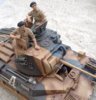 image.jpg3.6 KB · Views: 0
Cheers moni I'm finally getting the hang of this figure lark\ said:looks great Alan your done such a good job with the weathering,")
very nice work on the figures as well,nice detail on them and I think you
have improved so much with them,well done,
I used oils on them this time and I just need a bit more practice with knowing how much to use
G
Guest
Guest
I really like how you've done the Tilly Alan, that looks really nice.
I would like to see you try the gloss coat method before your wash though, just to bring out the detail - those many many rivets for instance would pop right out!
The crew figures are great too ...although my eye keeps being drawn to his hand resting on the turret roof
I would like to see you try the gloss coat method before your wash though, just to bring out the detail - those many many rivets for instance would pop right out!
The crew figures are great too ...although my eye keeps being drawn to his hand resting on the turret roof
G
Guest
Guest
Might I suggest that as you finish each kit in the dio, you post a separate thread in the ' completed ' section? That way everyone will see your excellent work!
- Status
- Not open for further replies.
Legal Notice
scalemodelling.co.uk is a privately operated online discussion forum. All content posted by members reflects their own views and opinions and does not necessarily represent those of the forum owners or administrators. While reasonable efforts are made to moderate content, no responsibility is accepted for user-generated material. By using this site, you agree to comply with UK law and the forum rules.