I managed a fair bit of progress over the weekend, largely therapitic as my mother died on Friday, she was a good age 88 with her quality of life damaged by a stroke 4 years ago, she died peacefully with the family around her. In a way, though he is devastated, it is a relief for my father who insisted on being her carer and it was taking a toll on him. They were married for 64 years and had a good life together. Anyway, life does not stand still....
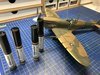
If you have not used masks then I strongly recommend that you try them. First of all they are easier to use than decals and produce a much better result, specially in a large scale. I got my masks, custom made, from Mal Mayfield who I understand is now semi-retired but there are others around. You cannot all together stop using decals and those I used are Kits World which are the best I have found, being very thin and much less prone to splintering than many others.
Here is a sequence of photos showing the process....
Having applied all the masks I widened the masked are with Tammy tape.
View attachment 291525
View attachment 291526
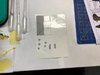
The Miracle Masks are a semi transparent vinyl which makes placing them easier. Mal Mayfield is quite generous with spare masks and blanks to hold each element together when removing them from the backing paper and placing them on the model.
View attachment 291527
Above are the elements that I then removed and placed on the backing sheet to put back later once I have sprayed the first colour.
View attachment 291528
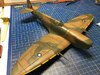
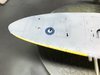
The light roundel blue has been sprayed in the centre on all roundels and the tail flashes.
View attachment 291529
I sprayed the exhausts MRPs Exhaust Metal after which I did a light spray of Burnt Iron. I love the final look that achieved. There will be some dry brushing and washes to do as well.
View attachment 291531
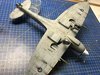
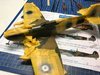
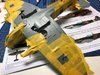
I replaced the centre circles to mask the Light Roundel Blue and the fin flash element. Then I removed the outer circle of the roundles and other fin flash element. before spraying Marking Blue. The serial number was also sprayed black.
Oh - I forgot to mention. I lightly sprayed the yellow ID strip with a yellew primer before spraying that Marking Yellow.
View attachment 291532
View attachment 291533
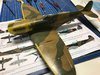
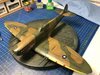
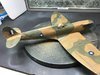
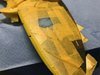
Above you can see those troublesome underwing roundels look pretty perfect. Always a problem with decal splintering around the uneven surface. It was quite easy with masks though I did have to use two centre elements to make sure it was right.
View attachment 291534
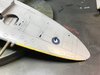
View attachment 291535
The above pics were immediately after removing the masks. As you can see, no runs. Achieved by using a cocktail stick to burinish down the masks. To deal with any slight ridge I wipe a polishing stick over the area lightly. Not that there is much of that with the ultra thin MRP paint. A little on the fin flash only.
Not only do the markings look painted on but they are a lot better for weathering washes.
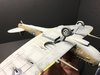
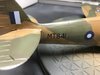
Some declals were needed.
View attachment 291536
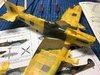
Pauline herself, prior to the application of Mr Softener
View attachment 291537
The walk lines and stencilling in place, above pictured after an application of Mr Softener. I also masked and painted the red around the gun ports and the red and green wing tip lights.
Panel line washes next.
One great thing about MRP is that I did not need to apply any gloss coats for the decals or washes. It is just not needed given the very smooth shiny finish it provides. I will be doing the first matt coat after I have done the panel line washes.


")