Theme editor

Scale Model Shop

Steves zsu-57-2

Status
Not open for further replies.
Thread owner
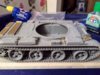
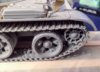
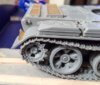
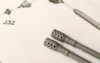
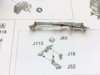
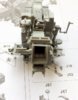
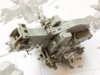
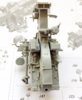
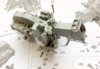
I don’t think I have constructed something that looks as complex as this 57-2 gun system. Still only about 80% of sprue J (over 100 parts) used , about 6 steps to go. Lots of very, very small bits, even the handle on the big wheel is a separate part, only about 1 mm in length, but has a perfect peg to fit into a minute holed on the wheel. This ‘bit’ of the sighting system, I think that’s what it is part of, has 8 parts in it, and you have to think about the build sequence, working out the best route to fit which bit where first.

View attachment 282288


Looks incredible though.

View attachment 282288 View attachment 282289 View attachment 282290 View attachment 282291 View attachment 282292
 

Attachments

  • IMG_0010.JPG
    IMG_0010.JPG
    1.9 KB · Views: 0
  • IMG_0011.JPG
    IMG_0011.JPG
    2.5 KB · Views: 0
  • IMG_0012.JPG
    IMG_0012.JPG
    2.7 KB · Views: 0
  • IMG_0013.JPG
    IMG_0013.JPG
    2.8 KB · Views: 0
  • IMG_0014.JPG
    IMG_0014.JPG
    2.5 KB · Views: 0
I'm going to have to stop going fishing, i keep missing great builds. Nice work so far Steve, it's got some detail this kit matey.

Have fun, John
 
Wow!! I doubt the original, has many pieces than this one!!!! :eek:
Excellent work so far ;)
 
Thread owner
With the shilka waiting for the paintshop, got back onto this beast, one thing i had been avoiding were the tracks, got totally dis-heartened with the trumpeter working ones, all the effort to remove them from the sprue gates, for some of the pin holes to break, or not be opened and then for the pins not to fit or look like they have fitted only for a run of tracks to come apart. SO for the first time i tried using kit tracks. Made up a simple jig from masking tape and a couple of strips of balsa and of i went, glued them together and waited for 25 minutes, picked them up and wrapped around the idler and drive sprocket. Just need to glue the bottom run together and then can start on the next side, took about an hour to get to this stage.

View attachment 285175 View attachment 285176 View attachment 285177
 

Attachments

  • IMG_0739.JPG
    IMG_0739.JPG
    3.3 KB · Views: 0
  • IMG_0740.JPG
    IMG_0740.JPG
    2.9 KB · Views: 0
  • IMG_0741.JPG
    IMG_0741.JPG
    3.3 KB · Views: 0
Thread owner
Whilst waiting for my new airbrush to arrive, I have a couple of review models waiting to go into the ‘paint shop’, and waiting for some dry weather to finish off weathering the turret on the Shilka, I drilled out the 57-2 barrels. Drilled one is the lower of the two in the picture, will need a clean-up of the holes. I dunno how it’s happened but it seems the right side of the cannon assy is protruding about 1mm more than the left, so will require some sanding on the gun attachment to line up both ends of the barrels

View attachment 286865
 

Attachments

  • barrell.jpg
    barrell.jpg
    4.7 KB · Views: 0
Bloomin Ella Steve this is looking really good indeed a d that intruder is looking very complex but superbly put together

Very impressive indeed

Regards

Robert
 
Just caught up with this thread Steve, looking very good indeed. That gun is incredibly detailed.
 
Thread owner
Just caught up with this thread Steve, looking very good indeed. That gun is incredibly detailed.

More parts on just the gun than in most full model kits !, TBF to Takom, they have been quite sensible in how they have devised this 'bit'
 
Status
Not open for further replies.
Back
Top