Theme editor

Scale Model Shop

Super Conqueror Amusing Models 1/35

Bigfoot57

Well-known member
Joined
Jun 24, 2015
Messages
1,179
Reaction score
301
Points
83
Age
68
1/3
Thread owner
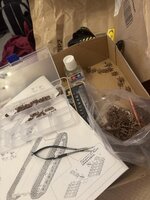
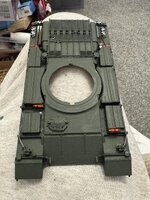
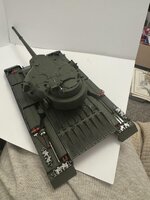
As I have issues with this model I thought I might as well give you a build sequence just in case anyone has this model and has the same problems so the initial model is very good sensible sprue connections reasonable fit not as good as a Tamiya but still reasonable and in some cases they’ve used the key system where they’ve use one part has one type of locking key as the other part has a slightly different one so that was good to see
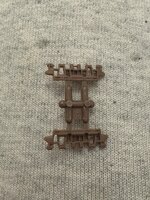
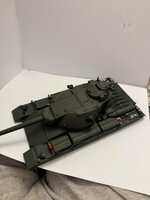
However now we come to the elephant in the room so speak and that’s the tracks. I can see what Amusing we’re trying to do but from what I can tell it’s not going to work. These are the so-called clip together tracks where you have two little pins either side which are supposed to clip into each other the only trouble is once you get a significant length of track about 20 links when you click the top one in the middle of the track will probably come unclipped forcing you to re-clip it again and then again and again and again sorry Amusing this system does not work. The only way this would work is if you put a pin all the way through from one side to the other so there was nothing to unclip as such these tracks will be glued to the wheels similar to the Tamiya way of doing it and then individual links around the idler and sprocket that’s the only way I can see this working unless someone else has got a better idea and I don’t mean going going and purchasing an aftermarket add-on
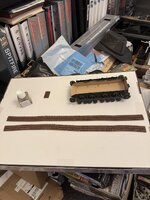
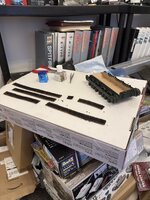
I’ve added four pictures as that seem to be the amount that we can add hopefully illustrate the problem as always thank you for your comments and I’ll update you with the next section which should be the attachment of the top of the hull and remaining side skirts Once we got the tracks sorted out, which I think is gonna be a right pain as you can see from the last picture, they’ve all felt to pieces again

Regards

Colin
 

Attachments

  • photo241834.jpg
    photo241834.jpg
    478.8 KB · Views: 0
  • photo241835.jpg
    photo241835.jpg
    304.8 KB · Views: 0
  • photo241836.jpg
    photo241836.jpg
    326.8 KB · Views: 0
  • photo241837.jpg
    photo241837.jpg
    368.2 KB · Views: 0
Last edited:
Morning Colin,
I see you have the clip track blues.... It is the same with all of these clip together tracks and those with the little resin or plastic pins, no matter how gently you treat them, they seperate.... The only solution I can offer from my hair pulling experience, is to decide if you are going to place the model on a flat surface or diorama base. Flat surface is easy because you glue together the length you need for the wheels to sit on, then you work around the drive sprocket while the glue is setting and the same with the idler wheel. Then it is a case of fixing the top run from return roller to return roller and then leave the last links undone so that you can remove the whole track for painting.
It is the same with the diorama base except you lay the track on the groundwork so that it adopts the shape of the ground and you do not end up with a 'dog taking a P' stance.
The only other way is to revert to metal tracks.
Tip on the photos.
After the 'Upload Attachments' and Upload from URL have done their thing, then you will see a small image of your photo below them. Click on the blue lettering 'Large' and your pic will be visible to all.
Then move the flashing icon to the next line by clicking the 'Return' key, this will then allow you to attach your next image.
You are only allowed to attach four photos with every post.
HTH
Mike.
 
Thread owner
wAAACH5BAEKAAAALAAAAAABAAEAAAICRAEAOw==
filedata/fetch?filedataid=242590
wAAACH5BAEKAAAALAAAAAABAAEAAAICRAEAOw==
filedata/fetch?filedataid=242591
wAAACH5BAEKAAAALAAAAAABAAEAAAICRAEAOw==
​ So just a quick update on this build as you can see from the attached photo, I’ve now got the tracks in place they’re not perfect, but they will do considering that they were constantly breaking apart when I was trying to fit them
Next up is the main hull structure top section I’ve added as much as I can to this It now needs painting as we’ve now got the tools the towing cables etc which are all different colours and materials as opposed to the armour that the actual tank was made from
 
Thread owner
IMG_1944.jpg IMG_1945.jpg IMG_1946.jpg After several weeks I have now finished the top section of the Super Conqueror all nicely fitted so it looks like apart from the tracks this is a very good kit almost on par with Tamiya so all we got now is just the turret and the extra armour which is made from my favourite thing photo etch not
Anyway here are some photos of the progress so far
 

Attachments

  • IMG_1944.jpg
    IMG_1944.jpg
    412.9 KB · Views: 0
Thread owner
So I’ve now finished the top of the tank including the turret and the commanders Copular however it’s spelt iPhone is unable to find the word so I give up trying to spell it anyway you know what it is
Next will be the additional armour which I’ve been constructing over the past two days using PE and CA glue what a great mixture why is it that the tweezers will stick the part to them? but it won’t stick to the PE piece you want it on there’s something for the tweezer manufacturers to come up with tweezers that don’t attach glue to themselves
After this assuming that the extra armour fits doesn’t fall off or come unstuck I will add the remaining details which are the two wing mirrors and two aerials which will need to be scratch built from wire as there’s none supplied. It will then be a case of fit in the hull to the tracks assembly and that will be it
 
Last edited:
Looking good Bigfoot, it seems it is spelt "commander's cupola" when I googled it. Have fun with the next steps, cheers
 
Thread owner
IMG_1973.jpg IMG_1974.jpg Well here is the final set of armour and I must say it’s a great disappointment. It looks like something Delboy and Rodney would’ve made no wonder it never went in production luckily for us it was the Genesis for the Chieftain which will be my next model? I’m planning on doing the Berlin camouflage one so it’ll be a mark 10.
my advice if anyone building this kit is just build it as a normal conqueror tank forget the extra 49 pieces of photo etch which 43 of them are little tiny brackets to hang the seven pieces of large photo etch off to represent the armour it’s still got to be painted to match the rest of the armour on the tank so it may not look too bad after that but was it worth all the grief of trying to fit these little stupid little brackets in my opinion no
 
Thread owner
IMG_1980.jpg IMG_1981.jpg IMG_1979.jpg So here is the finished article and you are right it does look a lot better painted up much to my surprise the decals what they were because most of them are covered up by the extra armour really good easy as good as cartograph and I was really impressed with them
so onto the next one, which will be the MK 10 Chieftain tank which I’m gonna attempt to do in Berlin camouflage I’ve just ordered a load of paint for the purpose
 
Back
Top