Theme editor

Scale Model Shop

Takom Luchs A1 A2

Status
Not open for further replies.

RM6239

New member
Joined
May 1, 2018
Messages
343
Reaction score
0
Points
0
1/3
Thread owner
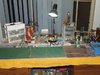
Well it's been so long since I've built anything I thought I better get a move along. First up to boost the mojo, clean up the workspace.

View attachment 299215
The Doctor says Hi :smiling4:.

The mojo starter.

View attachment 299216

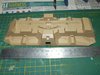
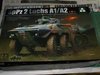
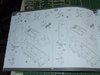
The paint scheme I will go with.

View attachment 299217

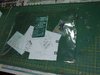
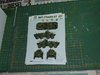
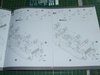
Extra's bag. Funny coloured PE fret, corrections to the manual, 8 metal springs and a little bit of rubber, plus the decals.

View attachment 299218

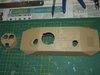
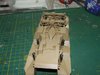
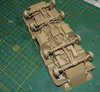
It's not going to be a small model. 8 inches long in the old measurement.

View attachment 299219

View attachment 299220

Tiny little turret though, compared to the rest of the model.

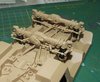
Moulding looks pretty good, I can't see any flash or nasty ejector marks, so far, detail looks to be nice. There are 2 sets of 8 rubber tyres as the different models had different treads. I will be building it OOB and the kit seems to include everything to get a pretty decent result but there are 2 things that could be improved, a metal barrel would provide better definition and for some reason the covers for the propellors aren't included, so unless you want to scratch them up you can't use the nice red and white decals which would add an extra splash of colour.

Anyway off to reread the instructions and I hope to get started this weekend.

cheers
Ross
 

Attachments

  • luchs a2 1.jpg
    luchs a2 1.jpg
    3.9 KB · Views: 0
  • luchs a2 1e.jpg
    luchs a2 1e.jpg
    3.3 KB · Views: 0
  • luchs a2 1d.jpg
    luchs a2 1d.jpg
    3.5 KB · Views: 0
  • luchs a2 1c.jpg
    luchs a2 1c.jpg
    3.1 KB · Views: 0
  • luchs a2 1b.jpg
    luchs a2 1b.jpg
    3.1 KB · Views: 0
  • luchs a2 1a.jpg
    luchs a2 1a.jpg
    3.4 KB · Views: 0
Nice one Ross, I like the look of this kit. Was thinking about getting one myself, so I'll watch this to see if I should.
 
Hi Ross, good to see you here! And good to see a build being started, looks it's going to be a fun ride!

Cheers
 
Thread owner
Cheers Ian, happy to be your Guinea pig mate, at least you might see what not to do.:smiling4:

Wouter, hope so mate.

Instructions read and I've cut up the additions and sticky taped them in the required locations and made a start on the suspension. Suspension looks very detailed and takes up around half the build steps in the instructions.

cheers
Ross
 
Ross .
Jim will be pleased to see your tidy bench !
I shall sit at the back .
John.
 
Thread owner
John
Hopefully it won't stay tidy too long mate. I know you, you can sit up the front where I can keep an eye on you :smiling6:.
cheers
Ross
 
Hi Ross nice choice and a clean and tidy bench not for long I bet :smirk: .
Good luck with your build.
Pete.
 
Thread owner
Peter, thanks.
Steve, you may.

Well the steering rods etc can all be made as fully moveable, a pin goes through and eye and then a PE washer is slipped over and you then melt the end of the pin to stop things falling apart. In the instructions it shows to glue some of the PE washers instead of melting the pins, for the first one I followed the instructions, after having it fall apart a few times while trying to fit it, I ended up melting eveything and ignoring the glue. It worked much better and that's the way I went for the second one. Finally for the 4 cap bits that attach to the steering rods and then go onto where the wheel attaches these were so loose that they kept falling off and getting in the way that I ended up gluing them in position after everything was fitted, so that did away with it being steerable anyway.

For practicable purposes I think little caps that could be glued on to the pins, giving the appearance of a nut and washer (I'm sure I've seen something like this in another model, just can't remember what it was), rather than the PE washer and melting the pin, would've worked better.

Also a bit worried about all my wheels touching the ground when it's all together as some of the mounting points seem a bit iffy. Still it looks to be aligned but I won't know until the wheels go on.

Anyway enough chatter, time for some pictures.

View attachment 299729

Only the back 2 to do now.

View attachment 299730

cheers
Ross
 

Attachments

  • luchs a2 2a.jpg
    luchs a2 2a.jpg
    3.2 KB · Views: 0
  • Luchs a2 2.jpg
    Luchs a2 2.jpg
    4 KB · Views: 0
Hi Ross
Good to see you getting stuck in straight away. Nice tidy bench :thumb2: Looks a nice kit - everything you need. The suspension/axle set up looks very well detailed, quite fiddly though.
Jim
 
Nice work Ross, and I like the fact that they made the steering mechanism functional. I have an AFV Stryker and on that kit it isn't, and that's a pitty. The wheels steered to the left or right gives it a bit more character I think.

Cheers
 
Great start Ross, looking forward to seeing this one develop.
Cheers
Tim
 
Good start Ross. this one has been on my radar for a while. Will follow along and be tempted :thumb2:
 
Thread owner
Jim, detailed but very fiddly.
Wouter, it starts out steerable but I'm not sure it will stay that way as there is a couple of pieces you add near the end that you have to glue and to me it looks like it would interfere with the movement.
Steve, Tim and Marcello, thanks guys.

View attachment 300412

The drive shafts are a very tight fit after the first 2, I placed them at the same time as I mounted the axles, the springs were a nightmare to keep in place while I mounted axles as well. Finally I got the orientation wrong on one of the steering shafts as you can probably see.

Just a light and a couple guards to place and the lower hull is done.

One of the nice things about the Takom instructions is they show you exactly what you need to do depending on the model you make.

View attachment 300413View attachment 300414

cheers
Ross
 

Attachments

  • luchs a2 3a.jpg
    luchs a2 3a.jpg
    2.5 KB · Views: 0
  • luchs a2 3.jpg
    luchs a2 3.jpg
    4.6 KB · Views: 0
  • luchs a2 3b.jpg
    luchs a2 3b.jpg
    2.4 KB · Views: 0
Hi Ross
The underside is so good I'd display the finished model upsidedown!!
Jim
 
Thread owner
Funny you should say that Jim, I found a picture of one on it's roof today.
cheers
Ross
 
Coming along nicely Ross, lets hope all the work on the axles wasn't in vane, if it isn't steerable in the end.
 
Hi Ross

Nice work on the suspension. Shame to hide it.

Regards Lee
 
Status
Not open for further replies.
Back
Top