
You are using an out of date browser. It may not display this or other websites correctly.
You should upgrade or use an alternative browser.
You should upgrade or use an alternative browser.
Tamiya 1/12 Ducati Desmosedici
- Thread starter Hecky
- Start date


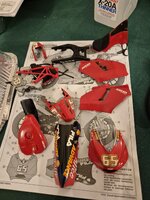
I tried 3 or four times to try and get a carbon fibre decal to confirm to the rear mud guard in a single piece. I nearly had it a couple of times but I gave up in the end. Instead I ended to airbrushing grey over black through a gauze to give a carbon effect. It's not as good as the decal, but it looks ok. I also did a black wash over the engine to bring out the detail.


Nice start George.
I've got some experience with CF decals (see my Ducati Superlegerra build) so can offer a little advice.
The secret to getting them to conform to odd shapes is decal solution, heat, time and patience. Start by laying the decal on and brushing/rubbing down as best as possible. Then apply liberal decal solution (I like the UMP strong) and leave it alone to soften the decal. Then start carefully brushing it, adding more solution and heat from a hot air gun or harirdryer as you go. Be careful, you don't want to overheat the decal or tear it. Keep working it, along with solution and heat and it will eventually conform. A final blast of heat will lock it in.
This is the hot air gun I use: https://www.amazon.co.uk/OundarM-Shrink-Tubing-Embossing-Option/dp/B07YWR9MST/ref=sr_1_23?dib=eyJ2IjoiMSJ9.jQ30TkTSltYAUZ1TWLbhn H9G4WtwpTguOqSRNd0elZeI64yAymLyA1zxe4jw7E1xu9j9-8TRtKS1FgTE-xhQx83OpU3UNLw6GWfsqzYgpGy7wqbOYR_Q682QGLzjkst6oZQ CNMW0KrZhBD6ojN6MOlnvDG8SHuYiuRjnJMDElkHtaVoMu9ZB-MmiG7-qTxPkL_aGKaL9yQuMWE9_A1z-bnBDit-jS6Fhrtzh7zCCjj_LUVbdGUsdxJxeoRYY_r0dYhU04AUO8s4wo 6soL-mo4Ys3UMgc3LYUePvQt8SCWKo58WGcbwPPgGt8fsncXuZl_9oW eNIitFVIjrFaGFfsxxfd2U1-ey5BXG4ooosTXi8.DPPMPKNgaY-bhGeBy5zMBwsZM9z453NFSGVigz6mmyo&dib_tag=se&keywor ds=hot+air+Guns&qid=1741950392&s=diy&sr=1-23
Thanks Bob, I'll give that a go next time. I've ordered another sheet of carbon fibre decal as I got it wrong so many times that I ran out. I've had the day off work today so I've made some more progress.
I've done some experimenting with the exhaust. I cut some thin strips of masking tape and used thinned x18 and some clear red and orange to make it look like it's been hot. I think it's better than my first attempt but I can't find my clear blue so I'll have to wait until some turns up in the post.

I've made some decent progress today with the bodywork. I tried Bob's trick of putting some heat into the decals with the hair drier and that made a big difference.
I also managed to get hold of some clear blue lacquer so I'll give the exhausts another shot tomorrow.

I also managed to get hold of some clear blue lacquer so I'll give the exhausts another shot tomorrow.
Attachments


Off to a great start. Big decals on complex curves are horrible but I have made a note Bob's method for the future. Glad yours are ok now. These large scale motorbike kits do build up into eye-catching models.
Thanks Jim, I've done a bit of assembly over the weekend and tried putting on some carbon fibre decals. It worked better than last time I tried it. Apart from a lack of knowledge, I think the old decal I had was a bit too thick. The new decal I got is much thinner and seems to respond well to the decal softener.
The exhausts look much better now in the context of the assembled bike.


The exhausts look much better now in the context of the assembled bike.

3rd time lucky. I'm trying these exhausts again after watching a YouTube tutorial. The guide I was using was one that is printed off from the Top Studio site about 12 years ago and I had the idea about building a motorbike model. I think some of the instructions were a bit lost in translation. The YouTube guide made much more sense.
That's the masking done

That's the masking done


Legal Notice
scalemodelling.co.uk is a privately operated online discussion forum. All content posted by members reflects their own views and opinions and does not necessarily represent those of the forum owners or administrators. While reasonable efforts are made to moderate content, no responsibility is accepted for user-generated material. By using this site, you agree to comply with UK law and the forum rules.