Theme editor

Scale Model Shop

Tamiya 1/12 Nastro Azzurro HONDA NSR 500 Valentino Rossi # 14082

Status
Not open for further replies.

simontie

SMF Supporters
Joined
Jan 13, 2010
Messages
1,547
Reaction score
131
Points
63
1/3
Thread owner
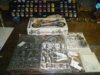
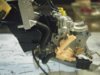
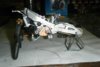
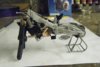
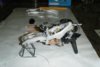
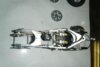
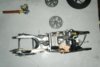
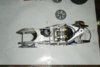
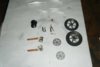
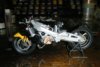
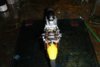
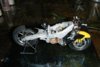
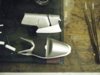
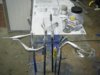
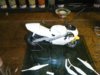
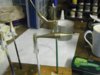
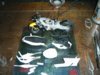
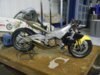
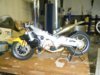
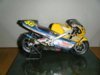
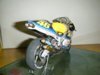
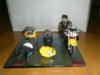
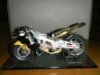
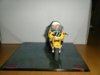
ok as promised i have started the nsr 500,and thanks to the holidays i have made reasonable progress. View attachment 23572View attachment 23571View attachment 23570View attachment 23573View attachment 23574

i all so took some advice i found on someone else tread about dipping the precoated crome finished frame work ect in to bleach and was amazed at the results will post them in the next up date

simon

View attachment 30191

View attachment 30192

View attachment 30193

View attachment 30194

View attachment 30195

View attachment 143217

View attachment 143218

View attachment 143219

View attachment 143220

View attachment 143221
 

Attachments

  • NSR500 -3.jpg
    NSR500 -3.jpg
    2.6 KB · Views: 0
  • NSR500 -2.jpg
    NSR500 -2.jpg
    2.5 KB · Views: 0
  • NSR500-1.jpg
    NSR500-1.jpg
    3.1 KB · Views: 0
  • NSR500 -4.jpg
    NSR500 -4.jpg
    3 KB · Views: 0
  • NSR500 -5.jpg
    NSR500 -5.jpg
    2.9 KB · Views: 0
Looking good Simon. That's an impressive display of Tamiya paints as well!!

Are those resin parts added to the engine or do they just look like it? I like the different metallic finishes on the engine. Have you done a bit of dry brushing on it yet? You will probably find enamels a lot easier for that as they don't dry as fast as acrylics so are easier to control when dry brushing.
 
Thread owner
thank you richard, no there all origanal kit bits - i just masked an airbrushed and touched up after assembly,when i first started modeling again last year i bought a whole load of bike kits then

sifted through them and collated a list of required paints and added to them when the wife was not looking - - found a hole saw the right size and built the stand for them it works quite well

simon
 
Thread owner
stage 2

last weeks progress - scrubbed in tyres and sprayed wheels, air brushed forks assembled frame and swinging arm after stripping off the crome plating then airbrushed with XF-16 Flat Aluminum - i think it looks better than the standard finish

View attachment 23586View attachment 23582View attachment 23583View attachment 23581View attachment 23584View attachment 23580View attachment 23585 23587

tubing was fun there seems to be awhole load of it to do on this kit spark plug leads were fun- to achive the bends in the large tubing i slipped a length of solder in to them and they held there shape really well smaller tubes i stripped some speaker cable and split to a neat fit diameter this worked really well also- know how i will be doing it in the future who said you cant teach an old dog new tricks?

View attachment 30201

View attachment 30202

View attachment 30203

View attachment 30204

View attachment 30205

View attachment 30206

View attachment 30207

View attachment 30208

View attachment 143227

View attachment 143228

View attachment 143229

View attachment 143230

View attachment 143231

View attachment 143232

View attachment 143233

View attachment 143234
 

Attachments

  • NSR 500 -12.jpg
    NSR 500 -12.jpg
    2.4 KB · Views: 0
  • NSR 500 -10.jpg
    NSR 500 -10.jpg
    2 KB · Views: 0
  • NSR 500 -8.jpg
    NSR 500 -8.jpg
    2.6 KB · Views: 0
  • NSR 500 -9.jpg
    NSR 500 -9.jpg
    2.3 KB · Views: 0
  • NSR 500 -11.jpg
    NSR 500 -11.jpg
    2.2 KB · Views: 0
  • NSR 500 -13.jpg
    NSR 500 -13.jpg
    2.2 KB · Views: 0
  • NSR 500 -7.jpg
    NSR 500 -7.jpg
    2.2 KB · Views: 0
  • NSR 500- 6.jpg
    NSR 500- 6.jpg
    2 KB · Views: 0
Simon looking awesome! Great to see a motorcycle build and this is a good one!
 
Looking very very good so far, and what a display of paints lol
 
Thread owner
weekend progress

thanks to the snow and cold snap had nothing else to do,

so here what i did instead comments welcome this is only my fifth build so getting better ?

well i think so

thank you all for you kind words

i have yet to experiment with other paints or add on parts but its in the pipeline hence the impresive display of tamiya paints

View attachment 23644View attachment 23643View attachment 23642View attachment 23646View attachment 23645

body work and exhausts to do this week have a few ideas for the exhausts ! so hopefully they will turn out ok

simon

View attachment 30253

View attachment 30254

View attachment 30255

View attachment 30256

View attachment 30257

View attachment 143279

View attachment 143280

View attachment 143281

View attachment 143282

View attachment 143283
 

Attachments

  • NSR 500 -17.jpg
    NSR 500 -17.jpg
    1.8 KB · Views: 0
  • NSR 500 -18.jpg
    NSR 500 -18.jpg
    2.6 KB · Views: 0
  • NSR 500 -14.jpg
    NSR 500 -14.jpg
    2.6 KB · Views: 0
  • NSR 500 -16.jpg
    NSR 500 -16.jpg
    2 KB · Views: 0
  • NSR 500 -15.jpg
    NSR 500 -15.jpg
    2.5 KB · Views: 0
Simon thats looking great,a nice light wash on the engine would really make the details pop. Looking forward to seeing those pipes!

Trey
 
Thread owner
tray

thank you

daft question (as if) what do you mean by a light wash?
 
hey Simon , this thread says it all

http://www.scale-models.co.uk/tutorials/11245-simple-basic-wash-tutortial.html
 
Thread owner
getting there!

ok started on the body work and as promised exhausts -body work, slow going mainly down to garage temp but this week I installed wait for it central heating (no really) the boiler is next door in the utility so when the better half popped out to visit friends I turned off the central heating and drained down, did the pipe work and hay presto radiator now in the garage not sweltering hot but raises the ambient temp - so big bonus for me and modelling. Anyway put the fairings together and surface primed them sprayed the inside matt black and masked off the belly pan and front fairing. View attachment 23801View attachment 23803View attachment 23799

i used the mask's supplied with the kit and all though i could have don it with tape they worked quite well bit fiddley but ok

Primed tank and got a coat of yellow on it but managed to stuff it up and ended up doing it again thanks to an over eager spray painter ! Exhausts were fun 1st off I put a light aluminium on them then highlighted the welds and bends with copper then a light mist of metallic blue mixed with clear coat, and over the top a nice haze of clear orange –

View attachment 23800View attachment 23802

View attachment 23805View attachment 23804

I think they look pretty good let me know what you think

Cheers Simontie

View attachment 30394

View attachment 30395

View attachment 30396

View attachment 30397

View attachment 30398

View attachment 30399

View attachment 30400

View attachment 143420

View attachment 143421

View attachment 143422

View attachment 143423

View attachment 143424

View attachment 143425

View attachment 143426
 

Attachments

  • NSR 500 -22.jpg
    NSR 500 -22.jpg
    2.7 KB · Views: 0
  • NSR 500 -20.jpg
    NSR 500 -20.jpg
    2.6 KB · Views: 0
  • NSR 500 -19.jpg
    NSR 500 -19.jpg
    3 KB · Views: 0
  • NSR 500 -29.jpg
    NSR 500 -29.jpg
    3.1 KB · Views: 0
  • NSR 500 -23.jpg
    NSR 500 -23.jpg
    3.2 KB · Views: 0
  • NSR 500 -28.jpg
    NSR 500 -28.jpg
    3.2 KB · Views: 0
  • NSR 500 -27.jpg
    NSR 500 -27.jpg
    3.3 KB · Views: 0
Simon clean build you've got going The pipes look very nice and suttle, great technique
 
Thread owner
Not quite the happy ending i wanted !

Ok final few pictures the painting went well on the body work but I let the project down with the decal work

quite disappointed with the damaged decals, but I will live with it till I can get a new set

if any one has any ideas how to get hold of them let me know (or a spare set) I have spoken to a couple of model shop's and no joy but will perceiver.

Let me know what you think of the final few pictures

I will leave you to find the damaged decals and the out of place replacement one i used at the front?

Simon

View attachment 30650

View attachment 30651

View attachment 30652

View attachment 30653

View attachment 30654

View attachment 30655

View attachment 30656

View attachment 143676

View attachment 143677

View attachment 143678

View attachment 143679

View attachment 143680

View attachment 143681

View attachment 143682
 

Attachments

  • NSR 500-37.jpg
    NSR 500-37.jpg
    2.4 KB · Views: 0
  • NSR 500 -36.jpg
    NSR 500 -36.jpg
    2.4 KB · Views: 0
  • NSR 500 -34.jpg
    NSR 500 -34.jpg
    2.3 KB · Views: 0
  • NSR 500 -31.jpg
    NSR 500 -31.jpg
    2.4 KB · Views: 0
  • NSR 500 -30.jpg
    NSR 500 -30.jpg
    2.4 KB · Views: 0
  • NSR 500 -32.jpg
    NSR 500 -32.jpg
    2.9 KB · Views: 0
  • NSR 500 -35.jpg
    NSR 500 -35.jpg
    1.9 KB · Views: 0
Great looking build Simon try this place they stock lots of bike goodies

1/12 Bike Decals
 
Thread owner
hi Zooks no obivous pit falls - decals were a pain i find the older the model the more brittle the decal other than that it went really well i was pleased with the build up to the decals - as for your rc211v it looks dam good from here, if its a first build its excelent well done as for mistake we all amke them it all part of the learning curve making amends is the challenge

simon
 
Thread owner
thanks Trey had a look and added it to my favorites might be of some use in the future

simon
 
Status
Not open for further replies.
Back
Top