I bought this kit part built a few years ago. I write 'Part built.' because the previous owner had built a bit of the tank hull and glued a bit of P.E. Zimmerit on it, then, for some reason, gave up.
The kit has been languishing in a corner of my den since it's purchase, as I didn't know quite what to do with it!....and I didn't know what to do with the zimmerit. So in the box it all stayed - until now!
I don't normally build more than one kit at a time, so I'll just quietly nibble at this now and then, and concentrate more on my G.B. stuff.....sez he!
I have little interest in the tech. side of modelling (this is too long, that's not in the right place) What's in the box is what get's built - I'm in it just for fun.
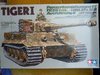
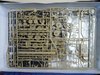
Here is the box and bits.
View attachment 293579
View attachment 293580
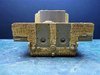
Here's where I'm up to so far. I've carefully removed the hull side P.E. Zimmerit. (Thankfully in one piece, so perhaps I can sell the set on)
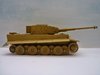
Now I've had a bit more practice with the zimmerit application, I've decided to have a go at the whole tank, It might not be to other people's liking, but I'm happy enough with it.
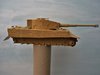
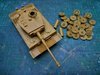
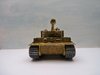
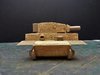
So, yesterday morning, after I assembled the turret, I had a bash at it.
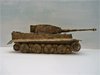
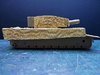
I tried to put myself into the mind set of the bloke troweling on the stuff "Mein Gott! How many more do I have to do?" Here's the result...
I think he must have tripped over the cat half way down this hull side. Don't you just love it?!
View attachment 293581
View attachment 293582
View attachment 293583
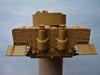
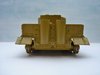
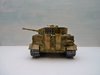
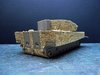
....here, I've marked where the exhaust heat shields and rear 'mud guards' go. Rough as a bear's posterior, just what I wanted.......
View attachment 293584
View attachment 293585
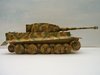
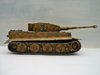
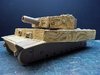
When the paste had set, I gave the stuff a quick coat of buff acrylic to cover the white filler.
All a bit stark and heavy looking just yet, but it'll tone down once I start to paint the model.
I hope you approve and thanks for looking.
Cheers.
Ron
The kit has been languishing in a corner of my den since it's purchase, as I didn't know quite what to do with it!....and I didn't know what to do with the zimmerit. So in the box it all stayed - until now!
I don't normally build more than one kit at a time, so I'll just quietly nibble at this now and then, and concentrate more on my G.B. stuff.....sez he!
I have little interest in the tech. side of modelling (this is too long, that's not in the right place) What's in the box is what get's built - I'm in it just for fun.
Here is the box and bits.
View attachment 293579
View attachment 293580
Here's where I'm up to so far. I've carefully removed the hull side P.E. Zimmerit. (Thankfully in one piece, so perhaps I can sell the set on)
Now I've had a bit more practice with the zimmerit application, I've decided to have a go at the whole tank, It might not be to other people's liking, but I'm happy enough with it.
So, yesterday morning, after I assembled the turret, I had a bash at it.
I tried to put myself into the mind set of the bloke troweling on the stuff "Mein Gott! How many more do I have to do?" Here's the result...
I think he must have tripped over the cat half way down this hull side. Don't you just love it?!
View attachment 293581
View attachment 293582
View attachment 293583
....here, I've marked where the exhaust heat shields and rear 'mud guards' go. Rough as a bear's posterior, just what I wanted.......
View attachment 293584
View attachment 293585
When the paste had set, I gave the stuff a quick coat of buff acrylic to cover the white filler.
All a bit stark and heavy looking just yet, but it'll tone down once I start to paint the model.
I hope you approve and thanks for looking.
Cheers.
Ron
")