G

You are using an out of date browser. It may not display this or other websites correctly.
You should upgrade or use an alternative browser.
You should upgrade or use an alternative browser.
Tamiya - 20mm Flakvierling - Sd.Kfz 7/1 1/35 Scale.
- Thread starter takeslousyphotos
- Start date
- Status
- Not open for further replies.


I knew this'd be trouble\ said:Oops the words big foot and mouth spring to mind Robert
")

I guess colour photos aren't going to happen\ said:Here's a nice DAK version
View attachment 122726
G
Guest
Guest
In 1942? You'll be lucky Colin!\ said:I guess colour photos aren't going to happen
View attachment 112216
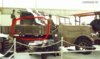
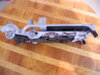
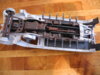
I'm pressing on with this and I'm nearly ready for some primer ........ I think I'm going to go with the Winter Camo. But I have a question ????
Around the deck (both Sides and the back end) are frames with mesh in, they drop down to become, I guess some kind of safety net around the deck........ and the question is???? Would they have been steel or wooden frames ???? I've done some searching but I can't find anything on it ???? ......... My best guess is that they'd be steel for strength but I don't know.
The bit I've put the Red line around in the photo.
View attachment 225239
Attachments
G
Guest
Guest
I think steel
Yes Patrick I think that'd be the most sensible.........\ said:I think steel
I think that is probably what they are for. So I reckon they'd have to be Steel.\ said:Possibly foot plates for when the weapon was deployed. Allows the crew 360 use without falling off.
Just my slant on it.
Gregg
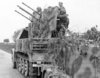
The reason fur the mesh sides ( made of steel) were for a platform as earlier mentioned. There were struts carried that secured the platform horizontal to the chassis underneath The 2cm shells were reused ( casings ) the mesh stopped the casings falling off. When using against aa they tended to eject from the guns and the German Wehrmacht carried large bags in the rear ( not shown in ref pics but I found a reference in armour ( look up 2cm aa gun
The loaders who were 2 and one gunner 1 spotter/ direction control
The loaders dropped the sides once positioned etc all could be achieved once positioned in under 5 mins
Hope this helps
Regards
Robert
The loaders who were 2 and one gunner 1 spotter/ direction control
The loaders dropped the sides once positioned etc all could be achieved once positioned in under 5 mins
Hope this helps
Regards
Robert
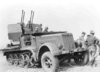
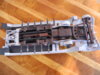
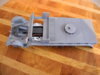
Found some pic ref for you with the rear gate shut you can see the rest attached that formed the horizontal struts when the sides were dropped. Regards
Robert View attachment 112252
View attachment 112253
View attachment 112254
View attachment 112255
View attachment 225275
View attachment 225276
View attachment 225277
View attachment 225278
Robert View attachment 112252
View attachment 112253
View attachment 112254
View attachment 112255
View attachment 225275
View attachment 225276
View attachment 225277
View attachment 225278
Attachments
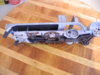
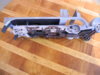
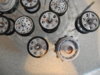
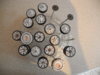
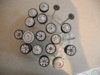
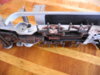
Chassis and main body are now in one piece. I've detailed the chassis parts as best I can but with it all in one piece it was difficult. The wheels are pretty much done, I'm not 100% happy with them but they are done. Brush painted without masks and on some (the double wheels) there isn't much of a demarcation line between the white and the black, and now they are photographed I can see they will need a little tidying. They've had two coats of white, a couple of goes over with a MIG Grey wash and a dab of rust for the securing nuts .........
View attachment 112664
View attachment 112665
View attachment 112666
View attachment 112667
View attachment 112668
View attachment 112669
View attachment 112670
View attachment 112671
View attachment 112672
View attachment 112673
View attachment 225687
View attachment 225688
View attachment 225689
View attachment 225690
View attachment 225691
View attachment 225692
View attachment 225693
View attachment 225694
View attachment 225695
View attachment 225696
Attachments
-
 DSCN1541.JPG3.1 KB · Views: 0
 -
 DSCN1540.JPG3.2 KB · Views: 0
 -
 DSCN1539.JPG3.2 KB · Views: 0
 -
 DSCN1538.JPG3.3 KB · Views: 0
 -
 DSCN1537.JPG3.4 KB · Views: 0
 -
 DSCN1536.JPG2.8 KB · Views: 0
 -
 DSCN1535.JPG3.1 KB · Views: 0
 -
 DSCN1534.JPG2.6 KB · Views: 0
 -
 DSCN1533.JPG2.5 KB · Views: 0
 -
 DSCN1542.JPG3.2 KB · Views: 0
G
Guest
Guest
Good stuff Peter, that's looking very nice.
- Status
- Not open for further replies.
Legal Notice
scalemodelling.co.uk is a privately operated online discussion forum. All content posted by members reflects their own views and opinions and does not necessarily represent those of the forum owners or administrators. While reasonable efforts are made to moderate content, no responsibility is accepted for user-generated material. By using this site, you agree to comply with UK law and the forum rules.