Aotake is always a tricky one.
In the Vallejo sets they have two versions, one in the IJN set and one in the IJA set. Both being clear colours to be painted over a silver/aluminium metaliser. One being more of a green and the other more of a blue.
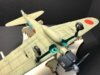
I used the one in the IJN set for my second Zero build. You can see the colour quite clearly in the shot below:
View attachment 291090
It has of course been weathered but it is very close to what you have mixed.
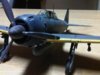
Gunze have a very good metallic blue in their range which I used on my first Zero build. I dont have such a clear shot of that one but you can just make it out in the photo below on the undercarrage.
View attachment 291091
I think that you have done a brilliant job with your mix, better than the Gunze colour. I think you can be very pleased with that result.
I will be interested to see how MRP address this tricky issue when they release their promised IJN/IJA colours in the near future.