Theme editor

Scale Model Shop

Tamiya chieftain tank build (my 5th build)

  • Thread starter Thread starter Guest
  • Start date Start date
Status
Not open for further replies.
Thread owner
By the way.


The pic of the rear section made up but not attached to the hull. See the nice greasy fingerprint? Yeah, that's what happens when your wife brings you two egg banjos in the middle of modelling!!
 
Thread owner
\ said:
Laurie,
Mine won't recover, I'm wheelchair now for good. The T4 was shattered, along with the T2 vertebrae. Luckily, they only nicked my nerve cord, but destroyed the ligaments in the spine. I've had a rod placed from T1-T5 to hold the spine together, but that's it.


The knee was rebuilt, the kneecap had shattered, all the ligaments ripped off, and the meniscus between the tibia and fibula was smashed.


I'm stil suffering with the mental side of it, I was the youngest member of the Pathfinders Platoon and the youngest SNCO in the battalion. I served in both gulfs, the afghan, Belize, East Timor, Sierra Leone (not a good tour!) and Bosnia. 19 years service, been racing motorcycles since I was 8, now I'm 42 and trying to cope with this loss of movement. Hence why I make models. Keeps me occupied and less likely to snap.
Shocking, not really anything to say apart from offering any support I can through the forum. I hope things pick up for you any way they can.
 
How ironic to have come through so many hot zones unscathed {I hope} only to be so badly injured at home, but keep a stiff upper and all that;) Lose yourself into your modelling and keep in touch , we're all in your corner.................Jim:)
 
Thread owner
Thanks Jim.


It is kinda stupid, I was shot in Belize by a Guatemalan drug boat, and walked away from it.


I was stabbed in1996 in Ireland while doing a vehicle checkpoint, and although took me six months to recover fit enough to serve, I did.


Went on the run from a guerilla group in Sierra Leone and all four of us were listed as missing for a while yet still came home with a smile and defiance.


And then some dopey driver can't be bothered to look and destroys my future. I've already had a few of the lads from the regiment come round and take the pee, so I feel at home now!


Beowulf. Egg banjos arent proper egg banjos unless they're half stale and partial cooked!
 
Thread owner
View attachment 121241

View attachment 121242

View attachment 121243

View attachment 121244

Ok, did some more this morning.

I started the upper hull. There's a fair few pieces, some very small which need placing on the upper hull. I've struggled today with the glue, and resorted to squeezing a blob on some acetate, and then using the point of a cocktail stick to apply it. Getting on better that way. Dunno why I didn't do this before.:rolleyes:


Then I made a cock up!:mad: I was affixing one of the front winching tabs and as I went to dip the very edge on the glue, the tweezers pinged and dropped it straight in the glue!


A certain four letter word was repeated for about two minutes as I desperately tried to clean up the glue before it melted the tab! Oh well, it's not horrendous. I'll just weather that one a little more!:confused:


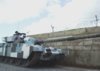
The light guards are two,piece, and again, my tweezers are letting me down. (So I'm off to the hobby shop to purchase new tweezers!!) one side went ok, but the other side is a little lop sided (see photo) but hey, this tank HAS seen action, so I guess a 7.62 pinged off it at some point and bent it!


Finally got the upper hull done, and I like the way Tamiya make the bottom hull attach with rubber plugs and a tab so you can take the hull apart later. There's also a battery compartment.....excuse my ignorance, but would that be for someone wanting to add lights?


So final bit this morning is the turret build and main gun, and I am suffering from MGB...


Main Gun Bends. The two halves of the centre section glued together, held with tape and pegs (this was a struggle for me, even though it had little pin locators, they didn't help!!) and then the rear elevator unit fitted together, and then affixed to the centre section, it didn't stay inline at all!! Had a bit of Brewers droop!


So I took it off, filed the locator, marked the barrel where it was and refitted it back in, and pulled it up a little to straighten it.


Taped up and pegged, so now that's all drying for today.


Tomorrow I'll begin the turret furniture, then it's time to begin paint.


I'm also going to pick up some proper primer today, as the Vallejo stuff I don't trust anymore.

View attachment 234132

View attachment 234133

View attachment 234134

View attachment 234135
 
Thread owner
That's a lot of work going into that Chieftain Dave!


The older Tamiya kits were designed to be motorized, hence the battery space & removable upper hull. Personally I'd glue the two halves together.
 
Thread owner
i was thinking, because the upper and lower hulls are able to separate, I could attach the wheel covers and paint the whole thing, then split the hull and attach the wheels. Or is that not possible?
 
Thread owner
You could do, there might be some touching up to do on the paintwork though.


I'd put the wheels & tracks on & then mask them off once I'd joined the hull halves & paint it as one piece.
 
Thread owner
Got bored watching daytime TV so I went back out into the conservatory and carried on.


Got the gun barrel into the upper turret mount, and used some filler on the gaps when both put together,


Also fitted up all the ancillary bits, some are more fiddly than a three fingered sloth shuffling a deck of cards!


I chose to glue the FLIR unit closed, and also the second hatch closed too. I'm considering closing the other one, and having the tank in full on attack mode rather than scout and report.


So now this lot needs to dry, then some clean up, and onwards with priming.


Also I built the machine gun up, but have left it off, and painted the base coat. I'll attach this at the end when everything else is done, save having to mask up fiddly breakable bits


View attachment 121267

View attachment 121268

View attachment 121269

View attachment 121270

View attachment 121271

View attachment 121272

View attachment 121273

View attachment 121274


View attachment 234158

View attachment 234159

View attachment 234160

View attachment 234161

View attachment 234162

View attachment 234163

View attachment 234164

View attachment 234165
 
Thread owner
Wow, that Berlin urban Hussars camo is trick, but I'm not sure I'm ready for that kinda masking job!! Unless someone wants to give me tips!


I hadn't thought about the camo yet, I was going to get it all in primer then start looking.


In my mind I had this, and was going to get some diorama grass to finish.


Tried to edit this with picture, but can't so it's below.
 
Just cut up the shapes out of masking tape ......... Start with the lightest colur and work up from there. Just a wee bit of planning on it.
 
\ said:
If you are going for that camo ........ are your brush painting or spraying? If I was doing it, I'd brush paint (or spray the green with a rattle can....... Then mask by tearing the tape, then you get a soft edge....... and spray the black. If you get a strip of 2" wide tape 12" long, tear it right down the middle so you get a wavy edge, then stick the two straight sides together with an overlap onto a board....... Then you can just tear bits off to get the wavy random shapes.
 
Thread owner
Yep, I'm airbrushing it, but I'll only go for it if I can get the foliage right scale
 
Thread owner
Right, got myself finally some decent moss for railways, looks the perfect scale and will work for my model.


Yesterday I finished the NATO green base coat, and some shading, and it's on to the camo now.


No pics sorry, I left my iPad in the house and wasn't going to wheel all the way In there and back out again. Besides I'd just got the garage warm!
 
Status
Not open for further replies.
Back
Top