Theme editor

Scale Model Shop

Tamiya's Little '10', 1/48 JGSDF Type 10 MBT

Status
Not open for further replies.

Steve Brodie

New member
Joined
Sep 17, 2014
Messages
4,652
Reaction score
0
Points
0
1/3
Thread owner
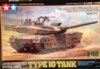
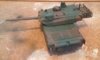
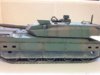
Started this little beauty last night, Tamiya's 1/48th offering of Japans latest MBT - the Type 10. Comes in a nice sturdy box with this great art work on the front of the box, when i was a lot longer i used to cut out the box art and use them as pictures and stick them to my bedroom wall!. Looking at  the box top and real photos, i may end up removing the lower molded skirt and using some lead foil to create the flaps instead  :/


View attachment 266865


Full info Here


Not many parts to this build;


View attachment 266866


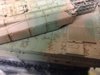
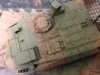
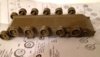
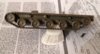
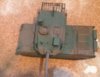
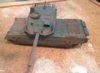
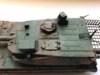
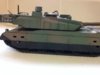
 first stages is to build the lower hull from 4 pieces - base, two side walls and an inner brace to square everything up, suspension arms are added next and no issues making sure they are all the same height as each arm also has a small peg to fit into a secondary hole so no guess work here. Next up is to add the small top wheels followed by making 10 sets of road wheels (my usual method - snip from the sprue, line up all the sprue points on the wheels, glue together and sand any sprue marks away). Wheels were then fitted and i used the single lower track run to make sure all was aligned.


View attachment 266867
 

Attachments

  • 1.jpg
    1.jpg
    3.2 KB · Views: 0
  • 3.jpg
    3.jpg
    2.2 KB · Views: 0
  • 1a.jpg
    1a.jpg
    3 KB · Views: 0
Steve, mate, I have been so looking forward to buying this kit and building it, so would really love to see your build on it. This I think is the first injection molded model kit MBT in 1/48. 


Good luck with this. 
 
Thread owner
Tracks fitted last night, a joy to work with - just push up to each other and glue. Fixed the first 6 to the drive wheel, then glued the drive wheel in its correct position and worked from there, adding the final piece it just slotted right into place, dab of glue at each end and they were complete.

View attachment 266903

Side skirts an front track flaps - on the one side i followed Tamiyas steps and fitted the front piece first followed by the side piece, this took some jiggling to get it to fit and line up, so on the next side fixed the side first then added the front piece, a lot easier.
 

Attachments

  • tracks fitted.jpg
    tracks fitted.jpg
    2.1 KB · Views: 0
Thread owner
Everything went together like a dream or a standard Tamiya build. No fit issues anywhere. So it was soon time to get the airbrush put and some paint on the tank. Went on like a dream, their is a guy on YouTube (Andys hobbystore) who has a great video on thinking Tamiya paints for airbrushing (along with other great build videos).
View attachment 270740 View attachment 270741 View attachment 270742

Next up will be painting the skirts back to black and some mild weathering.
 

Attachments

  • IMG_2889.JPG
    IMG_2889.JPG
    2.1 KB · Views: 0
  • IMG_2887.JPG
    IMG_2887.JPG
    2.4 KB · Views: 0
  • IMG_2886.JPG
    IMG_2886.JPG
    2.5 KB · Views: 0
very nice work with this ,Steve,;)
will be waiting to see what you do with it,
 
Looking good Steve. Im a big fan of Andys channel, he makes some great videos.
 
Thread owner
Copic pens arrived from Japan yesterday, so spent an hour last night with a 0.05 Brown ink pen, outlining all the panels, crevice's, bolts and handles, looked a bit stark when applying, but has toned down very nice overnight.

View attachment 274466 View attachment 274467

Dry brush with some dust pigment next to tie them in, headlights, rear lights and smoke discharger's to touch in as well.

Then noticed i hadnt added the front tow hooks since airbrushing :(, and that dark feeling when i realised i had thrown the box away some time ago :mad:, swore i kept the sprue but no its gone, email to Tamiya UK it is then :D
 

Attachments

  • IMG_3075.JPG
    IMG_3075.JPG
    2.6 KB · Views: 0
  • IMG_3071.JPG
    IMG_3071.JPG
    2.6 KB · Views: 0
Copic pens arrived from Japan yesterday, so spent an hour last night with a 0.05 Brown ink pen, outlining all the panels, crevice's, bolts and handles, looked a bit stark when applying, but has toned down very nice overnight.
Looking very good Steve, just a few questions:
What is a Copic pen - and where do you buy them (could you please let me know exactly which brand you used as well)? I have been looking for some sort of pen or pencil that gives the effect you have created but have never found one yet.
Your advice would be really helpful.
 
Thread owner
A Copic pen is an ink based marker, i beleive. Like you i spent ages trying to find any (in the UK), most were fat nibbed, or wedge shaped - no good, then searched on EBAY, loads were selling single pens for about £5-£6 each, then found this set - http://www.ebay.co.uk/itm/162327816851
 
very nice effect,Steve,I do like that idea of using a pen,the result looks great,
and give a even,look,were using washers,to pin line,you need a few go,s at it,;)
could you please show a pic,of the tip,interested to see what,its like,
 
very nice build steve , really like andy's hobby centre , some really good tip's there .
 
Thread owner

Attachments

  • MLSP003-multiliner-0.jpg
    MLSP003-multiliner-0.jpg
    1.2 KB · Views: 0
  • 21U4BE9Bg4L.jpg
    21U4BE9Bg4L.jpg
    1.3 KB · Views: 0
Thread owner
Well the hobby Co have come back and sprue A would cost £8.99 - tow hooks and lifting lug, the rear chain would cost £7.99 plus £4.99 p&p. Going to have to think of something else :( swore i had saved them, but had a massive clear out so maybe they went with all the junk !! :mad:, will have to take a harder look !! :D
 
Status
Not open for further replies.
Back
Top