
You are using an out of date browser. It may not display this or other websites correctly.
You should upgrade or use an alternative browser.
You should upgrade or use an alternative browser.
Tamiya's Masterpiece - Their 1/32 scale Mosquito
- Thread starter BarryW
- Start date
- Status
- Not open for further replies.
I have to say that this kit really does live up to its reputation and none of the plaudits that Tamiya has received for this kit are exaggerated. The only kit that I have built that can compare is the previous 1/32 Tamiya release, the Corsair. With every new release in this series of kits they set a new benchmark for excellence. Rumours abound about a new Tamiya 1/32 release next month at the big Japanese model show without any real information of what it might be.
My mind boggles at where Tamiya may take this hobby next and if they do release another in this range I will certainly buy it without knowing anything about it at all regardless of price or what it is. There is no other company I can say that for. As for what it might be rumours include a P38, P47, Bf109, Me262 or my big hope a Beaufighter. Most likely a Bf109 or P47 in my view.
My mind boggles at where Tamiya may take this hobby next and if they do release another in this range I will certainly buy it without knowing anything about it at all regardless of price or what it is. There is no other company I can say that for. As for what it might be rumours include a P38, P47, Bf109, Me262 or my big hope a Beaufighter. Most likely a Bf109 or P47 in my view.
I promised to get some better pics of the cockpit. The rear area won’t be finished until the wing is fitted. Here are some pics.


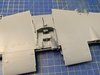
I have been working on the engines. They said that if something goes wrong with a Tamiya kit then it is always something that you have done. Well the tale of two engines demonstrates that.
Now I like to have clean lines on my aircraft so I done have panels open. Even though this kits engine panels are designed with magnets to be removable I am not one for moving parts, taking off panels etc, after all it is not a toy. So my plan is to just build the engines to enjoy the engineering for fun, not paint them and I will cement the panels in place. With that intention I probably set about the first engine with a little excess speed and confidence....
I changed the order somewhat and did not read the instructions very thoroughly. A page from the instructions that I did a stage later than I should....

That part P54 would not fit into place and then it broke. Not having the engine on display it is not really a problem. I threw the part away.

The engine fitted perfectly dropping into place with ease but it is fixed with two screws to the firewall and in trying to screw them in I bent and weakened a strut. It may break and give me problems later. Incidentally, I was only able to get one screw into place. Perfectly fitting as the engine was, the second screw would not screw in. So I just liberally went around every where with cement to make sure the one screw was enough.
I then realised that I would have left some sprue in place, yes the instructions said so, to protect the struts!! See below. The instructions say remove it at a later stage.

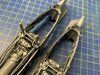
And I built the engine in the order Tamiya says and, guess what, P54 slips perfectly into place.

Here is that second engine all perfectly aligned and In place.

However. I could still only get one screw in.
So there you have it. Read the instructions and do what Mr Tamiya san says....all will be well. But even so why did only one screw fit on each engine? (not the same one).....
I have been working on the engines. They said that if something goes wrong with a Tamiya kit then it is always something that you have done. Well the tale of two engines demonstrates that.
Now I like to have clean lines on my aircraft so I done have panels open. Even though this kits engine panels are designed with magnets to be removable I am not one for moving parts, taking off panels etc, after all it is not a toy. So my plan is to just build the engines to enjoy the engineering for fun, not paint them and I will cement the panels in place. With that intention I probably set about the first engine with a little excess speed and confidence....
I changed the order somewhat and did not read the instructions very thoroughly. A page from the instructions that I did a stage later than I should....
That part P54 would not fit into place and then it broke. Not having the engine on display it is not really a problem. I threw the part away.
The engine fitted perfectly dropping into place with ease but it is fixed with two screws to the firewall and in trying to screw them in I bent and weakened a strut. It may break and give me problems later. Incidentally, I was only able to get one screw into place. Perfectly fitting as the engine was, the second screw would not screw in. So I just liberally went around every where with cement to make sure the one screw was enough.
I then realised that I would have left some sprue in place, yes the instructions said so, to protect the struts!! See below. The instructions say remove it at a later stage.
And I built the engine in the order Tamiya says and, guess what, P54 slips perfectly into place.
Here is that second engine all perfectly aligned and In place.
However. I could still only get one screw in.
So there you have it. Read the instructions and do what Mr Tamiya san says....all will be well. But even so why did only one screw fit on each engine? (not the same one).....
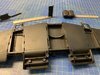
Couple more progress pics.
I black primed the interior of the wheel wells and sprayed silver as per the instructions and also picked out some detail. I will spray some gloss varnish and weather them next with AK enamel washes. There are some odd decals to apply as well.

I have also started assembling the centre section for the wing

All the fit was spot on but some care is needed with the p.e. ribs inside the wheel wells.
I black primed the interior of the wheel wells and sprayed silver as per the instructions and also picked out some detail. I will spray some gloss varnish and weather them next with AK enamel washes. There are some odd decals to apply as well.
I have also started assembling the centre section for the wing
All the fit was spot on but some care is needed with the p.e. ribs inside the wheel wells.
- Joined
- Apr 27, 2018
- Messages
- 15,043
1/3
Barry,
Looking really good.
Looking really good.
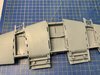
I have been fitting the wings.
The centre section box that gives them rigidity is fixed in place by four self tapping screws to each wing. I did, of course, apply extra thin cement as well


Tops of the wings cemented in place fitting perfectly as usual

Below is my first dry fit of the nacelles and engines to the wing. Not yet ready to cement them into place as I have some painting to do. Will also need to cement together the nacelles themselves fitting the engines inside. It is necessary to take great care over getting the correct sides together.

The centre section box that gives them rigidity is fixed in place by four self tapping screws to each wing. I did, of course, apply extra thin cement as well
Tops of the wings cemented in place fitting perfectly as usual
Below is my first dry fit of the nacelles and engines to the wing. Not yet ready to cement them into place as I have some painting to do. Will also need to cement together the nacelles themselves fitting the engines inside. It is necessary to take great care over getting the correct sides together.
Hi Barry
Very interesting. Just shows that even with your skills and experience you should read instructions :smiling2: Not come across a kit with screws. Is that usual for large scale aircraft kits or is it just something Tamiya do?
Jim
Very interesting. Just shows that even with your skills and experience you should read instructions :smiling2: Not come across a kit with screws. Is that usual for large scale aircraft kits or is it just something Tamiya do?
Jim
Hi Jim
There are screws involved on most of the Tamiya 1/32 WW2 warbirds. On the Zero I remember the undercarriage is fixed into place with screws as are the Merlins in the Mustangs and Spitfires. No don’t remember if the Corsair has screws.
There are screws involved on most of the Tamiya 1/32 WW2 warbirds. On the Zero I remember the undercarriage is fixed into place with screws as are the Merlins in the Mustangs and Spitfires. No don’t remember if the Corsair has screws.
G
Guest
Guest
I’ve built exactly one Tamiya aircraft kit in all (a 1/72 F4U Corsair) and it didn’t have any screws for assembly, but Tamiya does use screws in their kits sometimes. 1/12 scale motorbikes have them as axles, is my experience, but some 1/35 scale tank kits also require you screw bits on, usually where the screw heads will be hidden but the strength is needed.Not come across a kit with screws. Is that usual for large scale aircraft kits or is it just something Tamiya do?
G
Guest
Guest
I built the Tyrell P34 as a kid and was amazed by the screws incorporated into the design that served as axles. It came complete with a little plastic wrench for final assembly.
photo by TamiyaView attachment 338265
photo by TamiyaView attachment 338265
G
Guest
Guest
A Tyrell P34 … if there’s one Formula 1 car I’d want to build a model of, that’d be it. I’ve liked the looks of it ever since I saw it in the 1980 Matchbox catalog ")
Completed the wing box as far as I can. Parts that will form the rear cockpit glued into place.
View attachment 338522
A shot of the underside
View attachment 338523
Prepping to paint interiors of wings.
I have sprayed primer and will next check joints and seams when dry.
View attachment 338524
View attachment 338525
A pic of the engines securely cemented into place.
View attachment 338526
View attachment 338522
A shot of the underside
View attachment 338523
Prepping to paint interiors of wings.
I have sprayed primer and will next check joints and seams when dry.
View attachment 338524
View attachment 338525
A pic of the engines securely cemented into place.
View attachment 338526
Attachments

G
Guest
Guest
Hi Barry , just brought the kit , back into modelling after years , how do you go about camouflage ie the
Steps I should follow
Steps I should follow
Hi Twigs and welcome.
I will demonstrate my approach on this thread. Usually with this type of camo I use a mix of masking tape and clever putty. More recently I started freehanding the camo
I have not yet decided on what approach to take on this one yet.
I will demonstrate my approach on this thread. Usually with this type of camo I use a mix of masking tape and clever putty. More recently I started freehanding the camo
I have not yet decided on what approach to take on this one yet.
- Status
- Not open for further replies.
Legal Notice
scalemodelling.co.uk is a privately operated online discussion forum. All content posted by members reflects their own views and opinions and does not necessarily represent those of the forum owners or administrators. While reasonable efforts are made to moderate content, no responsibility is accepted for user-generated material. By using this site, you agree to comply with UK law and the forum rules.