Theme editor

Scale Model Shop

The Liberation of a Normandy Village - and some cheese and wine too!

Status
Not open for further replies.
Thread owner
Pushing swiftly on.

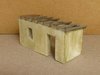
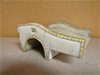
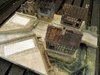
I wanted the model to be a mish mash of alleyways and all over the place, so....

One rendered out-house made from scrap stuff.

View attachment 308732

Tin roof to follow......sort of!

Thanks for looking in.

Ron
 

Attachments

  • dsc00722b.JPG
    dsc00722b.JPG
    1.7 KB · Views: 0
Hi Ron,
Thanks for filling me in, makes perfect sense given the surroundings. It wouldn't do to have your whole town wash away after working so hard on it. Your progress is incredible. Loved the way you created the stones along the banks. Must have missed the water...will take another look.
Cheers, Rick H.
 
Thread owner
Rick - Thanks for the links. I appreciate it.

Rich H. - Glad to help. Unfortunately there are no photos of the actual weir / water build. I've lost them, sorry.

Here's the road bridge.
I shot myself in the foot a bit with this. The bridge is square with the road and buildings, but the stream runs at a slight angle. This made it difficult to make a 'skew' arch.

Here's the first tentative fitting of the two sides of the bridge. This illustrates the angle I refer to. You will notice the stream bed is not coloured. I did warn you earlier the pictures of the build might get disjointed and sometimes not flow true....:confused:

View attachment 308795

Cheers all.
Ron
 

Attachments

  • DSC00725.JPG
    DSC00725.JPG
    2.7 KB · Views: 0
Thread owner
Don't worry folks, not long to go now.....
Here is the completed road bridge ready for some scribing and painting. Made from scrap polystyrene and the cardboard backing of an old receipt book.

Bit blurred, sorry.
View attachment 308844

....a test fit - just in case!
View attachment 308846


The finished bridge. Stonework and silly plaque scribed on to the polystyrene with my modelling knife, then painted with cheapo acrylics.
View attachment 308853

Yours.
Alan 'Fluff' Freeman
 

Attachments

  • 172 french Village 017a.JPG
    172 french Village 017a.JPG
    2.3 KB · Views: 0
  • 172 French Village 014.jpg
    172 French Village 014.jpg
    2.5 KB · Views: 0
  • 172 french Village 017b.JPG
    172 french Village 017b.JPG
    2 KB · Views: 0
Hey Ron,

From one Allen to another, I have to say you never cease to amaze us with such easy and so damn effective work. This just gets simpler and 100% better at every turn!!! I'm just loving the hell out of this Sir!!!!!!!!!!!

Prost
Allen
 
Nothing wrong with To Hell and Back. 'Twas a great movie! Just as your latest efforts Ron. I wouldn't worry myself trying to keep things too plumb & square...much more interesting if things are slightly skewed.
Cheers,
Rick H.
 
Thread owner
Thanks Rick. The trouble with the bridge was the actual stone structure had to be square with the road leading from the village, but the stream runs at an angle to it, so the making of the skew bridge arch to match was a pig to get right.

O.k., bridge in place and a bit of colour added to the stream and bank.

The 'Dug out with your finger nails' polystyrene beads make perfect rocks and stones for the banks and stream bed. Why waste your money on bought stuff? A bit of tile adhesive shoved in here and there to break them up a bit and away you go....:thumb2:

View attachment 308924

Cheers
Ron
 

Attachments

  • P1150671.JPG
    P1150671.JPG
    3.1 KB · Views: 0
Hi Ron
Love it. Such a great result from such simple materials.
Jim
 
Love it Ron.
The stream looks good.
I'm copying some guy with his method. Just hope its not Copyright.:nerd:
John .
 
Thread owner
Thanks Jim and John. I'm glad you approve thus far.

I didn't think I had any more pictures of the bridge in the early stages but I managed to find one.....

Here's t'other side. I've started to add a bit of muck to the model too.

View attachment 308989

Cheers.
Ron
 

Attachments

  • P1150736.JPG
    P1150736.JPG
    3.5 KB · Views: 0
Thread owner
Moving on.
This shot shows the basic construction of phase one, the lower level around the village square, more or less completed. The two bridges are fixed in place. You can just make out the stone steps either side of the wooden bridge and I've done a bit more general groundwork painting too.. This view better shows how I modelled the damage, getting progressively worse the nearer the strong point. which will obviously be the remaining two rendered buildings in the raised area.
This was taken earlier than the previous picture. No road surface over the stone bridge. Also, no 'lid' on the water above the weir. But I hope you get the general construction sequence.

View attachment 309019

Next up will be the actual stronghold construction - more like dis-truction .....:hungry:

Cheers.
Ron
 

Attachments

  • P1150674.JPG
    P1150674.JPG
    3.3 KB · Views: 0
Hi Ron
Like Scottie I'm really enjoying watching this develop.
Jim
 
Ron,
The overhead view really puts things in perspective. Multiple levels are extremely interesting. I'm looking forward to the next phase of your project!:thumb2:
Cheers,
Rick H.
 
If I spent two fortunes buying ready made ruins, and a dozen or so lifetimes building them, I couldn't create anything that looks as natural as this. You definitely got an 'eye' for layout young Ron!
 
Status
Not open for further replies.
Back
Top