Theme editor

Scale Model Shop

....... (The Secret Weapon)

Status
Not open for further replies.

takeslousyphotos

New member
Joined
Apr 14, 2013
Messages
3,900
Reaction score
0
Points
0
1/3
Thread owner
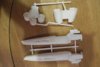
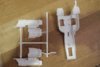
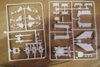
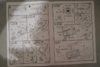
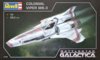
My "MkII Colonial Viper" has arrived .......... :)

I've been researching this and everyone seems to build them in the white/red livery, either pristine or weathered and battered around. Now, good that they are (and there are some damn good examples)...... I've decided, that after a great deal of "Soul Searching" that something had to be different ...... so I hacked into the MOD computers (if GCHQ or the NSA are watching, I'm joking ok!!!)..... It would seem that Tony Blair, managed to get hold of one of these ......

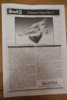
Up until now it's been classified ....... But, I can present to you. My next Project.

Gulf War Viper ....... (The Secret Weapon)

I will keep you updated on progress..........

Peter

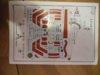
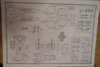
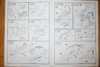
View attachment 97665

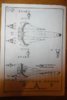
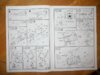
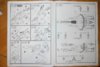
View attachment 210688
 

Attachments

  • viper.jpg
    viper.jpg
    11.5 KB · Views: 0
Go for it Peter! It's good seeing something done differently, as long as there's not a picture of ' Cheesy Grin ' Blair on the side of it! :P
 
\ said:
I like it nice idea. And John a nicely done viper.scott
Hi Scott it's not mine I came across it on another sit & thought you might like it.

Sorry if I gave the impression I made it.

John
 
\ said:
Hi Scott it not mine I came across it on another sit & thought you might like it.Sorry if I gave the impression I made it.

John
No problem mate, still looks cool though.

scott
 
Thread owner
Well, I've made a start ............ I've spent a while going through the "destructions". They don't amount to much as there are that many parts to the kit..............The mouldings look fairly good. But there is a bit of "flash to clean up on some parts...... and I've noticed a couple of "sink marks" on a panel or two Nothing major and they can be dealt with.

I've decided to start on the cockpit, so I cleaned up the components and dry fitted them. They are a bit Spartan in detail so I'll have to give a bit of thought to adding some. Also tried the dry-fit assembly into one fuselage half and I think I'm going to end up with some gaps. Which is a bit of a pain as I'm not going to have much room for rubbing down after. Maybe when both halves go together and it clamps up the gaps might not amount to much.........

View attachment 97686

View attachment 97687

View attachment 97688

View attachment 97689

View attachment 97690

View attachment 97691

View attachment 97692

View attachment 97693

View attachment 97694

View attachment 97695

View attachment 97696

View attachment 97697

View attachment 97698

View attachment 97699

View attachment 97700

View attachment 210709

View attachment 210710

View attachment 210711

View attachment 210712

View attachment 210713

View attachment 210714

View attachment 210715

View attachment 210716

View attachment 210717

View attachment 210718

View attachment 210719

View attachment 210720

View attachment 210721

View attachment 210722

View attachment 210723
 

Attachments

  • DSCN0903.JPG
    DSCN0903.JPG
    2.5 KB · Views: 0
  • DSCN0904.JPG
    DSCN0904.JPG
    2.2 KB · Views: 0
  • DSCN0905.JPG
    DSCN0905.JPG
    2.1 KB · Views: 0
  • DSCN0906.JPG
    DSCN0906.JPG
    2.1 KB · Views: 0
  • DSCN0902.JPG
    DSCN0902.JPG
    3 KB · Views: 0
  • DSCN0901.JPG
    DSCN0901.JPG
    2.5 KB · Views: 0
  • DSCN0899.JPG
    DSCN0899.JPG
    2 KB · Views: 0
  • DSCN0891.JPG
    DSCN0891.JPG
    2 KB · Views: 0
  • DSCN0892.JPG
    DSCN0892.JPG
    2 KB · Views: 0
  • DSCN0893.JPG
    DSCN0893.JPG
    1.9 KB · Views: 0
  • DSCN0894.JPG
    DSCN0894.JPG
    2.1 KB · Views: 0
  • DSCN0895.JPG
    DSCN0895.JPG
    1.9 KB · Views: 0
  • DSCN0896.JPG
    DSCN0896.JPG
    2.5 KB · Views: 0
  • DSCN0897.JPG
    DSCN0897.JPG
    2.1 KB · Views: 0
  • DSCN0898.JPG
    DSCN0898.JPG
    2.3 KB · Views: 0
we have to start some were Peter,so any starts a good start lol, ;)

like me i sit and look and look,and then think oh start later and this happens for a wk or more,:rolleyes:
 
Thread owner
I will try my best Monica........ One of the great things with building something as a "one off" is all the artistic licence it gives me ......... let's the imagination flow like I'm a kid again.

Peter
 
yes so true you are Peter,and that is the great thing about it all no limits or it has to look like this, ;)
 
Thread owner
The main cockpit assembly is together, or at least as much as isn't cause a problem with detailing it .............. and I just found and ordered.

1 AGM-130 Air to Surface Missile (That is a really "Bad Boy" ) and AQX-14 Datalink Pod ............... So that's the Ordnance sorted................. I just hope there's going to be room for it all. o_O

Peter

View attachment 97792

View attachment 97793

View attachment 210815

View attachment 210816
 

Attachments

  • AGM-130.png
    AGM-130.png
    11.4 KB · Views: 0
  • agm130&axq14DATA POD.jpg
    agm130&axq14DATA POD.jpg
    1.7 KB · Views: 0
Thread owner
I now have the Cockpit Assembly and the inner fuselage in Primer ........... So tomorrow I can start painting, and decals.

The Eduard Brassard "GUU-24" Bombs turned up today............. and they are Monsters. I've never used this stuff before and I'm proper impressed with the quality....... So I have a question ????? What is the best Adhesive to use for Resin ???? I thought maybe two part epoxy ??? or is there something better ???

Peter

View attachment 97885

View attachment 97886

View attachment 210908

View attachment 210909
 

Attachments

  • DSCN0907.JPG
    DSCN0907.JPG
    2.7 KB · Views: 0
  • DSCN0908.JPG
    DSCN0908.JPG
    1.5 KB · Views: 0
They do look the biz Peter.

As for the glue I'm not sure what's the best I just use CA
 
Status
Not open for further replies.
Back
Top