Theme editor

Scale Model Shop

The Stoic Arms

Status
Not open for further replies.

Gern

Active member
Joined
May 17, 2009
Messages
9,320
Reaction score
235
Points
63
1/3
Thread owner
Made a start on this over the last few days while the rest of the family have done the chaos of Xmas and left me in peace! :D (I haven't spoken to a soul for two days and it's been great!)


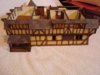
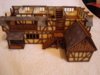
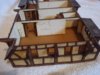
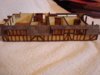
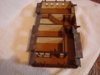
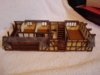
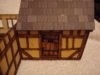
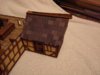
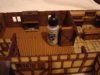
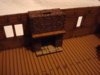
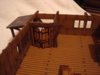
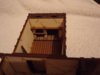
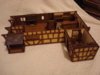
This is the ground floor and it's straight out of the box except for a couple of details. I painted all the door hinges and I've covered the roof sections with ready-painted paper in a slate tile pattern that Ron helped me find. It's over scaled but it covers up the connecting lugs which show on the kit and I reckon it looks much, much better. At least it does now I've put two layers on as I got the first layer upside down! I'll go round all the white edges with a dark felt tip once I've done them all.


View attachment 241774

View attachment 241775

View attachment 241776

View attachment 241777

View attachment 241778

View attachment 241779

View attachment 241780

View attachment 241781


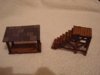
The build itself is straightforward and so far there have been no fit issues - even though it's not perfect. A lot of the parts (there are well over 100 for the first floor!) are a bit delicate, but once assembled everything is quite sturdy - a necessary quality for this kit as it's designed for use in wargaming.


There are window frames still to be added but they're not glazed. I have some thin acetate sheet I can use for glazing, I've just got to work out the easiest way to cut and fix it. I think CA will be OK as it won't fog the acetate - am I right with that?


I've put it in the Dio section as I intend to add furnishings and people. On that topic, can anyone suggest the best way to remove the bases from the figures which are made from lead-free pewter?
 

Attachments

  • DSC02338.JPG
    DSC02338.JPG
    2 KB · Views: 0
  • DSC02345.JPG
    DSC02345.JPG
    2.7 KB · Views: 0
  • DSC02344.JPG
    DSC02344.JPG
    2.4 KB · Views: 0
  • DSC02343.JPG
    DSC02343.JPG
    3.1 KB · Views: 0
  • DSC02342.JPG
    DSC02342.JPG
    2.7 KB · Views: 0
  • DSC02341.JPG
    DSC02341.JPG
    2.6 KB · Views: 0
  • DSC02340.JPG
    DSC02340.JPG
    2.2 KB · Views: 0
  • DSC02339.JPG
    DSC02339.JPG
    2.7 KB · Views: 0
Looking good, I use pva or canopy glue for gluing glazing I can never get cyno to work very well on anything.


Dave
 
thats real nice Dave,so what age do you have planed for this one,?


what I do is just clip around the feet then file then down, ;)
 
That's looking very nice already Dave, I'm sure I can begin to smell the beer fumes!


I reckon a flickering led in that fireplace would look good - just in case the builds not complicated enough already ;)
 
Thread owner
Thanks folks.


Dave - I wasn't sure PVA would be strong enough. The frames are very tiny and I was thinking of using just a few pin drops of CA rather than trying to coat the whole frame with glue. I'm still working on it though.


Moni - I wanted a sort of medieval look to everything, but I couldn't find any figures that weren't soldiers or in fighting poses. I settled for some Wild West figures from Knuckledusters. Although some have guns, they're not fighting and many are unarmed doing civilian stuff like playing cards, shopping, digging, customers and staff in a shop/bar etc. (along with some surprise figures!). What do you use to cut your bases? I've got a couple of old pairs of sprue cutters which are fine for the bases on plastic figures. Would they do the job on metal ones or would I need something heavier?


Patrick - I have got fires for all the fireplaces, but they won't be flickering! All that stuff with electrics is far too complicated for a simple chap like me!
 
\ said:
Thanks folks.
Dave - I wasn't sure PVA would be strong enough. The frames are very tiny and I was thinking of using just a few pin drops of CA rather than trying to coat the whole frame with glue. I'm still working on it though.


Moni - I wanted a sort of medieval look to everything, but I couldn't find any figures that weren't soldiers or in fighting poses. I settled for some Wild West figures from Knuckledusters. Although some have guns, they're not fighting and many are unarmed doing civilian stuff like playing cards, shopping, digging, customers and staff in a shop/bar etc. (along with some surprise figures!). What do you use to cut your bases? I've got a couple of old pairs of sprue cutters which are fine for the bases on plastic figures. Would they do the job on metal ones or would I need something heavier?


Patrick - I have got fires for all the fireplaces, but they won't be flickering! All that stuff with electrics is far too complicated for a simple chap like me!
Tut tut Dave! Have you forgotten the unconventional modellers favourite shop?


View attachment 241808


http://www.poundland.co.uk/flickering-tea-lights-3-pack


It'd be easy enough to adapt them.... I think! ;)
 
Very good work so far, Dave!


Mmmmm....these kits offer some amazing possibilities....:eek:


I really like them....
 
Dave, for my superquick card building windows which are the same as yours, I use UHU general purpose glue in a tube. Be careful a lot of this type of glue are stringy - UHU is not and works a treat.


The building looks well, old lad.


Ron
 
Does look superb Dave, I have used PVA on windows and also UHU, both seem to work well.


You could try scoring the metal bases with a sharp knife and then very slowly bending until they break away, just sand back any excess.
 
Thread owner
\ said:
That's it, but any clear general purpose glue will stick your windows......Just make sure it states 'Non stringy' on the tube.
Anyone know what the Polish for 'non-stringy' is?
 
Dave, if you think Si's Polish is a bit dodgy (Don't we all!) Get to the shop and secretly squeeze some glue onto your finger and see for yourself if it is indeed 'nie zylasty'.


P.S. Be prepared to run when you get caught experimenting though!
 
Thread owner
\ said:
Dave, if you think Si's Polish is a bit dodgy (Don't we all!) Get to the shop and secretly squeeze some glue onto your finger and see for yourself if it is indeed 'nie zylasty'.
P.S. Be prepared to run when you get caught experimenting though!
What? After experimenting with tube glue that I haven't used for nearly 50 years! I'll have stuck the tube to one hand and the other hand to a display shelf! Not to mention having the box stuck to my nose where I've tried to use my teeth to free one of my hands.
 
Thread owner

Attachments

  • DSC02351.JPG
    DSC02351.JPG
    2.9 KB · Views: 0
  • DSC02350.JPG
    DSC02350.JPG
    3 KB · Views: 0
  • DSC02349.JPG
    DSC02349.JPG
    3.3 KB · Views: 0
  • DSC02348.JPG
    DSC02348.JPG
    2.7 KB · Views: 0
  • DSC02347.JPG
    DSC02347.JPG
    2.7 KB · Views: 0
  • DSC02346.JPG
    DSC02346.JPG
    2.7 KB · Views: 0
Thread owner
One of the problems of using PVA is that it takes ages to dry firm enough for you to handle the pieces. I've used CA where I can to speed things up a little, but waiting for things to dry means jumping ahead to the next sections on the instruction sheet. You can never have too many clamps can you?


View attachment 241958


... and they can come in all shapes and sizes (did you see what I did there?):


View attachment 241959


PVA needs pressure to create a proper joint so I've weighed down the roof pieces where they're stuck to my paper tiles.
 

Attachments

  • DSC02352.JPG
    DSC02352.JPG
    3.2 KB · Views: 0
  • DSC02353.JPG
    DSC02353.JPG
    3.1 KB · Views: 0
Status
Not open for further replies.
Back
Top