Morning all,
Some of you may remember a few builds that I’ve been doing and the start of a diorama...not something I’m particularly good at.
I keep starting other projects and it keeps getting side lined, so before I tackle anything else I’m going to get this one moving.
The vehicles will be.....a Pz II J ( vk1601) a well armoured recon vehicle
View attachment 310362
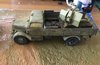
Opel blitz with a sled mounted flak gun.....
View attachment 310363
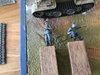
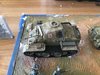
A couple of chaps already well into painting....
View attachment 310364
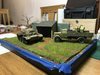
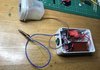
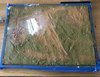
The base itself. I knocked up a frame and added a thin layer of Sculptamold for texture. I’ll add various length grass etc as I build it up.
View attachment 310361
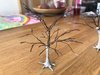
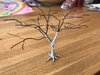
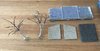
A miniart shed that I stumbled on in the stash and a couple of wire framed trees under construction still
View attachment 310359
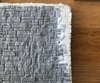
The shed is supposed to have a partly broken wall, but I’ve chosen to repair that so filled it and had started to scribe in the bricks.
View attachment 310360
So there’s all the bits so far. Wish me luck as I attempt to make a reasonable dio.
All comments, tips, advice and abuse are thoroughly welcomed :smiling4:
Cheers
Si
Some of you may remember a few builds that I’ve been doing and the start of a diorama...not something I’m particularly good at.
I keep starting other projects and it keeps getting side lined, so before I tackle anything else I’m going to get this one moving.
The vehicles will be.....a Pz II J ( vk1601) a well armoured recon vehicle
View attachment 310362
Opel blitz with a sled mounted flak gun.....
View attachment 310363
A couple of chaps already well into painting....
View attachment 310364
The base itself. I knocked up a frame and added a thin layer of Sculptamold for texture. I’ll add various length grass etc as I build it up.
View attachment 310361
A miniart shed that I stumbled on in the stash and a couple of wire framed trees under construction still
View attachment 310359
The shed is supposed to have a partly broken wall, but I’ve chosen to repair that so filled it and had started to scribe in the bricks.
View attachment 310360
So there’s all the bits so far. Wish me luck as I attempt to make a reasonable dio.
All comments, tips, advice and abuse are thoroughly welcomed :smiling4:
Cheers
Si
Attachments
-
 660BEF7C-1DF3-4DC1-92D0-8EEFFCE5CA34.jpeg2.5 KB · Views: 0
 -
 468BA0F5-FCF1-484F-9E05-EA2957B34DDE.jpeg3.7 KB · Views: 0
 -
 17A8061D-8CF8-44F3-A5FC-D48B2D93C074.jpeg3.4 KB · Views: 0
 -
 C691AC7A-F5D9-44C2-AD17-4A2CA2EE2D93.jpeg3.8 KB · Views: 0
 -
 531BBB18-8CB4-4420-A81F-A289728FDCF3.jpeg3.6 KB · Views: 0
 -
 9006FB4A-2F7A-4881-9791-A335DC538C95.jpeg4 KB · Views: 0