Theme editor

Scale Model Shop

Tiger I '112 1942' help

Status
Not open for further replies.

MattSki213

New member
Joined
Oct 13, 2018
Messages
487
Reaction score
0
Points
0
1/3
Thread owner
Hi all
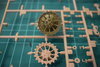
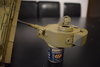
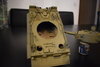
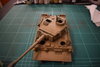
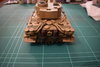
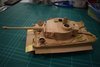
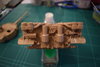
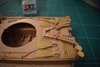
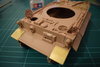
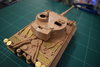
Can I ask for help with my Tiger. This is RMF RM-5001 in 1/35 scale.
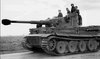
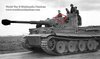
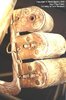
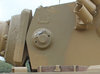
The goal is to build 112 tiger from 501st as seen on photo using only what's in box and at home already :smiling3: no aftermarket.
To start with a have two questions as i could not find any pictures of those areas:
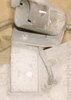
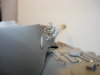
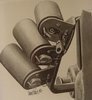
first - wire from left hand side smoke grenade launchers is it going to right hand side launchers or can it go inside turret as i did(seen it somewhere on photo)? ( I know that usually is going in next to bracket).
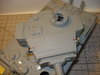
second - part no engine cover i use this one as i know this tank was supply with bigger box on turret but if im wrong i can swap it with flat one.
Thanks in advance.
View attachment 318146View attachment 318147View attachment 318148View attachment 318149View attachment 318150View attachment 318151
 

Attachments

  • tumblr_p18bzgfBXm1rc7erjo1_1280.jpg
    tumblr_p18bzgfBXm1rc7erjo1_1280.jpg
    2.2 KB · Views: 0
  • DSC_0001.JPG
    DSC_0001.JPG
    2.4 KB · Views: 0
  • DSC_0002.JPG
    DSC_0002.JPG
    2.7 KB · Views: 0
  • DSC_0003.JPG
    DSC_0003.JPG
    2.4 KB · Views: 0
  • DSC_0004.JPG
    DSC_0004.JPG
    2.8 KB · Views: 0
  • DSC_0005.JPG
    DSC_0005.JPG
    2.8 KB · Views: 0
Hi Matt, nice to see an African kitty being build. To answer your first question, the wire didn't go from right to left but went into the turret. However, the way you wired it is incorrect, it should more like this:
View attachment 318200
smaller wires of each smoke discharger went into a larger wire which went straight into the top of the turret
View attachment 318201
Regarding the turret bin and the engine cover I'm not 100% what you mean exactly with your question but the engine hatch cover and turret bin seem to be correct to me.

Tiger I expert David Byrden has a great website with plenty of info, there's a subpage on '112'
http://tiger1.info/tank-page/A2F
And he mentions the Rye kit too:
http://tiger1.info/models/products-page/RM5001

Cheers
 

Attachments

  • DSC01554.JPG
    DSC01554.JPG
    1.7 KB · Views: 0
  • DSC01557.JPG
    DSC01557.JPG
    2.7 KB · Views: 0
Ah Maciej.
Glad to see Wouts has answered this, he will put you right with out doubt :thumb2:
John
 
Thread owner
Hi John and Wouter
Thank You.
I will take more pictures with spare part for engine cover that may explain it more.
About that wire from left hand side i can see on orginal photo that there is some wire hanging just in front of grenade launchers going to front of turret.
View attachment 318230
Now the question is is it related in any way to launchers or not? I can not find any clear photos and any notes about this wire.
Wouter - thanks for links, I'm using that page, David Byrden knows what he is talking about. My lanchers have small wires going to bigger one and on right hand side are going straight to turret (my are not as good as your).
thanks
 

Attachments

  • wwii0156.jpg
    wwii0156.jpg
    3.3 KB · Views: 0
Hi mate, can't say that on this particular case it but wouldn't seem to make sense that the wire of the smoke dischargers is hanging there. After all these were factory installed parts so that would have been standardized. Just my two cents.
If you want to be sure feel free to send David Byrden an email. He's the Tiger guy around there. He answers emails quite swiftly normally :)

Cheers
 
Thread owner
Hi mate, can't say that on this particular case it but wouldn't seem to make sense that the wire of the smoke dischargers is hanging there. After all these were factory installed parts so that would have been standardized. Just my two cents.
If you want to be sure feel free to send David Byrden an email. He's the Tiger guy around there. He answers emails quite swiftly normally :smiling3:

Cheers
Thanks for that didn't know that contact with David Byrden is so 'easy' :) will definitely try to contact him.
I was thinking that running that wire some ware else would be more like damage replacement when there was no way of using original route:)
Thanks mate
 
Hi Maciej

I built this kit a couple of years ago as Tiger 141 and it went together really well. However as you are finding it is a challenge to adapt it to a specific Tiger. I will give you my opinions on your questions but as Wouter said you need to get confirmation from David B.

As for your engine cover question it is correct and the turret bin is also correct see HERE

As for the grenade launcher Wouter is correct in what he says. Here are some pictures to help clarify this

View attachment 318464View attachment 318465View attachment 318466View attachment 318467

(All pictures for discussion purposes only)

However what is that mysterious wire??? I personally think it is a battlefield addition. They may have had problems with the interior firing system of the nebelkerzen and had to rig up an external manual system liked this one pictured below

View attachment 318468

(Pictures for discussion purposes only)

Building accurate Tigers is always a challenge and I look forward to seeing how you progress. How did you get on with getting the sprockets right by the way?
 

Attachments

  • SmokeGrenade4.jpg
    SmokeGrenade4.jpg
    3.1 KB · Views: 0
  • Tiger Tank Trunnions.jpg
    Tiger Tank Trunnions.jpg
    5.6 KB · Views: 0
  • German-WW-II-photograph-Tiger.jpg
    German-WW-II-photograph-Tiger.jpg
    2.7 KB · Views: 0
  • nebel3sm.jpg
    nebel3sm.jpg
    2.8 KB · Views: 0
  • 131-smoke-grenade-launcher-1-2ef8098.jpg
    131-smoke-grenade-launcher-1-2ef8098.jpg
    2.4 KB · Views: 0
Steve, the Tiger below I built at the beginning of this year and it belonged to the s.Pz.Abt. 503. I don't believe the wire you are seeing on the photo is an external manual system. The crew were just using the smoke dischargers as hat rack and other useful things were hung up on it, well, that's my idea anyway :P 
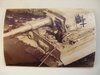
. This photo comes from tank recovery tests after Kursk.

Cheers
 
If not a battlefield modification then It will be interesting to find out what that mystery cable is. Make shift washing line??:smiling5::smiling3:
 
Wout's - I have had a look at the photos of when the 112 landed at Bizerta on 23rd November 1942 and the wire is not on the turret. If you look closely at the original photo of Maciej's the wire does go into the same hole as this one shown on DB's website

View attachment 318486
(For discussion purposes only courtesy of D Byrden website)

Where the other end of the cable then goes is anybody's guess. I will stick with my original theory that it was a battlefield bodge job as the internal mechanism wasnt working properly. Any thoughts yourself mate?? What about an earthing cable???
 

Attachments

  • SmokeGrenadeOutside.jpg
    SmokeGrenadeOutside.jpg
    2.1 KB · Views: 0
Wout's - I have had a look at the photos of when the 112 landed at Bizerta on 23rd November 1942 and the wire is not on the turret. If you look closely at the original photo of Maciej's the wire does go into the same hole as this one shown on DB's website

View attachment 318486
(For discussion purposes only courtesy of D Byrden website)

Where the other end of the cable then goes is anybody's guess. I will stick with my original theory that it was a battlefield bodge job as the internal mechanism wasnt working properly. Any thoughts yourself mate?? What about an earthing cable???
Early string telephone system !
Taxi.
Gone!
 
If not a battlefield modification then It will be interesting to find out what that mystery cable is. Make shift washing line??:smiling5::smiling3:
It looks more like a hose to me, or possibly a spare fan belt or similar.
 
Thread owner
looking at some pictures of other tigers I now can see that there is no space to run this wire as I did so will change it and run it like is should be 'not damage'. I've seen photos that they ware using it for many things include hanger for spare tracks. Thanks all for your input.
 
Thread owner
Hi Maciej

I built this kit a couple of years ago as Tiger 141 and it went together really well. However as you are finding it is a challenge to adapt it to a specific Tiger. I will give you my opinions on your questions but as Wouter said you need to get confirmation from David B.

As for your engine cover question it is correct and the turret bin is also correct see HERE

As for the grenade launcher Wouter is correct in what he says. Here are some pictures to help clarify this

View attachment 318464View attachment 318465View attachment 318466View attachment 318467

(All pictures for discussion purposes only)

However what is that mysterious wire??? I personally think it is a battlefield addition. They may have had problems with the interior firing system of the nebelkerzen and had to rig up an external manual system liked this one pictured below

View attachment 318468

(Pictures for discussion purposes only)

Building accurate Tigers is always a challenge and I look forward to seeing how you progress. How did you get on with getting the sprockets right by the way?
Hi Steve
This RMF set is from 2014 and it look like they use David Byrden's web site to get some parts right so in box there ware two sets of front sprockets if that's what you asking for.View attachment 318511
 

Attachments

  • DSC_00011.JPG
    DSC_00011.JPG
    3.8 KB · Views: 0
MattSki, great job so far. Steve's bottom photo shows clearly how "indestructable" Tigers got their reputation. I counted at least six hits, two direct. The driver & gunner sure got their bells rung. PaulE
 
now something that scares me chipping, I just can not get it right :).
Then don’t do it :) This chipping fad (although, is it still a fad if it’s been going for 10–15 years?) is all well and nice, but I just find most models to be FAR overdone in this department. If you’ve got a photo of a real vehicle with heavy chipping in the time and place your model represents, then sure, go for it. But otherwise, I don’t see the point of anything more than a few bits of chipped paint where these might logically occur.

In this case, you’re modelling a real vehicle from a photo. When I look at that picture, I don’t see much, or any, chipped paint on it.
 
Thread owner
Then don’t do it :smiling3: This chipping fad (although, is it still a fad if it’s been going for 10–15 years?) is all well and nice, but I just find most models to be FAR overdone in this department. If you’ve got a photo of a real vehicle with heavy chipping in the time and pace your model represents, then sure, go for it. But otherwise, I don’t see the point of anything more than a few bits of chipped paint where these might logically occur.

In this case, you’re modelling a real vehicle from a photo. When I look at that picture, I don’t see much, or any, chipped paint on it.

You right there is just some wear and tear on drivers hatch.
I will do that and see how it will go.
Thanks
 
Chipping is great once mastered. There are different ways of doing it and overtime you will find a system that is good for you. I am a big fan of Mig Jiminez work and his builds can be found all over the internet. Try and adapt your chipping to the age of the vehicle. For example 112 only arrived in N Africa in November so wear and tear would be limited. Lots of sand and dust though :smiling3:. I like to do my chipping before the weathering stages so they blend in more and not so much in your face. The camo has come out well. Its all shaping up nicely
 
Status
Not open for further replies.
Back
Top