Theme editor

Scale Model Shop

Tiger I - January 1943 production "Tiki" 8./SS-Panzer-Regiment ”Das Reich”

Status
Not open for further replies.

Tommy

New member
Joined
Mar 27, 2007
Messages
142
Reaction score
0
Points
0
1/3
Thread owner
As a real Tiger nerd I'm not satisfied with building a early, mid or late production Tiger.


I usually go deeper in my research and try to build a Tiger true to it's production month also.


So here is my approach to the (among Tiger enthusiasts) well known Tiger "Tiki".


View attachment 247901


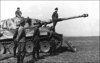
Tiger 812 from 8./SS-Panzer-Regiment ”Das Reich”


This Tiger is interesting due to it's field modifications and unique camo painting.


It was painted in the standard grey color with a plain yellow (not the usually dunkelgelb) camo paint applied by the crew in the field.


The yellow was hand painted in a rather sloppy way with a brush and so was the tactical number 812 on the turret.


The above picture shows the Tiki Tiger with the Division Commander, SS-Gruppenführer Krüger standing on the front plate of the Tiger


during a ceremony held on 20 april 1943.


View attachment 247908


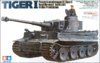
And this is the Tamiya kit I will use for this build. This early production Tamiya kit will not be early enough (january 1943)


for my build so there will be some modification in order to make it pass as a january 1943 production Tiger.


More will follow soon....


Tommy
 

Attachments

  • Tiger812_Tiki_02.jpg
    Tiger812_Tiki_02.jpg
    2.2 KB · Views: 0
  • wbTiki-001.jpg
    wbTiki-001.jpg
    6.3 KB · Views: 0
Looking forward to following this build, I love those big kitties;)
 
Thread owner
View attachment 247959


88mm KwK 36 L/56


This is the gun the early production Tigers used.


I will use this highly detailed gun barrel. It consist of 11 parts and it looks great when assembled.


View attachment 247960


It even got rifling, to bad it will not be visible when assembled. But it is a nice detail. :)
 

Attachments

  • wbTiki-003.jpg
    wbTiki-003.jpg
    4.6 KB · Views: 0
  • wbTiki-002.jpg
    wbTiki-002.jpg
    4.8 KB · Views: 0
do like this one,and will be looking forward to seeing


what changers you do make to it, ;)
 
I am never as dedicated to reality detail as you are but I cannot help admire the work that goes into reproducing history.
 
Thread owner
Sometimes I'm having a hard time to stop myself not to go too deep into details and accuracy.


If I do the build will never be finished :)
 
oh lol, :D


I do real like how you do add or change the detail,to be right for the time frame your making the tank too, ;)
 
Thread owner
View attachment 248045


All the holes filled with putty and I almost forgot to remove the plastic piece where the fire extinguisher is to be placed.


I will make a new one because the one that comes with the kit does not look good.


View attachment 248046


The sides are also done, only the rear is left to do.
 

Attachments

  • wbTiki-007.jpg
    wbTiki-007.jpg
    4.7 KB · Views: 0
  • wbTiki-006.jpg
    wbTiki-006.jpg
    5.1 KB · Views: 0
Ooooh I'm in watching this one Tommy some great additions and loving your attention to detail.
 
agree with Ian on this one,watching ,to see how and whats done,always like to lean new things, ;)
 
Thread owner
View attachment 248276


The holes on the rear is filled with putty and the molded taillight and the plastic latch for the jack handle is removed.


Have already glued on a small PE part where the new taillight will be placed.


A good thing with this Tamiya kit is that the frame mounts for the rear mudguards are actually looking good. So I won't replace them.


And as a January 1943 production Tiger the frame mounts should still be present.


They was removed in May 1943 when the new hinge design was introduced.
 

Attachments

  • wbTiki-008.jpg
    wbTiki-008.jpg
    4.9 KB · Views: 0
Thread owner
View attachment 248568


Next thing to do is to remove the front mudguards and the hinges, these will be replaced with new ones.
 

Attachments

  • wbTiki-009.jpg
    wbTiki-009.jpg
    4.5 KB · Views: 0
Thread owner
View attachment 248575


The mudguards are gone and the front plate is in place just need to fix the small gap.


View attachment 248576


First I planned to remove and replace the toggle bolts for the wading cap, but they are actually looking quite good so I will leave them as they are.


I have also drilled out the barrel of the front MG to increase the level of detail.
 

Attachments

  • wbTiki-011.jpg
    wbTiki-011.jpg
    4.9 KB · Views: 0
  • wbTiki-010.jpg
    wbTiki-010.jpg
    5.2 KB · Views: 0
just small detailing dose make all the difference to add just a little more, ;)


will be interested to see,what you are doing with the mud guards,
 
Thread owner
Thanks for your comments!


View attachment 248623


More stuff that needs to be fixed...


The drivers periscopes are missing on this kit so they need to be added.


View attachment 248624


The holes for the 5 steel rods that kept the splash screen in place are missing and the notches on each side of the splash screen are also missing.
 

Attachments

  • wbTiki-012.jpg
    wbTiki-012.jpg
    4.9 KB · Views: 0
  • wbTiki-013.jpg
    wbTiki-013.jpg
    4.9 KB · Views: 0
Status
Not open for further replies.
Back
Top