
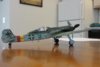
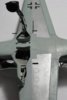
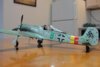
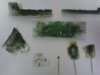
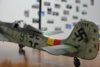
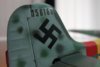
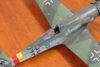
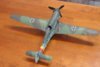
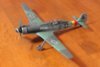
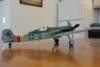
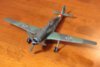
Dear Folks, Here is a finished Ta 152 H-1 in 1/48 from Trimaster, ‘green 9’ which is featured in the recent book by Thomas H Hitchcock. The paint was done with a combination of masking and free hand airbrushing techniques. The paints were Humbrol and Model Master. Most all lines demarcking different shades, the mottles and diffusion effects were done with rough edged paper masks that were first drawn out with a ball point pen and then carefully torn and perforated as needed. The rough edges give soft, well atomised overspray effects that can be readily manipulated. The photos show some examples of the masks. The diffuse patches were done by stopping down the spray with the paddle shaped masks shown. Best results were achieved by shifting around the mask slightly during application of semigloss paints at low pressure (15-20 psi), that was well thinned down with lacquer thinner. This technique produced the nebulous effects along the top of the fairing and added complexity to the demarcation lines on the fuselage. After the paint had hardened, any paint defects such as particles, rough finish or uneven thickness on broad colour areas and canopy framing were carefully smoothed out by wet sanding with fine grit sanding film. The spiral is a decal and the seat belts are strips of aluminium foil.
View attachment 63598
View attachment 63599
View attachment 63600
View attachment 63601
View attachment 63602
View attachment 63603
View attachment 63607
View attachment 63624
View attachment 63627
View attachment 79192
View attachment 79193
View attachment 176624
View attachment 176625
View attachment 176626
View attachment 176627
View attachment 176628
View attachment 176629
View attachment 176633
View attachment 176650
View attachment 176653
View attachment 192215
View attachment 192216
Attachments
-
 DSC07242a.jpg2.1 KB · Views: 0
 -
 DSC07228a.JPG2.1 KB · Views: 0
 -
 DSC08224.JPG2.2 KB · Views: 0
 -
 DSC07219a.jpg2.2 KB · Views: 0
 -
 IMG_20130422_173226.jpg1.9 KB · Views: 0
 -
 DSC07209a.jpg2.4 KB · Views: 0
 -
 DSC07206a.jpg2.1 KB · Views: 0
 -
 DSC07201a.jpg2.3 KB · Views: 0
 -
 DSC07197a.jpg2.4 KB · Views: 0
 -
 DSC07196a.jpg2.1 KB · Views: 0
 -
 DSC07194A.jpg2 KB · Views: 0

")