Theme editor

Scale Model Shop

US Armored Infantry

Status
Not open for further replies.

homechild

New member
Joined
Oct 17, 2010
Messages
474
Reaction score
0
Points
0
1/3
Thread owner
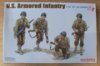
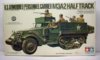
I'm just about to start a US Armored Infantry diorama. Never made a tank or a halftrack before, in fact the only reason I'm doing this is a) I practically stole the kits from someone on ebay, and b) I'm going to try something from almost every type of scale model group (e.g. cars, WWII planes, jet planes, tanks/armour, helicopters, etc) before picking one to concentrate on (seems most people here have a specific area of expertise).

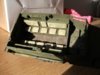
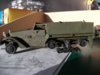
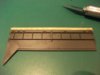
So, here are the kits, I'm not 100% sure of the scene although I have a fair idea in my head.

View attachment 42986

View attachment 42987

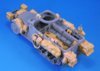
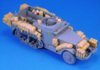
View attachment 156012

View attachment 156013
 

Attachments

  • 01 Box Art.JPG
    01 Box Art.JPG
    5.6 KB · Views: 0
  • M3A2 Half Track.jpg
    M3A2 Half Track.jpg
    2.5 KB · Views: 0
Nice haul drew! I made the tamiya halftrack when i was a kid , its a great looking model , looking forward to seeing the dio, cheers tony
 
The Dragon Gen2 figures are usually very good though having made a few, I'd advise you to test-fit the pieces before gluing.

Some of them can be tricky!

Look forward to seeing how it turns out Drew.

Patrick
 
Thread owner
I'm going to take my time with the half track, I know a lot of people on here have made them and like them and I don't want to offend, lol. I'm also going to look online for uniform colours. I want it to look good so I'm going to attempt weathering so will be asking for help when the time comes (also not too sure on the fitting of the tracks so will have a look on here for advice). I'm aiming for a 2 month build give or take a couple of weeks.
 
nice kits, been looking for the tamiya half track for a while now.

scott
 
Thread owner
This build is going really well so far...

Got the half track almost finished, it has pretty much fallen together, no problems with the fit. One or two places to put a seriously tiny amount of filler but that's more to do with me not putting the pieces together as cleanly as I could have.

The side walls of the rear passenger compartment had to be attacked with a blade and some sandpaper. The M3A2 was only a prototype and never saw action in WWII, becuase of this some changes had to be made. They have molded on ladders which had to be removed (I can't find any evidence of the M3A1 having ladders on the sides). After messing this up a little because I wasn't as skilled as I thought I was I've had to buy some stowage to put on it.

Other than that it's going well, I'll try to get some photo's up tomorrow once I've given the half track some colour.
 
Thread owner
So here are the "in-progress" shots.

There's a shot of the side walls with the molded on ladders that had to be removed, a side profile and some interior shots.

I've also ordered the M3A1 stowage kit and I'm currently waiting for it to arrive.

All in all the build's been going well, and, I have to admit that I'm enjoying building my first ever WWII armour piece!

View attachment 43625

View attachment 43626

View attachment 43627

View attachment 43628

View attachment 43629

View attachment 43630

View attachment 156651

View attachment 156652

View attachment 156653

View attachment 156654

View attachment 156655

View attachment 156656
 

Attachments

  • 08 stowage 2.jpg
    08 stowage 2.jpg
    5.6 KB · Views: 0
  • 07 stowage 1.jpg
    07 stowage 1.jpg
    5.5 KB · Views: 0
  • 06 interior 2.JPG
    06 interior 2.JPG
    2.7 KB · Views: 0
  • 05 interior 1.JPG
    05 interior 1.JPG
    2.7 KB · Views: 0
  • 04 side profile.JPG
    04 side profile.JPG
    2.7 KB · Views: 0
  • 03 side walls pre cut.JPG
    03 side walls pre cut.JPG
    1.9 KB · Views: 0
Looking good Drew, and that's a hell of a lot of stowage! Where did you get that from?

Patrick
 
Thread owner
Yeah, I thought there was a bit much there too, don't think I'll be using all of it, maybe keep some in case I need it in the future.

It's made by Legend Productions and ordered from Lucky Model. Had to get something to cover where the ladders used to be.
 
Thread owner
Okay, I'm having to put this aside for the next 2 - 3 months. I've pretty much completed the half-track and halftrack figures (some touching up and weathering to do but essentially it's done), the Dragon figures are a completely different story. There are so many parts to each figure...to be honest...they're a bit of a nightmare. Don't get me wrong, they look fantastic and I'm sure in the hands of someone more skilled than I would look great once complete however, mine are lying in the box half-built.

I will come back to this but some kits have started arriving for the Vietnam SIG that I want to get started on before it's too late.

I've put some pics of the half-track as it is at the moment (please remember it's not complete...oh, and if anyone has any advice on how to make the tracks sag a little bit it would be greatly appreciated.

View attachment 42492View attachment 42493View attachment 42494View attachment 42495View attachment 42496

View attachment 45822

View attachment 45823

View attachment 45824

View attachment 45825

View attachment 45826

View attachment 158848

View attachment 158849

View attachment 158850

View attachment 158851

View attachment 158852
 

Attachments

  • DSCF0933 [800x600].JPG
    DSCF0933 [800x600].JPG
    3.1 KB · Views: 0
  • DSCF0932 [800x600].JPG
    DSCF0932 [800x600].JPG
    2.4 KB · Views: 0
  • DSCF0930 [800x600].jpg
    DSCF0930 [800x600].jpg
    3 KB · Views: 0
  • DSCF0929 [800x600].JPG
    DSCF0929 [800x600].JPG
    2.7 KB · Views: 0
  • DSCF0934 [800x600].JPG
    DSCF0934 [800x600].JPG
    2.4 KB · Views: 0
I feel your pain with the Dragon figures Drew, I went through the same agonies with the tank riders on my recent Pershing build! Boots & hands everywhere!

I wouldn't worry too much about sag on the tracks as they were generally pretty tight on US vehicles.

Cheers

Patrick
 
Yes, the tracks were comparatively tight on US vehicles, but if you want some sag to make it look less like a toy and more like a model, an easy technique is just to put some glue on the wheel where it touches the tracks, and jam something (rolled up tissue paper for example) between the wheels to pull it down a bit. when the glue dries it will be "saggy" You are doing exceptionally well, especially since this is your first armor build. Great work.
 
Great build so far. One tip though is that US Halftracks had very tight tracks. There would be little to no sag at all. There were after all made of rubber. Here a couple of pics for you.

The Dragon models come with hard styrene tracks as they more accurately reflect the real thing.

Cheers.
 
\ said:
Great build so far. One tip though is that US Halftracks had very tight tracks. There would be little to no sag at all. There were after all made of rubber. Here a couple of pics for you.As I said previously! The concept of track ' sag ' is always a difficult one. Ask most ex-tankers & they'll tell you that track maintenance was very high on their to-do list for obvious reasons! Really, only Russian WW2 vehicles displayed very saggy tracks.

They weren't made of rubber, but steel with rubber inner pads. And using kit or reenactment picture references is dubious at best, you're then relying on someone else's interpretation.

Cheers

Patrick
 
I'm sorry but US Halftracks used Kégresse tracks

A Kégresse track is a kind of rubber or canvas continuous track which uses a flexible belt rather than interlocking metal segments. It can be fitted to a conventional car or truck to turn it into a half-track, suitable for use over rough or soft ground. Conventional front wheels and steering are used, although skis may also be fitted.

The Kégresse propulsion and suspension system incorporates an articulated bogie, fitted to the rear of the vehicle with a large drive wheel at one end, a large unpowered idler wheel at the other and several small guide wheels in between, over which run a reinforced flexible belt. The belt is fitted with metal or rubber treads to grip the ground. It differs from conventional track systems by using a flexible belt rather than interlocking metal segments.

In the late 1920s the U.S. Army purchased several Citroën-Kégresse vehicles for evaluation followed by a licence to produce them. This resulted in the Army Ordnance Department building a prototype in 1939. In December 1942 it went into production with the M2 and M3 half-track versions. The United States eventually produced more than 41,000 vehicles in over 70 versions between 1940 and 1944.

I'm at work right now so I can't post pictures but later I will post pictures of an assembly factory that show workers installing tracks. They had to use chains to compress the bogie assembly so they can fit the one piece continous rubber track. When they release the chains the track goes tight. Any pictures of a halftrack with saggy tracks means they are not servicable and will have to be replaced. If a track gets torn it is replaced because there are no individual links like you find on tanks. The rubber tracks either had rubber cleats or could be fitted with metal cleats. There are no track pins on a halftrack.

German and Russian tanks have what is considered as static or dead tracks. Dead tracks have sag. American tanks have live or tensioned tracks and therefore have little to no sag. That's how they operate and if they do have sag that is out of spec they have to be re-tensioned or they run the risk of of being thrown.

Cheers
 
Thread owner
Okay boys...back to your corners lol

You're both agreeing on the same thing anyway.

US halftrack = no to little sag.

I'll keep this in mind and will try not to open any more cans of worms...coughcough

Seriously though, thanks for the comments.
 
Status
Not open for further replies.
Back
Top