Theme editor

Scale Model Shop

V2 - Vengeance From Above

Status
Not open for further replies.
Dude 1.
All your hard work and research is paying off. Those cable reels look spot on, and the work on those vents is perfect. As for the chassis, well as I seem unable to get one square I take my hat off
Dude 2
 
Allen this is absolutely stunning! Your attention to detail is amazing! It’s really coming together nicely! Excited for the weekend to see it ready! So when the Steyr finished what is the next step afterwards? And I hope you will be able to finish it for the show! And also I have no doubt that it will be a well deserved winner! Best regards Danny
 
Reels came out very well & the hvy car is shaping up to be a stunner. I am not a hater Allen, but the less said of he who shall not be named the better. PaulE
 
Allen,
Not to worry, I'll get the LOX trailer sorted out. Your progress is commendable and by all means get the nipples on! :smiling5:
Rick H.
 
Is that one of those beer mats that come with your watery beer. You want to try lager mate:smiling5:
 
Gutentag Allen,

What a mighty titanic project is on it's way here mate :surprised:. I missed a lot and will take some time to watch all the updates but what I've seen already is very impressive, just awesome :thumb2:

Cheers
 
Hi Allen
I can only echo what the others have said. A huge project that just keeps getting better and better.
Jim
 
heyAllen as usual you are doing a stunning job on the scratch building ... keep it coming...:smiling::smiling::smiling::smiling:
 
Thread owner
Evening Rocketeers Around The Block and In Brooklyn Too,

I spared you all the agony during the week as there wasn't a lot done and I have been over busy at work, Even with the holiday on Wednesday, table time was minimal. I went to post an update and fell asleep in the middle and lost all my work, but...

Dude 2 - Thanks John and remember Tamiya kits have one piece frames and no headaches there. A whole lot better than others...

Danny - Thank you too Sir! I have made some progress and when the Steyr is finished, I will probably build the 2 Italeri tankers, as I won the second one on evilbay a couple of days ago. Have the resin wheels for them and the rest is mostly OOB!!! Or, I could build the Hanomag SS100's as a tandem build...

PaulE - I know my friend and I just like to keep you on your toes. It's the same here in the Fatherland. We won't go there anymore and just stick to plastic and good times. All the best buddy!!!

Paul - Thanks to you, a major part is finished and looking good. Take care and keep on tarping and1/2 tracking!!!

Rick - Great news that you haven't given up on the LOX. I know you will sort it and make it shine. Sorry, but it is too late to add the nipples now. There is still too much to do. Thanks Sir!!!

Stevie - AHHH, what can I say my friend. If you ever get the chance to come back to Germany and come to Bavaria, I'll give you a few beers to drink that will knock your socks off and you will never speak of Lager (bath water) again... We'll start with Schlenkerla Rauch Beer and finish with a Keeseman Bock. After we pick you up off the floor, you will see the light!!!!!!!

Wouter - Hi my man, it's so good to hear from you again! I am building the Steyr first as it is mostly scratch and the rest are kits both resin and plastic. It is taking some time though. I hope all is well with you and the family. SMC maybe this year??? Take care!!!

Jim - Thanks Sir! I just hope I can finish this one and keep on keeping on with the rest of the project I have hit a few snags though...

Greg - Thank you too! You are too kind. I hope to get this finished shortly. Then I can go real crazy...

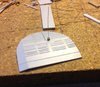
Well I have been trying to accomplish a little each day during this week, but that wasn't happening. I have done a lot of work over the weekend and here is where we are at the moment. Most of the major stuff is finished, so now we do the little crap. For instance, Add the mesh in the hood of the Steyr,
View attachment 315776
With a major brain fart, i attempted to glue the mesh with CA. DOH, regular glue was the answer and it worked great. Up next was the starter crank cover with dummy cord,
View attachment 315777
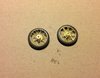
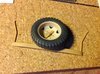
Then it was the spare tire holder on the front bumper,
View attachment 315790
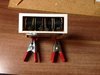
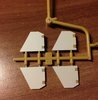
It was time to play cable reels in the trunk and set the middle 2 in place. That didn't work too well as the two outside reels wouldn't clear the fender wells in the trunk. Back to the drawing board on this one and had to remake the reel holders. Did that and we ended up with this,
View attachment 315780
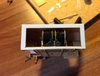
Ok, we were off on a good roll and after they dried, we butchered the other 2 into place and had this,
View attachment 315781
Ok, so I didn't center them in the middle perfect, but at least they are in the trunk!!! 10 foot rule, 10 foot rule, get it??? I modified the trunk doors and gave them some detail and a reel crank holder. the crank was used to roll up/out the cable reels on the cart...
View attachment 315782
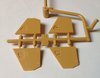
Now it was time to check the ref pics once again and see if I had missed any details. I wanted to spray a coat on the body and the doors, but something wasn't right. Looking at the doors, I needed to add handles on the inside of each one and handles on the outside, to open them. Hit the reference pic for the outside handle shape and WHAM, The handles on the outside are not recessed like the 1500A model,
View attachment 315783
For Discussion Purposes only
Here's what I mean,
View attachment 315784
Compared with the ref pic, you can see what I mean. On the left I have started to shave off the raised detail and the handles There are 2 ways to correct this and I am still debating which way to go. There always seems to be something in the damn reference pics that you miss! It will be corrected...It was then time for a test fit of all the nonsense to see what I had made a mess of!!!
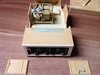
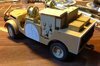
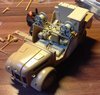
View attachment 315787
Nothing is glued in placed and the first probs are to be seen...battery box is too high and doesn't fit under the switch panel roof. Another shot,
View attachment 315788
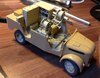
And one more before I go to bed,
View attachment 315789
Lots to be done yet, but it is starting to look like an F 105 Stromversorgungs Steyr 2000. I wish you all a great week, stay warm, dry and drink a real beer. Thank you for following my madness and all abuse is more than welcome!!!

Prost
Allen
 

Attachments

  • IMG_1562.JPG
    IMG_1562.JPG
    3.5 KB · Views: 0
  • IMG_1567.JPG
    IMG_1567.JPG
    3.2 KB · Views: 0
  • IMG_1574.JPG
    IMG_1574.JPG
    3.2 KB · Views: 0
  • IMG_1573.JPG
    IMG_1573.JPG
    4 KB · Views: 0
  • IMG_1572.JPG
    IMG_1572.JPG
    3.4 KB · Views: 0
  • IMG_1571.JPG
    IMG_1571.JPG
    2.4 KB · Views: 0
  • steyr-2000-power[1] (2).jpg
    steyr-2000-power[1] (2).jpg
    2.5 KB · Views: 0
  • IMG_1570.JPG
    IMG_1570.JPG
    2.7 KB · Views: 0
  • IMG_1569.JPG
    IMG_1569.JPG
    2.6 KB · Views: 0
  • IMG_1563.JPG
    IMG_1563.JPG
    2.9 KB · Views: 0
  • IMG_1565.JPG
    IMG_1565.JPG
    3.2 KB · Views: 0
Sweeeet Ooooogly Booooogly! That is so fine Allen. Love the reels even without the nipples!
At least we're not gender confused.:rolling:
Get some rest,
Rick H.
 
Allen,
That is a sweet build loving all the details and the time you are taking in getting it right.
 
Thread owner
Rick. Jim and Paul, Thank you Gentlemen for the kind words! It keeps me going and striving to get this puppy finished. A small update is in order...

I thought about how to fix the door prob and the two ways to do it. One way was to fill the recesses with sheet stock and the other was to make new door panels out of sheet. I went with the latter and made me 4 new door panels out of some really thin sheet I had lying around. I will be leaving the rear doors open and maybe one of the front doors too, so you won't really see them. They look like this,
View attachment 315834
They are not glued on yet and when they are, I will drill out the holes for the handles and tidy up the edges a bit. I want to leave them on the sprue piece as it will be easier to shoot a coat on them with the hissy stick...

Short and sweet tonight! Thanks again for looking and have a super Monday evening!

Prost
Allen
 

Attachments

  • IMG_1575.JPG
    IMG_1575.JPG
    3.3 KB · Views: 0
Looking great Allen! keep that mojo going mate.:thumb2:
Love the set-up test pics, any weathering planned?
 
Thread owner
Hi Fernando,

It is getting a little close to finishing this on time and I am glad I did the test. I found a few problems and now in the process of fixing them. The Steyr will be lightly weathered as the Tactical V2 vehicles were pretty well taken care of. I will weather a few areas more to cover up my bad work too!

I am wondering if I should enter this in class 26, MV scratched/converted or in class 29, MV standard. Any ideas??? Thanks my friend and any help is appreciated in this matter...

Prost
Allen
 
I would go for 26 Allen, but that's just me. Some really masterful research & modeling here. PaulE
 
Evening Allen,
Had to have a little bit of a catch up.....that’s a lot of progress! Great to see you’ve managed to keep the mojo flowing and pushed through to the final stretch.
Top stuff mate:thumb2:
 
Gott in Himmel
Das ist ein schönes Detail, liebe diese Türen.
Typ 2
 
Thread owner
Evening Gents,

PaulE - You may be right there as 26 is for scratch/converted vehicles and not only military, but all types. I am beginning to hate ref pics as you always seem to oversee something and then discover it too late! Thanks for the kind words my friend. Any luck with the Vette yet???

Si - Thanks so much Sir. The mojovation is soaring as I am loving this nonsense scratch building to death. Or, it could be the death of me yet. Best wishes to you and the family!!! Oh, BTW, Did you ever contact the Modell club in East Sussex???

Dzhon - Vielen Dank mein Freund!!!. The top right one is a little flaky, but that door will be opened so you won't see the oopsie anyway. Eben, es machts viel spaß alles zu Bauen!

A little step further was taken tonight. Can you say etch spoked wheels boys and girls??? Yup, I decided that it was time to get the darn things finished so I could mount them into the tires. They were still a PITA, so with many a bad word and a cold one, they ended up looking like this,View attachment 315954
Ok, so the one on the right really sucks and when I attempted to fix it a little, the CA came apart anyway. I then re-glued it together and it looks better than it did before (no pic). I have to paint the tires before I can finally set and CA them in place. After that, the mounts have to be added for them on the rear side panels on the Steyr. No rest for the weary I'm afraid...

Once again a short update. Thanks again for looking and, with luck, till tomorrow Rocketeers!!!

Prost
Allen
 

Attachments

  • IMG_1576.JPG
    IMG_1576.JPG
    1.8 KB · Views: 0
Status
Not open for further replies.
Back
Top