Theme editor

Scale Model Shop

"What goes up - Must come down!"........Mykolaiv, Ukraine.

Thread owner
Hi, Big Box!

Of course I have a rough outline/Idea and what to use, but just how to finally present stuff I truly don't know.

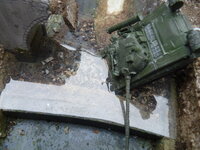
Initially I thought to have the tank going merrily on it's way over an intact bridge, with a lady on the bridge selling fresh fruit to the tank crew and them offering to show her around their bit of armour. The husband would wait a while and then ride up on Trigger and throw a Molotov Cocktail into the open hatch of the tank. His secret lover would then show up on a tandem and they would abandon the horse and both mount the bike and ride off into the sunset....

But then I changed my mind.


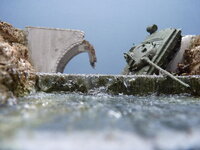
That paintin' cock up was brill. wasn't it? However, of course I knew it would balls up the whole model, I just couldn't resist the thrill I knew I would get watching the thing melt before my very eyes.

Merry Christmas.
Ron
 
That could have been a lot worse Ron, but looks like damage and rubble to me ( even though it’s green.)
 
Thread owner
Fortune favours the brave.....

After completing the painting and a simple weathering with a dusting of dry Polyfilla powder (Other parrot orifice fillers are available) I've finally decided just what to do with the tank.

After marking out the cut line on the hull and using a Junior Hacksaw, I cut the thing in two - Brave or what?

I still need to 'Wreck' the tank a tad and generally knock things off it.
So for now it's just loose fitted.

Click image for larger version  Name:	P1390096.jpg Views:	3 Size:	192.6 KB ID:	1242441

Click image for larger version  Name:	P1390097.jpg Views:	0 Size:	438.2 KB ID:	1242442 Click image for larger version  Name:	P1390098.jpg Views:	0 Size:	304.9 KB ID:	1242443

Now I can sort out the river bed around the tank. Fit the plastic and then hopefully, start to bring the water to life.

Cheers.
Ron
 
Last edited:
Thread owner
Cheers Jim.
Thank you for the input.

i don't normally look at my statistics but I've just noticed our posts are nearly the same....

Ron
 
Thread owner
Thanks Graeme.
Yes indeed, it was nasty stuff. No wonder all that was on the can read 'Inflammable'!

Update....
I've loose fitted the 'water' and slotted in the tank. It doesn't have to be a neat fit in the hole as any gaps will be filled with moving water.

P1390099.jpg P1390100.jpg P1390101.jpg
P1390103.jpg

Next I'll stick the surface water and tank(minus a bit of stuff) in place.

Then I can start work on any above water debris. This before I finally add any movement to the water.

Cheers.
Ron
 

Attachments

  • P1390102.jpg
    P1390102.jpg
    327.6 KB · Views: 0
Thread owner
Thanks to Paul and Paul for your nice comments.

We're getting there - Slow but sure. I hope!

Ron
 
Thread owner
Thanks Jim, and I don't take any pills for it either!

I still need to increase the amount of water coming over the left hand side of the weir cill, but it's a base to work on.

Cheers.
Ron
 
Thread owner
I've highlighted the water movement, so apart from a bit of tweaking, the bottom half of the water course is done.
I've also added some slabs of busted road to below the water surface and abutting the tank....

Click image for larger version  Name:	P1390111.jpg Views:	0 Size:	355.1 KB ID:	1243221

Click image for larger version  Name:	P1390112.jpg Views:	0 Size:	502.6 KB ID:	1243222

Click image for larger version  Name:	P1390113.jpg Views:	0 Size:	328.5 KB ID:	1243223

Click image for larger version  Name:	P1390115.jpg Views:	0 Size:	725.6 KB ID:	1243224

Cheers and thanks for taking a blimp.
Ron
 
Last edited:
Back
Top