Theme editor

Scale Model Shop

WW1 bi-plane photos and information

Status
Not open for further replies.

Snowman

New member
Joined
Oct 20, 2014
Messages
2,114
Reaction score
76
Points
0
1/3
Thread owner
I'm starting to research my next build, a 1/48 DH2, in particular the rigging for one of these old kites.


I happened to stumble across this site where they are building/refurbing these old kites in New Zealand! http://thevintageaviator.co.nz/node


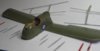
They have some great photo's for detailing work and reference.
 
Is this Peter Jackson's outfit? The director of The Hobbit and Lord of the Rings, I think he's involved in the WingNutWings operation. If you go onto the WingNutWings site there are instructions for each of their kits with detailed rigging plans. I often use their build instructions to get ideas for detailing 1/72 kits.
 
I think this is the outfit that the director of The Hobbit and Lord of the Rings, Peter Jackson is involved in. I think he also has something to do with wingnutwings. If you go to their site they have detailed build instruction for each of their kits and these are a good source for detailing and rigging plans
 
Yes, it's the collection Peter Jackson is involved in. He is also involved as Barry says, In Wingnut Wings Models. Also of interest ins the Omaka Aviation Heritage Centre in Blenheim. http://www.omaka.org.nz/
 
I built the Eduard model a couple of years ago. I found it really useful to make a load of rigging eyes and glue these into the wings etc, then you can run longer rigging wires rather than individual wires which would take ages.


Rigging eyes like these:


View attachment 114988


View attachment 228011
 

Attachments

  • Wing.JPG
    Wing.JPG
    1.7 KB · Views: 0
Thread owner
\ said:
Rigging eyes like these:
Thanks, that is a cool idea!!


Do you have any close ups of the "eyelet's", maybe some "how to" info & pics?o_O
 
I haven't got any pics of the eyelets being made, but simply the were just some very fine lengths of wire, about 2 inches long. Then they were bent around a former like a really small drill bit and twisted very tightly. To twist them I held the ends in a croc' clip which was easy to spin with the forefinger and thumb. Next step is cut them to length, to fit the holes, which you pre-drilled earlier. I made many in one go, and rejected lots, but you will know a good one when you see it.


With all the eyes in place, have a good think where to start and where to end the rigging to give you the longest run possible. This will make rigging so much easier and not so much of a chore ! Some lengths will still be short, but you might be surprised how much you can rig in one run. Good luck.
 
Colin is right doing eyelets makes the rigging a lot easier. On my 1/48 Hawker fury I did eyelets and by doing a sort of half hitch on each one managed to do the whole of the front of the aircraft in one go. Doing that all I had to do was put a drop of superglue on each knot then when it has set cut off the bits not required. On my 1/72 Albatros I drilled all the way through both wings and using a very thin needle stitched the whole of the ringing one go. Then filled the holes with superglue and then cut off the bits not needed. It just takes a bit of time and patience and it helps if you draw a rough diagram of how you want to construct the resulting cats cradle. If you follow the rigging diagram on the WNW site for the DH2 its colour coded for the different wires which makes it easier to follow. Hope this helps.... pics below


..View attachment 115133


View attachment 115134


View attachment 228156

View attachment 228157
 
Status
Not open for further replies.
Back
Top