Theme editor

Scale Model Shop

Yamaha YZR500 with Kenny Roberts racing rider.

Status
Not open for further replies.

simontie

SMF Supporters
Joined
Jan 13, 2010
Messages
1,547
Reaction score
131
Points
63
1/3
Thread owner
This was one of the first kits I bought and have put off building it for such a long time, it’s an old kit and king Kenny Roberts was one of my heroes when I was a teenager first spotted him in the movie classic "on any Sunday" (worth watching if you haven’t all ready)

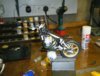
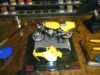
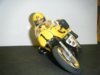
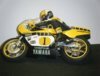
I opened the box back in the spring just after the biker build off and have had very little time since, work commitments you know the story anyway dark nights and here we go again so I cleared out the workshop blew all the dust away and off we go just a couple of pictures of progress so far, I will say I have found this model a challenge so far, Mainly because the plastic parts are not as well formed as the newer kits (or is it just me?)

It’s going to be fun anyway.

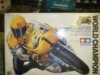
THE BOX View attachment 36851

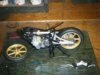
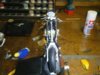
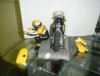
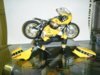
FRAME AND ENGINE View attachment 36850 i cut the plastic chain due to the fact I had not read the instructions the older one's don't have a split in them)

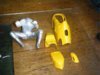
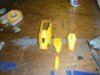
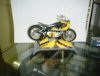
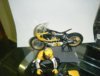
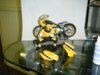
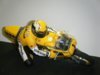
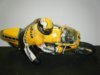
THE KINGS BODY AND FAIRINGSView attachment 36852 this is well and trully filled with putty set the arms to the handle bars before I attached the to the trunk the silver is just under coat to let me see the imperfections

Enjoy, comments more than welcome

Simon

View attachment 41076

View attachment 41077

View attachment 41078

View attachment 154102

View attachment 154103

View attachment 154104
 

Attachments

  • DSCF1554.jpg
    DSCF1554.jpg
    2.9 KB · Views: 0
  • DSCF1556.jpg
    DSCF1556.jpg
    3.2 KB · Views: 0
  • DSCF1555.jpg
    DSCF1555.jpg
    2.6 KB · Views: 0
Not looking too bad at all Simon keep up the good work should turn out to be a stunning build
 
Simon I built this kit a few years back and you're right its not as nice as the newer ones but it does build out okay. Its the only game in town for this subject unless you want to scratch one. There are a lot of upgrade kits available for the YZ500

at 1/12 Bike Grade-up Set
 
Thread owner
thanks Trey - had a look at the up grades before i started but nothing stood out - quite happy to plod on with the putty and sand paper.hopefully i will look the part when finished

simon
 
Simon the only problem I really had now that I think about it were the decals ,they we're really brittle and I had to spray them with decal set before using them,looking forward to seeing this build!
 
Thread owner
thanks for that tray - iwill test them before use - hope i do it justus !!!!!!!!!-

tried the clock decals and lckly managed to get them both into place but you are correct very brittle

whats the story with the decal set if you don't mind me asking?

simon
 
Thread owner
update

small up date managed to get the exhaust's fitted and some smaller parts, only proble was connecting all the radiator hoses at the same time very tight space - exhaust turned out ok and i think there in the right place (bonus) moved on to the fairings and more filler not much just need a small window now to prime and paint hopfully over the weekend

simon

View attachment 37077View attachment 37078View attachment 37079View attachment 37080

View attachment 41286

View attachment 41287

View attachment 41288

View attachment 41289

View attachment 154312

View attachment 154313

View attachment 154314

View attachment 154315
 

Attachments

  • DSCF1559.jpg
    DSCF1559.jpg
    3.4 KB · Views: 0
  • DSCF1561.jpg
    DSCF1561.jpg
    3 KB · Views: 0
  • DSCF1562.jpg
    DSCF1562.jpg
    2.8 KB · Views: 0
  • DSCF1560.jpg
    DSCF1560.jpg
    3.2 KB · Views: 0
Simon its coming along nicely ,really like the heat blueing nicely done!
 
Thread owner

Attachments

  • DSCF1564.jpg
    DSCF1564.jpg
    3.3 KB · Views: 0
  • DSCF1563.jpg
    DSCF1563.jpg
    3.3 KB · Views: 0
Simon looks great!And good luck with the decals,even after spraying mine with decal bonder they still gave me a fit!
 
Thread owner
just about there !!

The bike

Just about there, this was a real labour of love! – managed to get all the bits together the paint was looking quite good then I tried the decals Tray had warned me about them so I started on the smallest ones first tank and rear end came out fine the was some damage on the tank Yamaha stripe but I dressed as best I could the really small decals just disintegrated before my eyes a real bummer. The worst was yet to come the fairing decals just broke up the minute I took them out of the water despite trying to piece them together there were just too many twists and turns to negotiate – luckily because I had been warned and possible a bit of hind sight I had scanned them in to the pc – and after doing much research I finally bought some decal paper and acrylic spray. Worked a treat

Rider (Kenny Roberts)

Despite my initial problems with the rider painting was quite straight forward and after what seems like months I have managed to finish him he could be better but I am happy with the results and wanted to move on to another project – for some reason the decals for the rider were ok no issues with them and they went on no bother at all, although I was very cautious.

Let me know what you think (be gentle)

Final pictures next day or two

Simon

View attachment 41975

View attachment 41976

View attachment 41977

View attachment 41978

View attachment 41979

View attachment 41980

View attachment 155001

View attachment 155002

View attachment 155003

View attachment 155004

View attachment 155005

View attachment 155006
 

Attachments

  • M.jpg
    M.jpg
    2.7 KB · Views: 0
  • N.jpg
    N.jpg
    2.8 KB · Views: 0
  • O.jpg
    O.jpg
    2.7 KB · Views: 0
  • L.jpg
    L.jpg
    2.8 KB · Views: 0
  • K.jpg
    K.jpg
    3.1 KB · Views: 0
  • J.jpg
    J.jpg
    3.1 KB · Views: 0
Thread owner
Finished and in the cabinet

Here as promised the last couple of pictures – looks pretty good, well pleased with the end results although I did doubt I would get it finished.

Not sure what’s next but I will post any update’s as and when.

Hope everyone had a good new year

All the best

Simon

View attachment 38171View attachment 38172View attachment 38173View attachment 38174View attachment 38175

View attachment 42277

View attachment 42278

View attachment 42279

View attachment 42280

View attachment 42281

View attachment 42282

View attachment 155303

View attachment 155304

View attachment 155305

View attachment 155306

View attachment 155307

View attachment 155308
 

Attachments

  • 1A.jpg
    1A.jpg
    2.5 KB · Views: 0
  • 1B.jpg
    1B.jpg
    2.1 KB · Views: 0
  • 1C.jpg
    1C.jpg
    2.2 KB · Views: 0
  • 1D.jpg
    1D.jpg
    2.5 KB · Views: 0
  • 1E.jpg
    1E.jpg
    2.2 KB · Views: 0
  • 1F.jpg
    1F.jpg
    2.9 KB · Views: 0
Really impressive action build Simon.

The rider, figures being my bug bear, is very well done.

Tony.
 
Simon what a great job you did on a really tough subject!!! 5stars from me !
 
Status
Not open for further replies.
Back
Top