Theme editor

Scale Model Shop

Airfix 1/72 Messerschmitt Bf110 E

flyjoe180

SMF Supporters
Joined
Jan 18, 2012
Messages
13,275
Reaction score
1,074
Points
113
1/3
Thread owner
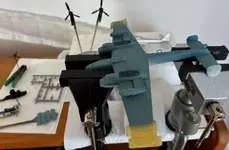
I've been working in the background on this, Airfix's 1/72 Messerschmitt Bf110E.
IMG_2360.jpg

IMG_2368.jpg
IMG_2369.jpg
IMG_2370.jpg


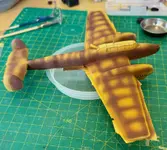
The kit is well proven, but doesn't come without faults. The most apparent is the engine nacelles extend over the trailing edge flaps. I corrected them with careful scraping and sanding.

Before correction:
IMG_2372.jpg

After correction:
IMG_2373.jpg
 
Thread owner
The lower wing half with the wheel bays installed. Airfix moulded the Bf110C and E kits with a Bf110G wing. I'm not that fussed about it, so it'll stay as is.
IMG_2374.jpg

There wasn't much to see in the cockpit, and I didn't add anything of significance. Not a lot can be seen once the canopy is on. Constructions happens quickly and without any problem. I used only a tiny amount of filler on the tail cone area, otherwise it was amazing.


RLM78 on. I added the lower aft fuselage antennae using thin brass tubing.
 
Thread owner
RLM79 on top. I started with a yellow and dark brown pre shade:

I was happy with the effect it gave me

IMG_2405.jpg

Of course things were going too well, so the tail wheel decided to snap. I thought about using the non-tropical tail wheel, but it is significantly smaller, so I drilled the damaged tropical shaft out and inserted a rod strut inside to add strength.
IMG_2407.jpg

Things moved on, and here we are today, waiting for the decals to dry. Some of them will require some treatment later. I'm going to add a wash to the underside, but the top I'm tempted to leave as is, due to those deep panel lines. Just some weathering perhaps, exhaust staining, etc.
IMG_2558.jpg
 
Thread owner
Thats looking really well Joe. Great job on spotting and correcting the faulty top wing nacelles. Great paint job as well.
Thanks Steve. Luckily the kit styrene is the softer type used by Airfix in the 2010s so it was relatively easy to reshape
 
Superb paintwork joe ! It looks fantastic , you were right about the weathering , ive often not bothered highlighting the panel lines if theyre quite deep , it can overdo it and look very false , cheers tony
 
Thread owner
Superb paintwork joe ! It looks fantastic , you were right about the weathering , ive often not bothered highlighting the panel lines if theyre quite deep , it can overdo it and look very false , cheers tony
Thanks Tony. This one is painted with old fashioned Humbrol enamels.

Liking that very much!
Steve
Cheers Steve!

Great job Joe, it looks great 👍

I agree with your thoughts on how you might weather it too.

Geoff.
Thanks Geoff!
 
That is a great finish. Fingers crossed for the removal of all those canopy masks - good double up as a greenhouse.
 
Thread owner
Some really subtle but effective paintwork and weathering on that Joe. Lovely.
Cheers Steve. Those panel lines really didn't need much more highlighting.

That is a great finish. Fingers crossed for the removal of all those canopy masks - good double up as a greenhouse.
Thank you Jim. Yes, that's going to be a tedious little job unmasking the canopy.


Today I got some exhaust staining on. Not far off completion, just a flat varnish and lights to go.
 
Thread owner
Flat varnish has been applied, the canopy unmasked, propellers fitted, and the wheels are on and currently setting. The landing light slots straight in to the wing leading edge and sits flush, a very nice fit from Airfix. In fact the whole kit has gone together very nicely, with the exception of the wheels which I found fiddly despite having lugs to ensure they sit flat. Nearly there, just the navigation lights to go.
IMG_2583.jpg
 
Back
Top