Theme editor

Scale Model Shop

"The Hole in the Doughnut"...Bastogne. December 1944

Status
Not open for further replies.

spanner570

New member
Joined
May 26, 2009
Messages
15,599
Reaction score
613
Points
0
1/3
Thread owner
I was looking for inspiration for this G.B. of Terry's, when I came across a great photo taken during the German Ardenne Offensive in December 1944.

I already have the 1/35 'hardware', so just need to concentrate on the diorama aspect of the build.

So here is the start. A simple wood/machinery, farm store building made from kitchen foil, coffee stirrers and scrap polystyrene.

View attachment 274392


View attachment 274393

O.K., I'm up and running!

Cheers all,
Ron
 

Attachments

  • P1160539.JPG
    P1160539.JPG
    1.9 KB · Views: 0
  • P1160540.JPG
    P1160540.JPG
    1.9 KB · Views: 0
Nice, definitely following this one Ron, looking forward to seeing more;)
 
nice start Ron,looking real good will be watching this one,I do real enjoy your builds,:D
 
Thread owner
Thanks for all your encouraging posts folks.

It's been freezing here for the last few days, but I've been able to dash out to the garage workshop and do a bit of work on the base, so here is some progress-


The base is a thick piece of polystyrene scrounged from our local tip. I don't like flat, level ground, so I set to with my hand saw and 'shaved' off some of the poly to give a dished effect to the soil.

View attachment 274472


The dipped field....
View attachment 274473


I intend having a small stream meandering across the model, so here I'm roughly cutting a scrap piece of poly to form the opposite side of the stream.
View attachment 274474


Next I stuck down my cardboard field.
View attachment 274475


Here is the main initial base work construction completed. I added a second layer on the right hand bank to raise it a bit and add a bit of interest, then I added a bit more field.
View attachment 274476


Whilst I still had a bit of feeling in my hands, I soaked the whole thing in watered down PVA. ready for the filling and shaping of the stream banks, etc.
View attachment 274477
Other makes of PVA are available.....:rolleyes:!

Next up. The filling, painting the base and adding more 'things' to it.

Thanks for looking in.

Ron
 

Attachments

  • DSC00963.JPG
    DSC00963.JPG
    2.4 KB · Views: 0
  • DSC00961.JPG
    DSC00961.JPG
    2.5 KB · Views: 0
  • DSC00955.JPG
    DSC00955.JPG
    3 KB · Views: 0
  • DSC00956.JPG
    DSC00956.JPG
    2.1 KB · Views: 0
  • DSC00953.JPG
    DSC00953.JPG
    2.4 KB · Views: 0
  • DSC00949.JPG
    DSC00949.JPG
    2.6 KB · Views: 0
At first with you saying it's so cold I thought the first photo was snow in your workshop Ron. :)
A cracking start Ron and love the idea for the field and stream. I'm now in watching.
 
Your usual great work Ron, good to see the corrugated ploughed field again!

Any chance of posting the photo you're basing it on?
 
Thread owner
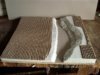
Ian - It does look like snow, doesn't it? It was certainly cold enough in the place.

Gavin - 'fraid it's the only way I can work. If it gets too fiddly or long winded, I get bored. I spent all my working life being self employed, every bit of work I did was on a price, so too slow or no work mean't less money for the wife! I guess the discipline is still with me.....not the wife bit though.

Patrick - I didn't note where I found the picture, but I do seem to remember it was taken during the Invasion of the Aleution Islands. My model will bear very little resemblance to the picture anyway, it just gave me that spark of inspiration.

Colin - I had to put in some water for my Cosford Buddy, didn't I!


Right, the weather is mild today, so I've made a good bit of progress.......


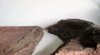
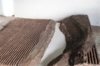
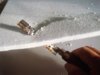
I used tile adhesive to start to get some contours on the polystyrene. Anything sloppy that goes hard can be used!
View attachment 274486


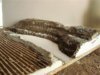
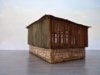
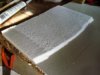
As sometimes happens at this sort of stage, something didn't look right. I decided to rip off the top ploughing, and increase the height of the right hand bank by one thickness of poly. I then re-laid the field. I know I keep mentioning this, but when making a diorama, no matter what size, never be afraid to rip things apart and start again
Here is the extra layer stuck on.
View attachment 274487


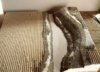
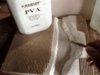
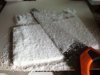
More adhesive to smooth things a bit. Still wet and shiny.
View attachment 274488


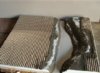
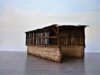
The adhesive sets in an hour, so this afternoon I was able to give the model it's first coat of paint ( Ordinary brown, water based fence paint)
View attachment 274489

View attachment 274490


See how, with a bit of prep. the undulations of the ploughing are starting to show? I think it looks better than a dead flat surface.
View attachment 274492

I think that's it for the basic base work. Now I can keep warm up in my den making all the bits and bobs. Not that I have any idea just what!

I hope you approve thus far, and thanks for looking in.

Ron
 

Attachments

  • DSC00971.JPG
    DSC00971.JPG
    1.7 KB · Views: 0
  • DSC00968.JPG
    DSC00968.JPG
    3 KB · Views: 0
  • DSC00967.JPG
    DSC00967.JPG
    2.8 KB · Views: 0
  • DSC00966.JPG
    DSC00966.JPG
    2.6 KB · Views: 0
  • DSC00964.JPG
    DSC00964.JPG
    2.5 KB · Views: 0
  • DSC00969.JPG
    DSC00969.JPG
    2.2 KB · Views: 0
Thread owner
Please accept that original comment as a compliment! No excuse is required from your end.o_O
I never thought of it as being anything else, and very nice too! Just bad phrasing on my part. 'BISH - BASH - BOSH' suits my style a treat.

.....and I love it so much, hell, I'm gonna get me a tee shirt with the words printed on!

Cheers Gavin.

Ron
 
Chair pulled up and coffee in the pot!
Bish-Bash-Bosh..... sounds like a good title for another diorama Ron "Bish - Bash - Bosch" lol
 
It's always nice to watch your ideas develop Ron. Got my comfy sofa set up and I'm watching ......
 
If I get some bits of junk and stick them together, I get a pile of junk. If you do it you get a great landscape. Really annoying lol :D
 
Status
Not open for further replies.
Back
Top