
You are using an out of date browser. It may not display this or other websites correctly.
You should upgrade or use an alternative browser.
You should upgrade or use an alternative browser.
Fleet Air Arm Corsair II - Tamiya 1/32
- Thread starter BarryW
- Start date
- Status
- Not open for further replies.
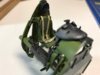
I worked on the interior with the silver pencil to make the detail pop a little more and add some additional scratched and chips.
here is what a couple of pieces looked like after - not sure how well it will show in the photos..
View attachment 287342
View attachment 287343
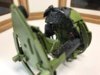
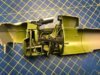
I then brought the various sub-assemblies together.
View attachment 287345
View attachment 287344
View attachment 287346
View attachment 287348
View attachment 287347
View attachment 287349
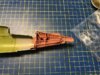
I tacked the fuselage halves together with tape and drops of Mr S Cement, keeping it well away from the tape.
View attachment 287351
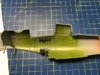
After 15 minutes I removed the tape and ran the Mr S Cement along the seam.
View attachment 287352
View attachment 287350
Tonight I will treat the seams.
here is what a couple of pieces looked like after - not sure how well it will show in the photos..
View attachment 287342
View attachment 287343
I then brought the various sub-assemblies together.
View attachment 287345
View attachment 287344
View attachment 287346
View attachment 287348
View attachment 287347
View attachment 287349
I tacked the fuselage halves together with tape and drops of Mr S Cement, keeping it well away from the tape.
View attachment 287351
After 15 minutes I removed the tape and ran the Mr S Cement along the seam.
View attachment 287352
View attachment 287350
Tonight I will treat the seams.
Attachments
-
 IMG_2554.JPG3.4 KB · Views: 0
 -
 IMG_2575.JPG3.2 KB · Views: 0
 -
 IMG_2556.JPG3.1 KB · Views: 0
 -
 IMG_2557.JPG3.1 KB · Views: 0
 -
 IMG_2558.JPG2.8 KB · Views: 0
 -
 IMG_2559.JPG2.8 KB · Views: 0
 -
 IMG_2560.JPG32.6 KB · Views: 0
 -
 IMG_2561.JPG3 KB · Views: 0
 -
 IMG_2571.JPG3.7 KB · Views: 0
 -
 IMG_2572.JPG3.3 KB · Views: 0
 -
 IMG_2573.JPG3.3 KB · Views: 0
G
Guest
Guest
Awesome work, Barry!! Looking forward to the "Rollout"!!!!
")
Last night I ran a bead of Mr Dissolved Putty along the seams, after half hour and it had shrunk back a bit, I did it again. Tonight I will sand it down and rescribe once I am happy with the join. Sometimes it needs two treatments in places. I love the Mr Dissolved Putty, it is very thin and very self-levelling and gets right into small cracks and joins. It is great for helping 'level' a rough surface, if you get glue finger marks for instance, a spot of this and a light sanding once cured is the best and easiest correction to make.
View attachment 287440
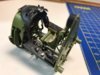
After that I spent what time I had left preparing some pieces and starting the engine build.
View attachment 287441
View attachment 287440
After that I spent what time I had left preparing some pieces and starting the engine build.
View attachment 287441
Attachments

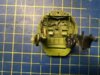
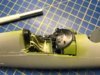
I treated the seams, attached some panels and the engine firewall.
I did have a small problem with the sanding stick slipping and grazing the front of the pit just behind where the windscreen will be. Easily rectified, I sanded it down and painted it black. You can see the dead flat black in the pic just after I painted it, handbrushed with Vallejo black. Tonight I will spray some semi-gloss varnish then dry brush. Pulled together a few more engine parts as well. The engine panels will be fixed in place so I will be painting that area with what will be seen in mind.
View attachment 287510
Attachments
G
Guest
Guest
Nice going, looking awesome!
G
Guest
Guest
Barry, what is your preferred method of applying Mr Dissolved Putty ?Last night I ran a bead of Mr Dissolved Putty along the seams, after half hour and it had shrunk back a bit, I did it again. Tonight I will sand it down and rescribe once I am happy with the join. Sometimes it needs two treatments in places. I love the Mr Dissolved Putty, it is very thin and very self-levelling and gets right into small cracks and joins. It is great for helping 'level' a rough surface, if you get glue finger marks for instance, a spot of this and a light sanding once cured is the best and easiest correction to make.
View attachment 287440
After that I spent what time I had left preparing some pieces and starting the engine build.
View attachment 287441
Watching this build with interest.
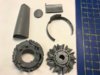
A quick update. I am working through some Sub assemblies before starting on the wings.
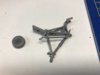
The tail wheel assembly
View attachment 287681
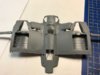
The stabs
View attachment 287682
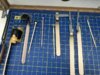
Parts ready for painting. I used Montez masks for the canopy rather than the supplied masks.
View attachment 287683
I am going to get a few more of these done before working on the wings.
The tail wheel assembly
View attachment 287681
The stabs
View attachment 287682
Parts ready for painting. I used Montez masks for the canopy rather than the supplied masks.
View attachment 287683
I am going to get a few more of these done before working on the wings.
Attachments

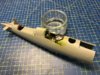
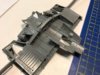
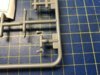
I am working on the wing centre section which alone has more parts than many models. Engineering and fit is outstanding.
Progress so far
View attachment 288031
View attachment 288032
There is still a fair bit to do on these before working on the outer wings.
Progress so far
View attachment 288031
View attachment 288032
There is still a fair bit to do on these before working on the outer wings.
Attachments
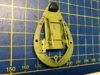
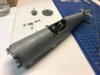
The main undercarraige build under way. It is a model in itself and with the various interconnecting elements it can be an engineering challenge for lesser model companies, Tamiya pull it off in style, perfect fit and sublime engineering. It is a pleasure to work on. The picture below was after an hour of work. It is ready to add to the ready to paint collection of assemblies.
View attachment 288151
The other to do tonight. Soon I will be moving on to clipping the wings to depict a FAA bird.
View attachment 288151
The other to do tonight. Soon I will be moving on to clipping the wings to depict a FAA bird.
Attachments
G
Guest
Guest
Enjoying watching your build BarryThe main undercarraige build under way. It is a model in itself and with the various interconnecting elements it can be an engineering challenge for lesser model companies, Tamiya pull it off in style, perfect fit and sublime engineering. It is a pleasure to work on. The picture below was after an hour of work. It is ready to add to the ready to paint collection of assemblies.
View attachment 288151
The other to do tonight. Soon I will be moving on to clipping the wings to depict a FAA bird.
A question
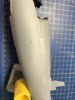
Looking at pictures of FAA Corsairs there seems to be an air scoop on the fuselage below the cockpit. Indeed there is a mark on the fuse where this air scoop appears.
This is what I mean
View attachment 288187
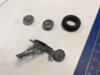
Looking at the sprues I found these among the parts not needed for this build.
View attachment 288186
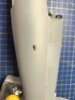
They look the right size and shape, indeed they position perfectly over the fuselage mark.
View attachment 288188
So does anyone know if I would be right to glue these into place?
Pity no clipped wing tips are included in the kit though! That is my next task......
Looking at pictures of FAA Corsairs there seems to be an air scoop on the fuselage below the cockpit. Indeed there is a mark on the fuse where this air scoop appears.
This is what I mean
View attachment 288187
Looking at the sprues I found these among the parts not needed for this build.
View attachment 288186
They look the right size and shape, indeed they position perfectly over the fuselage mark.
View attachment 288188
So does anyone know if I would be right to glue these into place?
Pity no clipped wing tips are included in the kit though! That is my next task......
Attachments
G
Guest
Guest
Mmmm, I'd guess not - this might help: http://aviationanoraks.co.uk/Archive/2014/2014_07_18 FAA Museum Vought Corsair/slides/IMG_3313.jpg
G
Guest
Guest
But then again... https://farm3.staticflickr.com/2509/4075954473_d87e4e7abb_b.jpg
https://images.duckduckgo.com/iu/?u...um%20Vought%20Corsair/slides/IMG_3309.jpg&f=1
Thing is, these don't look quite the same as yours.
https://images.duckduckgo.com/iu/?u...um%20Vought%20Corsair/slides/IMG_3309.jpg&f=1
Thing is, these don't look quite the same as yours.
G
Guest
Guest
Odd that there's no reference to them in the instructions though!
- Status
- Not open for further replies.
Legal Notice
scalemodelling.co.uk is a privately operated online discussion forum. All content posted by members reflects their own views and opinions and does not necessarily represent those of the forum owners or administrators. While reasonable efforts are made to moderate content, no responsibility is accepted for user-generated material. By using this site, you agree to comply with UK law and the forum rules.