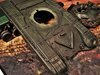
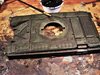
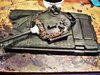
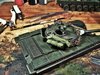
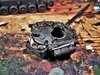
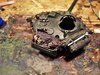
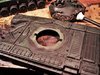
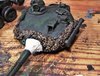
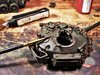
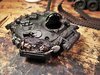
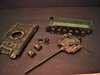
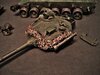
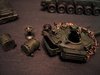
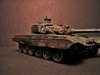
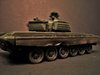
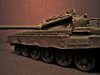
Here's what's happened thus far, slapped her together somewhat except for tracks and kept top and bottom hulls separate.
Prepped some "soft" stowage, left out big searchlight because I felt like it.
Banged up the fenders and mud guards a bit.
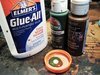
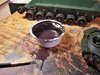
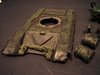
I use the cheapest acrylic water based craft paints.
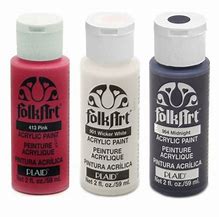
A mixture of 'pavement' and 'patio brick' colors are mixed 2/3 pavement to 1/3 brick and thinned with plain water.
Thin it to a point where it will flow into creases and so forth, but also to where its not opaque but translucent.
I apply it right over unpainted and untreated plastic, I usually apply three or four coats allowing each to dry first.
Dry time is usually about 20 to 30 minutes under a warm light bulb.
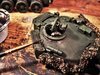
At time of pics she's had three coats of dark wash and one layering of forest green with a hint of leather.
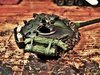
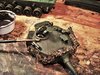
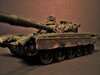
The method is "dry brushing"..... tedious I know :rolling:
I'll give a brief description, I use women's eye shadow brushes, they are soft and durable and CHEAP!
I put a miniscule amount of desired color on end of brush and dab most of that off on a paper towel, then on a piece of test plastic
I check to see effect and adjust accordingly, one wants to put the least amount of paint on as possible per application.
Technique, (mine anyway), is to very lightly, in a circular motion wisp brush along surfaces, you will see the effect.
After a couple of dry brushed coats (again dry time 15 minutes or so) I go back to the dark wash, and pick out detailing, this process of dry brushing and pin washing
is probably repeated a dozen times or so before it's all said and done (not counting extra detailing as with a diorama theme).
I'll try to show perceptible stages to completion and hopefully provide an understandable narration.
Thanks for looking in.
Cheers!...Jim
View attachment 308239
View attachment 308231View attachment 308232View attachment 308233View attachment 308234View attachment 308235View attachment 308236View attachment 308237View attachment 308238
Prepped some "soft" stowage, left out big searchlight because I felt like it.
Banged up the fenders and mud guards a bit.
I use the cheapest acrylic water based craft paints.
A mixture of 'pavement' and 'patio brick' colors are mixed 2/3 pavement to 1/3 brick and thinned with plain water.
Thin it to a point where it will flow into creases and so forth, but also to where its not opaque but translucent.
I apply it right over unpainted and untreated plastic, I usually apply three or four coats allowing each to dry first.
Dry time is usually about 20 to 30 minutes under a warm light bulb.
At time of pics she's had three coats of dark wash and one layering of forest green with a hint of leather.
The method is "dry brushing"..... tedious I know :rolling:
I'll give a brief description, I use women's eye shadow brushes, they are soft and durable and CHEAP!
I put a miniscule amount of desired color on end of brush and dab most of that off on a paper towel, then on a piece of test plastic
I check to see effect and adjust accordingly, one wants to put the least amount of paint on as possible per application.
Technique, (mine anyway), is to very lightly, in a circular motion wisp brush along surfaces, you will see the effect.
After a couple of dry brushed coats (again dry time 15 minutes or so) I go back to the dark wash, and pick out detailing, this process of dry brushing and pin washing
is probably repeated a dozen times or so before it's all said and done (not counting extra detailing as with a diorama theme).
I'll try to show perceptible stages to completion and hopefully provide an understandable narration.
Thanks for looking in.
Cheers!...Jim
View attachment 308239
View attachment 308231View attachment 308232View attachment 308233View attachment 308234View attachment 308235View attachment 308236View attachment 308237View attachment 308238
Attachments
-
 100_9525 (3).JPG2.4 KB · Views: 0
 -
 100_9526 (5).JPG2.7 KB · Views: 0
 -
 100_9527 (3).JPG2.4 KB · Views: 0
 -
 100_9528 (3).JPG2.5 KB · Views: 0
 -
 100_9529 (3).JPG2.3 KB · Views: 0
 -
 100_9530 (3).JPG2.1 KB · Views: 0
 -
 100_9531 (3).JPG2.1 KB · Views: 0
 -
 100_9532 (3).JPG2.3 KB · Views: 0
 -
 100_9435 (3).JPG4.1 KB · Views: 0