
You are using an out of date browser. It may not display this or other websites correctly.
You should upgrade or use an alternative browser.
You should upgrade or use an alternative browser.
Minicraft SS100 Jaguar (1/16th)
- Thread starter Jim R
- Start date
- Status
- Not open for further replies.
Thanks Scottie
Hi all
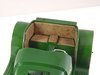
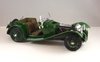
Some good progress - just very slow as every part of this kit requires extra work. Not really difficult, quite enjoyable in fact, but time consuming.
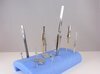
Fitted the lower body to the chassis. Stuck the radiator in place. Made some floor mats, partly to look good but mainly to cover the holes where the chassis joined the body. The steering column is typical of this kit - too long. The wheel would be touching the drivers chest so it will need to be shortened. Chromed all the bits and pieces. Finished the folded tonneau cover.
View attachment 312321
View attachment 312322
View attachment 312320
View attachment 312323
It is actually not too far from the finish line. (famous last words!!)
Jim
Hi all
Some good progress - just very slow as every part of this kit requires extra work. Not really difficult, quite enjoyable in fact, but time consuming.
Fitted the lower body to the chassis. Stuck the radiator in place. Made some floor mats, partly to look good but mainly to cover the holes where the chassis joined the body. The steering column is typical of this kit - too long. The wheel would be touching the drivers chest so it will need to be shortened. Chromed all the bits and pieces. Finished the folded tonneau cover.
View attachment 312321
View attachment 312322
View attachment 312320
View attachment 312323
It is actually not too far from the finish line. (famous last words!!)
Jim
Attachments
G
Guest
Guest
Jim.
Sad to read of the loss of Belle.
John .
Sad to read of the loss of Belle.
John .
Hi all
Thanks for your kind comments regarding Belle.
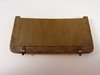
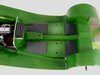
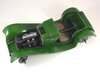
Really getting there now :thumb2: Upper body fitted. Dashboard and other bits and pieces glued in place. Home made rear pads fixed. I am not sure whether those rear pads were fitted to original vehicles or are just part of restoration. They do seem quite common on refurbished cars.
View attachment 312780
View attachment 312781
View attachment 312782
Had a quick look at how the bonnet fits. Looks like there may be problems so even at this stage it may end up as a shelf queen :sad:
Jim
Thanks for your kind comments regarding Belle.
Really getting there now :thumb2: Upper body fitted. Dashboard and other bits and pieces glued in place. Home made rear pads fixed. I am not sure whether those rear pads were fitted to original vehicles or are just part of restoration. They do seem quite common on refurbished cars.
View attachment 312780
View attachment 312781
View attachment 312782
Had a quick look at how the bonnet fits. Looks like there may be problems so even at this stage it may end up as a shelf queen :sad:
Jim
Attachments
G
Guest
Guest
What !
Jim , its not like you. Its gone from strenght to strenght , keep going mate its looking really good.
John.
Jim , its not like you. Its gone from strenght to strenght , keep going mate its looking really good.
John.
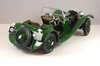
Hi all
Ian and John - thanks for the encouraging words.
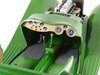
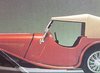
So I slept on it and did some thinking. Not something I do much!! :smiling4: Now the 1930s SS100 had a 4 piece bonnet which fitted snuggly between the chrome radiator and the scuttle. As in this reference photo.
View attachment 312838
The kit, have I mentioned that it is hopeless, provides a coil of thin, black plastic tube. This is fitted between the mudguards and the body as a seal. The real car had a similar seal there in the same way. The kit also tells you to run a length of this tube across the scuttle as in this picture from the side of the box.
View attachment 312837
Wrong, wrong, wrong!! That is why the bonnet sections don't fit without the tube. They are too short. Anyway I have used thin styrene to extend the front of the bonnet pieces. I wanted as smooth a join as possible so painted on Mr Surfacer 500 and sanded it back. Hopefully under primer and the green the join shouldn't be too noticeable. And they fit :smiling:. The white blob is a replacement rivet 'cause I got carried away and sanded off the original :worried:
View attachment 312834
View attachment 312835
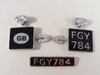
I have also fitted the lights etc to the front and painted the number plates. Also made a GB decal for the plate on the other side. I have seen that in a few reference photos.
View attachment 312832
View attachment 312833
View attachment 312836
So we are another step closer to a finished model. Thanks for your continued support.
Jim
Ian and John - thanks for the encouraging words.
So I slept on it and did some thinking. Not something I do much!! :smiling4: Now the 1930s SS100 had a 4 piece bonnet which fitted snuggly between the chrome radiator and the scuttle. As in this reference photo.
View attachment 312838
The kit, have I mentioned that it is hopeless, provides a coil of thin, black plastic tube. This is fitted between the mudguards and the body as a seal. The real car had a similar seal there in the same way. The kit also tells you to run a length of this tube across the scuttle as in this picture from the side of the box.
View attachment 312837
Wrong, wrong, wrong!! That is why the bonnet sections don't fit without the tube. They are too short. Anyway I have used thin styrene to extend the front of the bonnet pieces. I wanted as smooth a join as possible so painted on Mr Surfacer 500 and sanded it back. Hopefully under primer and the green the join shouldn't be too noticeable. And they fit :smiling:. The white blob is a replacement rivet 'cause I got carried away and sanded off the original :worried:
View attachment 312834
View attachment 312835
I have also fitted the lights etc to the front and painted the number plates. Also made a GB decal for the plate on the other side. I have seen that in a few reference photos.
View attachment 312832
View attachment 312833
View attachment 312836
So we are another step closer to a finished model. Thanks for your continued support.
Jim
Attachments

1/3
That is starting to look really good now....love the low angle front shot especially.
Cheers
Tim
Cheers
Tim
G
Guest
Guest
Jim .
Good for you, great idea to do the bonnet like that ,those number plates look the business as well .:thumb2::smiling:
John .
Good for you, great idea to do the bonnet like that ,those number plates look the business as well .:thumb2::smiling:
John .
G
Guest
Guest
Hi Jim very nice work on the bonnet modification, almost there, keep it going.
Pete.
Pete.
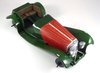
Hi all
Thanks for your kind words :thumb2:
Simon it is a sink mark :worried: More noticeable in the photo that in reality. I should deal with it but I think it will be left. Didn't even notice it until I saw the photo.
The bonnet fits. Just dry fitted although the two top sections are tacked together and the centre hinge is fixed. The ends still need sorting.
View attachment 312969
Jim
Attachments
G
Guest
Guest
Jim .
That's great.:thumb2: nice fit.
John.
That's great.:thumb2: nice fit.
John.
Gentlemen you are too kind - but I do appreciate your comments.
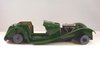
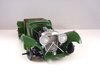
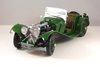
Right folks - drum role and applause from the cheap seats - 'tis done :smiling5: Bonnet still to add but it is painted. Just needs a long time to dry being enamel.
View attachment 313229
View attachment 313230
View attachment 313231
The kit is best described as "an enjoyable challenge" but don't expect too much. I will stuck some more piccies on the Completed Civilian Vehicle forum in a day or so.
Thanks for all your support - it really did keep me going.
Jim
Attachments
- Status
- Not open for further replies.
Legal Notice
scalemodelling.co.uk is a privately operated online discussion forum. All content posted by members reflects their own views and opinions and does not necessarily represent those of the forum owners or administrators. While reasonable efforts are made to moderate content, no responsibility is accepted for user-generated material. By using this site, you agree to comply with UK law and the forum rules.
Currently on our website
Threads
36,587
Messages
699,753
Members
2,564
Latest member
Cat tree creator