
You are using an out of date browser. It may not display this or other websites correctly.
You should upgrade or use an alternative browser.
You should upgrade or use an alternative browser.
Dave Ward's 1/48 Revell/ICM Mig-25 RBT Foxbat 'B'
- Thread starter Dave Ward
- Start date
- Status
- Not open for further replies.
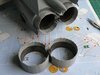
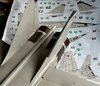
I decided to assemble the exhaust 'petals' - the inner petals onto the aircraft, and the outer petals to the final fuselage piece.......................
View attachment 314519
This was to allow me to airbrush the nozzles - WRONG
I tried to dry fit the outer petal assembly over the inner petals - not a chance. I had to remove the carefully fitted inner petals, then re-attach them after assembling the outers to the airframe - it just goes to show that the instructions are sometimes in that sequence for a reason
View attachment 314520
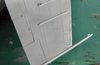
Onto tricky masking for the gunmetal rear fuselage section............
Dave
View attachment 314519
This was to allow me to airbrush the nozzles - WRONG
I tried to dry fit the outer petal assembly over the inner petals - not a chance. I had to remove the carefully fitted inner petals, then re-attach them after assembling the outers to the airframe - it just goes to show that the instructions are sometimes in that sequence for a reason
View attachment 314520
Onto tricky masking for the gunmetal rear fuselage section............
Dave
Attachments

Gunmetal sprayed, and masking removed. The Vallejo Gunmetal Grey was not very good to spray, it seemed to cover poorly, and when I peeled the masking off, the gunmetal had crept under! - so more touching up will be needed - so much for my careful masking
View attachment 314532View attachment 314533
When all the touching up is completed, I'll seal all in with a coat of varnish, then there are a lot of decals to add..................
Dave
View attachment 314532View attachment 314533
When all the touching up is completed, I'll seal all in with a coat of varnish, then there are a lot of decals to add..................
Dave
Attachments
- Joined
- Apr 27, 2018
- Messages
- 15,043
1/3
Dave,
Coming on very nicely.
Coming on very nicely.
Hi Dave after masking I usually spray the same colour again over the masking tape, so if there is a small gap the paint will fill it. That usually stops any bleed of whatever colour your using next.Gunmetal sprayed, and masking removed. The Vallejo Gunmetal Grey was not very good to spray, it seemed to cover poorly, and when I peeled the masking off, the gunmetal had crept under! - so more touching up will be needed - so much for my careful masking
View attachment 314532View attachment 314533
When all the touching up is completed, I'll seal all in with a coat of varnish, then there are a lot of decals to add..................
Dave
Nice work so far by the way.
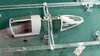
All sealed in with gloss varnish - rather than masking the rear of the fuselage, I used Bare-Metal Foil for the section in front of the petals
View attachment 314601
Canopy painted - no masking, just holding my breath......... ( needs a little touch up )View attachment 314599
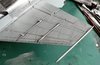
I decided to do the panel washes before adding the decals, here's the wing underside without a washView attachment 314600
And with a light panel wash..............
View attachment 314602
I find it best to do smallish sections, then remove excess wash with kitchen towel, wait too long, and it can take a bit of effort to clean off, too early, and you can wipe it clean out of the panel lines.
Dave
View attachment 314601
Canopy painted - no masking, just holding my breath......... ( needs a little touch up )View attachment 314599
I decided to do the panel washes before adding the decals, here's the wing underside without a washView attachment 314600
And with a light panel wash..............
View attachment 314602
I find it best to do smallish sections, then remove excess wash with kitchen towel, wait too long, and it can take a bit of effort to clean off, too early, and you can wipe it clean out of the panel lines.
Dave
Attachments
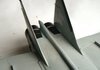
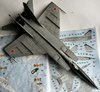
Rapidly approaching the finish line, a few major decals added to get the positions right - View attachment 314738View attachment 314739
The canopies are still loose, so I can give a satin overspray to seal the decals. I'm not sure about how much weathering to go for - the majority of photos show pristine examples, or really sad looking museum exhibits!
Dave
The canopies are still loose, so I can give a satin overspray to seal the decals. I'm not sure about how much weathering to go for - the majority of photos show pristine examples, or really sad looking museum exhibits!
Dave
Attachments

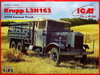
As I approach a finish on this monster, I've decided on my next build, for the Forum GB: Wheeled Military LorryView attachment 314899
I've made a fair few of the ICM trucks, and enjoyed them. They're not 'shake the box' builds, and can be quite challenging.
Construction will start on completion of the Foxbat
Dave
I've made a fair few of the ICM trucks, and enjoyed them. They're not 'shake the box' builds, and can be quite challenging.
Construction will start on completion of the Foxbat
Dave
Attachments
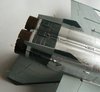
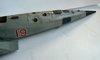
Undercarriage and wheels finally added.............................View attachment 314957View attachment 314956
The reason for the Mig-25 RBT - camera ports in the nose ( awaiting clear parts ) The grey panels were made by painting clear decal sheet, rather than trying to hand paint/mask
View attachment 314955
Undercarriage doors to add ( & those camera ports ) before a final coat of satin varnish. There are still a number of aerials & sensors to add - very fragile!
Dave
Attachments


- Status
- Not open for further replies.
Legal Notice
scalemodelling.co.uk is a privately operated online discussion forum. All content posted by members reflects their own views and opinions and does not necessarily represent those of the forum owners or administrators. While reasonable efforts are made to moderate content, no responsibility is accepted for user-generated material. By using this site, you agree to comply with UK law and the forum rules.