
You are using an out of date browser. It may not display this or other websites correctly.
You should upgrade or use an alternative browser.
You should upgrade or use an alternative browser.
- Status
- Not open for further replies.
G
Guest
Guest
That's what she looks like after your meds
Hi Mick.:smiling3: .....welcome to a " Rabble " build. Some times, but not often we talk about the build, normally it degenerates into a mess.
.. I'm really looking forward to this... will it be a small diorama? on rest or in action?
Greg....... I'm going to do a street scene, the Su will be inside a damaged building facing out wards. Snow on the ground, so some winter infantry in the building as snippers. Don't want to make it too big size wise. Plenty of building damage ......... bricks esp .:smiling:
I see the rabble are getting a bit over excited!
Still, at least the SU-76 is going together nicely, despite John's best efforts gluing his fingers together (we've all done that!)
Thanks Graeme ! ..........Its so funny when it happens, Catch All apron on so can't move far. Trying to reach the debonda, which of course is not where it should be. The rest is as you imagine.
Hope your feeling better John,
hoping for an update soon sir:smiling4:
Yes thanks Si...... thanks for your pm.:smiling:
Well having had a snorter of a damned cold I didn't feel like doing anything until to day model wise. Had a couple of days in my pit , drank loads of tea, came on here, did U tube. Thank goodness for tablets, at least you can stay in touch with the forum.
This afternoon I went into the cave, nice and warm and set too. The gun was finished , not easy as some of the parts were so small. and it moves as well !
View attachment 320927
That sight was a s*d kept falling off, I've now started to use a small paint brush to apply the TXT as Jim had mentioned. I still manage to get a few over glues, but keep reminding my self that its going to be in an action scene. The thing is I might put too little glue on only to have the thing fall apart later !:surprised:
Now the instructions for the PE, who writes these :thinking: I 'm going to show what I mean.
View attachment 320928
Starts with a ? well that threw me straight away. Does the part No 7 go on the outside of the filter box, or slot inside . should the existing fins be removed there's no mention of removing any bits and I can see where the blue lines point. Needless to say I now have several pieces of PE to go along with the ammo racks into the spares box.
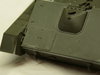
I've used PE where I can, even managed to do the bends for the mountings above the exhausts, and not too much CA over spill .
View attachment 320929
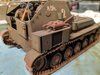
Photo of the gun in place, but not fixed, I shall paint the model first as the gun will get in the way if I fir it now, this also applies to the tools, I much prefer to paint and then fix. Would have done that with the exhausts, but one has a cover over the deck mounting point.
View attachment 320935
Slight bend in that mesh, it looked ok, very little glue applied, then it sprung up at one end. Out with a little more CA.
Right handt rack guard went on after some trimming at the rear , but the front where I had the problem earlier with the front plate I had to trim the plate itself.
View attachment 320936
You can just see the triangular shaped bracket, just to the top. Iv'e just noticed that the lower section of the guard needs regluing as well.
Quite pleased with progress, not a lot more to do on the model, the suspension, wheels etc. and then I shall start on the Fruils. No more plastic tracks , or rubber If I can help it. Ive ordered some RB ammo, the figures have arrived and I think I have enough foam board in stock. That part I'm really looking fwd to.
Right of to cook, comments abuse all welcome
Thanks for looking in.
Dzhon.
.
Attachments

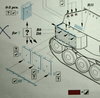


John, the ? marks denote that the PE can go over the filter, or hang off the back of the box.
I went with two installed and one unused on the back.
View attachment 320960
I went with two installed and one unused on the back.
View attachment 320960
Attachments
G
Guest
Guest
Thanks Bob....... That's great and looks good too. Think I can manage something like that. Top man.John, the ? marks denote that the PE can go over the filter, or hang off the back of the box.
I went with two installed and one unused on the back.
View attachment 320960
John.
G
Guest
Guest
Thanks Paul.. Still full of infection, p*****d off as feel worse now that Saturday.Shaping up nicely Dzohn. PaulE

Hope you were looking at my efforts and not Bob's when you kindly say that .:smiling:Very nice mate!! I see Bob has been a great help for you on this one. Looking forward to seeing the next instalment. Keep it comin mate
Thanks John..... and welcome.just gone through your thread bud some lovely work look forward to seeing more
Hi John
I like the triangular extra small.
Jim
Hi mate....thank you, damned cold has gone onto my chest now, so have broken out the steroids and antibiotics that I have ready.
Evening, as I said to Paul and Jim the standard cold has gone onto my chest. Being a long time asthmatic I have an emergency supply of medicine. Like most things early treatment of the infection is the thing. Having a great Doctor who has given me the treatment rather than having to turn out and attempt to see them at the surgery is a godsend. Feel ok at times, but the tight chest will soon go,along with all the crap I'm coughing up.
I did manage a couple of hr's this afternoon. Did the side plates Bob has kindly put me right over. Cut off the front and rear mud guards ! And made some pewter ones, complete with lip. Being determined to crack this PE lark I've continued fitting so small brkts for the tow cable. Trying out methods of applying the CA as suggested.
Only have the thin stuff at the moment, was going to try the Gator glue that Jim suggested , but John is out of stock.
Hopefully tomorrow the meds will kick in and I will feel like attempting some photos.
Thanks for looking in.
John.
G
Guest
Guest
Hi John sorry to hear you're not well start those emergency med's now, I started mine Friday so I can sympathise with what you have got, not good, nothing like 27 tablets for breakfast :tired: keep your chin up.
Pete
sorry to hear you're not well start those emergency med's now, I started mine Friday so I can sympathise with what you have got, not good, nothing like 27 tablets for breakfast :tired: keep your chin up.Pete
G
Guest
Guest
John,
Not you as well, I am going through kitchen towel as though it is going out of fashion.... Question, are you allowed to add a dose of JD to Lemsip? If not then I will cut out the Lemsip, as it appears that it is that, making me fall over.
Get well soon,
Cheers, Mike.
Not you as well, I am going through kitchen towel as though it is going out of fashion.... Question, are you allowed to add a dose of JD to Lemsip? If not then I will cut out the Lemsip, as it appears that it is that, making me fall over.
Get well soon,
Cheers, Mike.
Get well soon my friend you are in my prayers
G
Guest
Guest
Thank you one and all .
Paul ,Simon , Rick , Pete, Greg, Mike and Lee
Feeling a lot better, the meds have kicked in. Not
done much if any bench work, spent some Nerd time researching Russian buildings as you do .Ceiling heights, roofing degrees and the like. Being a Nerd is so much fun .:smiling2::smiling2::smiling2::smiling2:
Done a chart to enable a quick ref to building stuff, saves time looking for dimensions later when your about to cut some board.
Normal service should be resumed shortly
Dzhon
Stalingrad Building Materials.
- Status
- Not open for further replies.
Legal Notice
scalemodelling.co.uk is a privately operated online discussion forum. All content posted by members reflects their own views and opinions and does not necessarily represent those of the forum owners or administrators. While reasonable efforts are made to moderate content, no responsibility is accepted for user-generated material. By using this site, you agree to comply with UK law and the forum rules.