Barry. looks nice Hope you don’t bin it if you run into another problem I’m with the others like to see it finished. You did a great job on the cockpit too

You are using an out of date browser. It may not display this or other websites correctly.
You should upgrade or use an alternative browser.
You should upgrade or use an alternative browser.
Trumpeter F/A-18E Super Hornet 1/32
- Thread starter BarryW
- Start date
Not likely to have another real issue now except for decals and, if so, I will just work around it as I have previously. It really only was that fuselage fit issue which, if not corrected, would have been fatal. Brute force did the trick.Barry. looks nice Hope you don’t bin it if you run into another problem I’m with the others like to see it finished. You did a great job on the cockpit too
Progress really being made, moving into my favourite part of a build...
I have treated and sanded the flaws I identified. Mostly it was around the front fuselage joins. MRP Primer feathers beautifully...


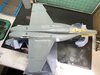
I then re-primed those areas and sprayed the underside, Light Ghost Grey which is much too close to the primer colour than I like. It does feel unnatural to me to spray such an even clean finish rather than make this the first weathering stage from black basing. The photo below is just after applying a mist coat of MLT to provide the best possible finish, taken while still drying.

I have also been doing some detail painting...
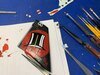
Bombs and missiles. The copper is the AKI wax metallisers and I will have to do a second coat tonight. I will remove the masking once it is dry, not before. I anticipate a little clean up being needed.

A bit more detail added to the front u/c

The 'expanded' photo does not look right to me. However there is still a spot of work needed on that, the rubber wheels need a clean up before some earth pigment gets carefully drybrushed on. Not to replicate dirt so much, as this was a carrier aircraft, but to make the tyres look more authentic.
The red edges added to the u/c door.

I have treated and sanded the flaws I identified. Mostly it was around the front fuselage joins. MRP Primer feathers beautifully...
I then re-primed those areas and sprayed the underside, Light Ghost Grey which is much too close to the primer colour than I like. It does feel unnatural to me to spray such an even clean finish rather than make this the first weathering stage from black basing. The photo below is just after applying a mist coat of MLT to provide the best possible finish, taken while still drying.
I have also been doing some detail painting...
Bombs and missiles. The copper is the AKI wax metallisers and I will have to do a second coat tonight. I will remove the masking once it is dry, not before. I anticipate a little clean up being needed.
A bit more detail added to the front u/c
The 'expanded' photo does not look right to me. However there is still a spot of work needed on that, the rubber wheels need a clean up before some earth pigment gets carefully drybrushed on. Not to replicate dirt so much, as this was a carrier aircraft, but to make the tyres look more authentic.
The red edges added to the u/c door.
VERY nice job Barry on that front undercart an there is even the carrier landin light as on the real aircraft I cant really see what pupose they serve but they look good as I first noticed these when lookin round a real phantom nose gear in duxford museum :thumb2:
chris
chris
I sneaked to the bench to lay down the Dark Ghost Grey. Here it is, picture taken while the MLT mist coat is drying.
View attachment 389439
I will be masking up for the black tonight.
View attachment 389439
I will be masking up for the black tonight.
Attachments


So, on to the dreaded decals.
I started with what is usually the main problem area - the large tail decal. So far these have been a disaster for me on modern jets. Fortunately this set's main big decal is a fairly simple shape, move it into position and the whole decal moves at the same time eliminating the major problem with complex shapes where if you move it part just crinkles and splinters....
I managed to position this without problems but it is a bit thick and I cannot get it bedded in down and around the detail. I cracked a bit in one area while I tried to tamp it in but not too badly. All I could do is take out my strongest decal solution, Daco, and use lashing of it.

Later I will see whether it worked and if it need more treatments.
These decals are not too bad at all where they are not going over a lot of raised detail...

I used the Trumpy ones for the stores

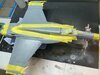
The instructions for the selected aircraft say that a walkway should be on both shoulders and to use the kit decals. The problem is that there is only a walkway for the left shoulder. So I masked up to paint the right shoulder.

A you can see its not bad but I do need to adjust the rearward 'sweep' which should not be an issue, a little bit of masking to change the angles will do it.
I started with what is usually the main problem area - the large tail decal. So far these have been a disaster for me on modern jets. Fortunately this set's main big decal is a fairly simple shape, move it into position and the whole decal moves at the same time eliminating the major problem with complex shapes where if you move it part just crinkles and splinters....
I managed to position this without problems but it is a bit thick and I cannot get it bedded in down and around the detail. I cracked a bit in one area while I tried to tamp it in but not too badly. All I could do is take out my strongest decal solution, Daco, and use lashing of it.
Later I will see whether it worked and if it need more treatments.
These decals are not too bad at all where they are not going over a lot of raised detail...
I used the Trumpy ones for the stores
The instructions for the selected aircraft say that a walkway should be on both shoulders and to use the kit decals. The problem is that there is only a walkway for the left shoulder. So I masked up to paint the right shoulder.
A you can see its not bad but I do need to adjust the rearward 'sweep' which should not be an issue, a little bit of masking to change the angles will do it.
I got to the bench for 20 minutes this morning and found the decal solution had dried overnight and it looked like this:

Err, well, wrinkled and pretty awful.... But, I think that this is actually hopefull...
So, I went around pricking the decal in a number of places with a knife....
The another dab of strong decal solution.

Lets see what it looks like tonight.... It may need a few more treatments plus a varnish before it is acceptable. But I have a feeling it will work out.
I masked up and did a correction to the walk area on the starboard wing.

The picture is at a slight angle that makes the starboard patch look a spot larger than it is. Well it looks about right now in real life and I am rather pleased with it.
Err, well, wrinkled and pretty awful.... But, I think that this is actually hopefull...
So, I went around pricking the decal in a number of places with a knife....
The another dab of strong decal solution.
Lets see what it looks like tonight.... It may need a few more treatments plus a varnish before it is acceptable. But I have a feeling it will work out.
I masked up and did a correction to the walk area on the starboard wing.
The picture is at a slight angle that makes the starboard patch look a spot larger than it is. Well it looks about right now in real life and I am rather pleased with it.
HI Barry lookin good as you say a few small wrinkes but at least it has'nt all splintered but the raised bit on the tail in the location marker light isn't it well when I do mine Im goin to do like I did on my 1/48 super hornet an that's measure on the tail for the size an location of said raised light an then measure on the decal an gently cut a slot in the decal with a scapel blade before I drop it in the water so when applyin it to the tail the decal will give an let it seat over the raised light but your build is comin on great an its nice a colurfull brilliant :thumb2:
chris
chris
The fin on the left is after the third use of decal solution. As you can see it is progressing but I will try a couple more doses to see if I can reduce the wrinkles a bit more. The one on the right is after just one application of solution, a good few more to do for that one. There will be some touching up to do and I have some ideas for that.

I really hate decals, but these Fightertown ones are not bad at all and are the best set that I have used on a modern jet. I have just finished the main airframe and had few issues. Little or no splintering and they react well to solution.


There will be a lot more work on the fins of course, touching up and more decals to apply but we will get there and under some varnish I think they will look pretty good.
I really hate decals, but these Fightertown ones are not bad at all and are the best set that I have used on a modern jet. I have just finished the main airframe and had few issues. Little or no splintering and they react well to solution.
There will be a lot more work on the fins of course, touching up and more decals to apply but we will get there and under some varnish I think they will look pretty good.
HI Barry I think its comin up great an the tailfin decals look very acceptable an its great to see a nice colourfull layout on the plane as they aernt all done in this drab grey decalls VERY NICE BUILD
:thumb2:
chris
:thumb2:
chris


HI Barry fantastic work an where is the spotlight fitted on the tail as im readind on the orange bit behind the tail ?I have finished the fins
here is the outside...
the innerside.
as you can see I have some touch up to do with paint and then a varnish coat or two and they will look all hunky dory....
chris
Await final fitting. Painted clear red and ready.HI Barry fantastic work an where is the spotlight fitted on the tail as im readind on the orange bit behind the tail ?
chris
I have just had half hour at the bench.
I have some spare decals that I can cut up to use to patch area where they cracked on the fin.
On some areas I will need to now some paint to get a shade as close as possible to finish the touching up but using these decal patches deals with the more prominent flaws.
I applied some solution so hopefully they will blend in when dry.
View attachment 390131
The back and white will be easily matched with paint.
Some varnishes and then on to the next stage.
Attachments
Legal Notice
scalemodelling.co.uk is a privately operated online discussion forum. All content posted by members reflects their own views and opinions and does not necessarily represent those of the forum owners or administrators. While reasonable efforts are made to moderate content, no responsibility is accepted for user-generated material. By using this site, you agree to comply with UK law and the forum rules.