Theme editor

Scale Model Shop

Tamiya British 3/4 Ton Ambulance Rover 7.

prichrd1

New member
Joined
Apr 27, 2018
Messages
694
Reaction score
2
Points
0
Location
Conwy
1/3
Thread owner
Whilst rummaging through the stash, at the back of my cupboard I cam across this rather tatty box!!

Box.JPG

Immediately brought back memories of the one I built some 45 ish years ago, and promptly made a right hash of! :flushed:

Judging by the state of this box I think it's the oldest kit in the stash - there's not even a bar code on the box!!!!
Plus the cardboard muncher has been at it !! :anguished: So I thought maybe it's time to build this classic, before it ends up completely munched.
View attachment 399740

Initially released back in the mid 70's - Tamiya Model No 82, then MM182 (Which this one has on the box), it has gone through some re-boxing and re-numbering over the years, new parts etc.

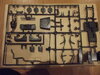
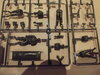
The parts inside were still stapled - yes - stapled into the plastic bags, along with the decals. There are three main sprue's in very shiny hard, dark green plastic for the vehicle parts:-

View attachment 399741 View attachment 399742 View attachment 399743

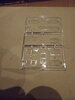
One slightly softer green sprue with the stretcher party & casualty, a clear sprue with the glazing and some slightly yellowing stickers. Plus the "very easy to follow" Tamiya instruction pages.

View attachment 399744 View attachment 399745 View attachment 399746 View attachment 399747

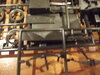
One thing I did notice is that this kit like so many other kits, it shares a sprue with it's more famous "pink" brother!!
View attachment 399748
(Sorry for the blurrrrr - it does say "Pink Panther" on the tab :flushed:)

Without boring everyone to sleep with the history etc of Land Rovers and associated vehicles - I did a little research on 'tinternet for Land Rover Ambulances and found this excellent site:-

Katy

Also found another site which is devoted to ex-military Land Rover's but has useful information on vehicle markings for all types of military vehicles:-

EMLRA

So as the saying goes - "let the fun begin" - finger painting by numbers - :flushed::smiling5::smiling5:

Paul.
:smiling5:
 

Attachments

  • Corner.JPG
    Corner.JPG
    2.6 KB · Views: 1
  • A.JPG
    A.JPG
    3.8 KB · Views: 1
  • B.JPG
    B.JPG
    3.6 KB · Views: 0
  • C.JPG
    C.JPG
    3.9 KB · Views: 0
  • Crew.JPG
    Crew.JPG
    3.8 KB · Views: 0
  • Clear.JPG
    Clear.JPG
    1.9 KB · Views: 0
  • Stickers.JPG
    Stickers.JPG
    2.4 KB · Views: 0
  • Instructions.JPG
    Instructions.JPG
    2.7 KB · Views: 0
  • PinkP.JPG
    PinkP.JPG
    3.9 KB · Views: 0
Thread owner
Also found this one for LRDG fans:-

LRDG

It may be of use to some one!!

Paul.
:smiling5:
 
Oh I'm in please, remember the real ones back in the late 60's early 70' s
 
Hi Paul
A real golden oldie. A great subject and enough to build into a nice little dio. Even if the decals have had it basic crosses should be easy enough to mask and paint.
Jim
 
Thread owner
Oh I'm in please

Welcome aboard John, yes I do remember the "real" Land Rovers, but sadly don't see so many around.
Errm can you move to the front please John, so I can keep an eye on you - and no - you can't take yer wellies off!!!! :flushed::smiling5::smiling5:;)

A great subject and enough to build into a nice little dio

Jim,
Don't expect a miracle - (Dio that is!! :flushed: ). Not one of my strong points.

Pondering about the final colour at the moment.

Should it be green/black as per the instructions, all green - as I've seen in loads of pictures, or
do I do a desert scheme sand/dark green ?

I'm tempted by the last one - only ever seen one picture of a Landy Ambi in desert scheme!!!!

Paul.
:anguished:
 
Hi Paul, quite safe boots are super glued on !
The ones I remember we're just green .
 
Thread owner
Here you go John - just for you - borrowed it from Alamy!! :flushed: :flushed:


B2DJCB.jpg

Not the same model of Land Rover - but I was thinking green instead of brown!!

View attachment 399806

This kind of green - but not as much!! ;)

Paul.
:smiling2:
 

Attachments

  • camoambulance.jpg
    camoambulance.jpg
    3.3 KB · Views: 0
Yes would look better than the one above, that No Plate doesn't look very military issue to me either.
 
Seat front and centre for this one Paul. Looking forward to seeing how this old classic goes together. Good luck my friend

Here is a link that you may like HERE
 
I'll pull up a chair Paul, I have on my drive a 1973 Series 3 88", not too many around now, but there are a few in my area. The sand & brown one in the photo looks to be a Stage 1 V8, still a leaf sprung series but with Rover V8 making progess a bit more than leisurely, but I've never seen one with an ambulance body. You could go for BATUS camouflage, green & sand. Look forward to seeing how you do this one.
 
Thread owner
that No Plate doesn't look very military issue to me either
Think that one is taken at a "military show" somewhere, and is obviously someones personal interpretation!! ;)

Seat front and centre for this one Paul.
Welcome aboard Steve, just watch 453 - he's got his hands in his pockets again!! :flushed::flushed:
That article is all about the "Pulse" vehicle, interesting read, but one thing that did stand out was that one of the reasons the Pinzgauer was rejected as a replacement was because of the suspension!!

You could go for BATUS camouflage, green & sand.
Graeme, welcome along! ;)
I presume you're Landy is green??? (Please correct me if I'm wrong!! :smiling2: (a good slap usually works :thumb2:)
Most of the ex-military ones I've seen at shows etc are always NATO or Deep Bronze Green!! :smiling2:
The BATUS scheme certainly looks good - I've seen some larger vehicles and heavy armor painted in this scheme at various shows over the years.

Paul.
:smiling2:
 
Thread owner
Sorry for the delay in updating, life & technology getting in the way!! :sad:
I actually started this build on Wednesday afternoon, took pictures, then loaded them onto me laptop. :smiling2:

Thursday laptop screen died, laptop working just no picture on the screen !! EEEK!!!! :poop::flushed::flushed: :thinking:
Eventually got the thing going again :cold-sweat:

Then my wife informed me that the youngest (27 y/o) !!!! Is re-arranging his room!!!! Not more DIY surely?
:loudly-crying: I'll never get me Landy finished at this rate !

As it turns out today - it's only to cost a new bed ! Phew!!!! ;):surprised:;)
(Think I got off lightly TBH :smiling:)

Paul.
:smiling:
 
Thread owner
Right here goes,

Wednesday, started assembly with the chassis/driveshaft assembly as per the instructions.:thumb2:
View attachment 400059 View attachment 400060

This involves installing the driveshaft unit along with the gearbox section and a cross member.
Including the chassis it involves 4 parts. These are fairly easy to fit, but you have to ensure that the ends of the prop shaft are
free enough to glue to their respective axles. This believe it or not, is the hardest part in this kit!!
View attachment 400061
I remember trying to do this some 45 ish years ago - followed the instructions to the letter then had to bend the prop's
to marry up to the axles!! :flushed:

This time round I cut everything off the sprue's for sections 1, 2 & 3. Total about 16 parts!! :dizzy:
Found it easier to fix the axles first, then the driveshaft/gearbox, but not forgetting the cross member.
Step1Comp.JPG

Then moved on to the front axle, Tamiya have molded this axle so that the wheel ends are spherical, and, they
provide a simple steering rod that attaches to A9/A10 wheel hubs. These fit over the axle ends and are held
together by the steering rod, which clips very carefully in place :cold-sweat::cold-sweat:.

The front and rear bumpers - will be installed later on.

Section 4 - construction of the wheels again these will be painted and attached later on :tongue-out3:.

Section 5 attach the remaining cross members and the 4 x one piece leaf springs/shocks :smiling5: - I just love the simplicity of these
early kits!!
Step12345Comp.JPG

Section 6 involves the assembly of the seats, and gear levers.
View attachment 400069 View attachment 400064 View attachment 400065
Yes those tiny fragile lengths of plastic!!!! :flushed:

Moving on quickly to the assembly of the bulkhead, steering and engine compartment
(Shame its empty - you would have thought Tamiya would have added an engine by now!
A nice 3.0L Diesel????:thumb2:).

View attachment 400066 View attachment 400067

Section 8 - is the assembly of the windscreen and a couple of interior pieces, the door mirrors will be
affixed later - I have a habbit of big fingers getting in the way!! :flushed::tongue-out3:.
View attachment 400068
Right off to the paint shop to hide from wifey & get high ermm mix some paint!! :flushed:

Paul.
:smiling:
 

Attachments

  • Step6Comp.JPG
    Step6Comp.JPG
    3 KB · Views: 0
  • Step7.JPG
    Step7.JPG
    3.2 KB · Views: 0
  • Step7Comp.JPG
    Step7Comp.JPG
    3.3 KB · Views: 0
  • Instr8.JPG
    Instr8.JPG
    2 KB · Views: 0
  • Instr67.JPG
    Instr67.JPG
    2.1 KB · Views: 0
  • LeversCU.JPG
    LeversCU.JPG
    2.9 KB · Views: 0
  • Instr1.JPG
    Instr1.JPG
    2 KB · Views: 0
  • Instr23.JPG
    Instr23.JPG
    2.1 KB · Views: 0
  • Step1.JPG
    Step1.JPG
    2.9 KB · Views: 0
Thread owner
Thursday, managed to get a bit of time in the paint shop,
Came back with a flat packed Landy :flushed:

View attachment 400084

While I was there - I thought ahead, after section 8, assembly is primarily of the rear section so took advantage of
the reasonable weather - and primed all the large flat sections of the rest of the vehicle.
Paint2.JPG
So after the primer had dried, I then masked off the sections, starting with the white area of the rear.
Moved onto the green inside the door & cab section and then the black on the chassis and inside the
wheel arches etc.
Exhaust pipe - gave it a brush coat of stainless metal colour.

Then did a dry run of all the components just to see :-
View attachment 400087 Dryfit2.JPG

Paul.
:smiling:
 

Attachments

  • FlatPack.JPG
    FlatPack.JPG
    2.6 KB · Views: 0
  • Dryfit1.JPG
    Dryfit1.JPG
    3 KB · Views: 0
Right off to the paint shop to hide from wifey & get high ermm mix some paint!! :flushed:

Wow Paul,

That reminded me of back in my dubious days before acrylics were around. Had me laughing my butt off!!! The Tamiya kit is looking good Sir and you are getting so much done on it too. Gonna do the figures too???

Prost
Allen
 
Thread owner
Allen,

Thanks for the kind comment, I have one or two rattle cans that I have been waiting to use up. Due to slight health problems,
probably caused like you say - before acrylics (and smoking!!!!) :tongue-out3: I can only use these outside. The weather has so far been
reasonable so took advantage.

As for the crew - I had not planned to do them - not even the driver !! ;)
You can see very little of the interior, once it's assembled - the cab doors are molded closed!!
The rear doors are on simple hinges - but if I remember correctly they do not take kindly to being open/closed
too many times.

Tamiya did release the stretcher party as a separate item but I think they are discontinued now.

Paul.
:smiling2:
 
Looking forward to seeing this come together...PM sent to you as well
 
Thread owner
Nearly caught up with myself!!
Friday night - painted rear deck RAF Blue Grey, the other parts were already sprayed matt white.
Added exhaust pipe & rear bumper. "Rusted up" exhaust a little & opened out the end slightly.
View attachment 400105 View attachment 400106

Right now up to date - today (Saturday) I have managed to highlight some of the dash board, gear levers and added
passenger seat & seat backs. Not adding too much detail on the inside as there is not much visible when assembled.
Painted rear windows transparent blue, these will be fitted once the final color has been applied.

View attachment 400107 View attachment 400108 View attachment 400109

All that remains now is assembly of the rear compartment as per the instructions:-
View attachment 400110 View attachment 400111

Or not quite!! ;):flushed::smiling2:

Paul.
:smiling2:
 

Attachments

  • Backdeck.JPG
    Backdeck.JPG
    2.4 KB · Views: 0
  • Chassis.JPG
    Chassis.JPG
    2.8 KB · Views: 0
  • Dash.JPG
    Dash.JPG
    2.8 KB · Views: 0
  • Seats.JPG
    Seats.JPG
    2.9 KB · Views: 0
  • Glass.JPG
    Glass.JPG
    3.1 KB · Views: 0
  • Instr91011.JPG
    Instr91011.JPG
    2.3 KB · Views: 0
  • Instr1213.JPG
    Instr1213.JPG
    2.1 KB · Views: 0
Back
Top