Theme editor

Scale Model Shop

Tamiya 1/35 sd.kfz 7/1 Flakvierling.

CarolsHusband

New member
Joined
Feb 9, 2021
Messages
474
Reaction score
3
Points
0
1/3
Thread owner
Ok, here we go, my first build for about 30 years.

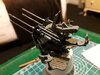
I've had a bit of a debate as to whether it's a soft skin or artillery but I'm sure it can be moved if I've done it wrong.

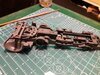
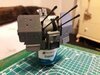
My reason for starting with this kit is that my cousin built it when we were kids and I always wanted to get one but never did. I've made a bit of a start over the past couple of evenings and I'm beginning to get the feel for it again. Rather ambitiously I bought a set of photo etch parts for it but I doubt I'll use all of them, my hands and eyes and patience aren't what they used to be !

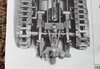
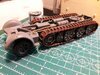
I looked on the 'net for inspiration and found this....

kjotG0y.jpg

A bit of a double-edged sword as I've now got to try not to copy it but obviously I'm going to compare it once I'm done. I have different plans for the diorama though.
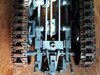
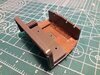
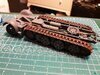
Anyway, I made a start. Building some bits up on the sprue as well as per instructions. I always used to hand paint my kits before, but am spraying the base coat on this one. Quite what sort of learning/failure curve I'll end upon we shall see.

pJnxejX.jpg

wQxMmOu.jpg

Gonna do a bit more building and get a bit of paint on things tomorrow.
 
I built one of these with an Eduard PE set when I first started.
Made an utter pigs ear of it and it ended up a weathering test bed :smiling5:

Nice start, look forward to seeing how it should be done :thumb2:
 
Thread owner
Yeah, I didn't really think it through. I'll use the tread plate and the mesh for the bed sides and a few other bits but without a proper bending machine I'll probably just end up turning the really fiddly bits into mush.
 
Yeah, I didn't really think it through. I'll use the tread plate and the mesh for the bed sides and a few other bits but without a proper bending machine I'll probably just end up turning the really fiddly bits into mush.
All you need is flat-nosed pliers for the small pieces and a flat work surface, a (steel) ruler and a sharp knife for larger ones.

Hold small parts with the pliers so the bend line is at the edge of the pliers’ jaws, and you can bend it nice and straight.

Long parts you put down onto your work surface with the ruler along the bend line, then press firmly down on it and insert the knife under the bit that sticks out from under the ruler, so you can lever it up to bend it.

Also, photoetched parts get easier to bend if you anneal them by heating them up red-hot (for example over a cooker — use pliers!) and letting them cool. This softens the brass, which is quite useful for some parts — though not for others if they need to stay properly flat, so best plan ahead.
 
Hi Dan
Nice choice of kit to go with. Tamiya kits usually fit well, don't have a silly number of tiny parts and the instructions make sense. As for the PE - most people only use the parts that are actually an improvement over the kit part or add a detail that is missing. A lot of PE parts are 'fret fillers' and are not worth using.
Jim
 
Thread owner
Thanks Jakko and Jim R, I'll give it a bash. I guess regular superglue is ok for joining PE to itself as well as plastic ? Having a look at the armour plate at the moment. I mean, what's the worst that can happen ?
:rolling:
 
I guess regular superglue is ok for joining PE to itself as well as plastic ?
It is. To improve adhesion, you can sand the etched part with fine sandpaper, either the whole sheet or just the areas where the parts will be glued. The aim is to scratch up the whole surface, to give the glue more area to grip.
 
Thread owner
Teeny update, I've only got back to it this evening. Chassis started & painted.

View attachment 414586

Flakvierling nearly assembled, started doing a little patina on the guns and the first colour for the wooden foot rests.

View attachment 414587

I also painted about half of the track wheel tyres. I'd forgotten what a tedious job that is ! Anyway, hopefully a bit more substance next time.

Dan.
 

Attachments

  • J41lJGg.jpg
    J41lJGg.jpg
    3.5 KB · Views: 0
  • vLeEsGc.jpg
    vLeEsGc.jpg
    3.9 KB · Views: 0
Thread owner
Double post. Actually a triple post but the other one vanished. Stupid internet, it'll never catch on.
 
Thread owner

Attachments

  • mC93SjM.jpg
    mC93SjM.jpg
    3.6 KB · Views: 0
  • KYU85oY.jpg
    KYU85oY.jpg
    3.7 KB · Views: 0
  • 9XS5FTe.jpg
    9XS5FTe.jpg
    3.7 KB · Views: 0
  • TdKdfK4.jpg
    TdKdfK4.jpg
    6.6 KB · Views: 0
Thread owner
You have the left one on backward :smiling3:

So the big question is, is that my left or your left ? From the front or the rear ?
How about in this pic....

View attachment 415064

I totally admit to just chucking them on without a thought. Rookie mistake. However.....

" I know", I thought, "I'll check the instructions".

Yep, that helps !

View attachment 415065

:thinking:
 

Attachments

  • fFbl1Ej.jpg
    fFbl1Ej.jpg
    3.8 KB · Views: 0
  • 6gi0fJc.jpg
    6gi0fJc.jpg
    2.9 KB · Views: 0
Back
Top