Theme editor

Scale Model Shop

Dzhon's KV2 Trumpeter 1/35 SCALE

  • Thread starter Thread starter Guest
  • Start date Start date
Thread owner
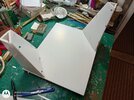
Managed to add some timbers to the edge of those ammo boxes, been pondering how best to display this build .
I originally thought of the KV having slipped down a bank and landing in a river. This was in the early autumn, so there was not a winter camo, they gave up trying to tow it back up the bank due to its immense weight and the onset of winter. So this would have resulted in the KV left in the water and now the ice and snow.
Not enough happening so thought what about a collapsed bridge ! The KV' s weight has brought the bridge down into the river . Now abandoned it sits in the frozen water, the paint work staring to rust awaiting it fate .
Now off to explore Russian bridges !
Hopefully the tracks will be suitably painted and those ammo boxes finished next time I post .
 
Vivid imagination at work there JR.......hope you get it sorted out so we know which direction this build is going. ;) Rick H.
 
Whatever you choose I'm sure you'll make a great job of it John.
Pete
 
Thread owner
Coming on very nicely indeed John!!! Love the artist!!

ATB.

Andrew
Thanks Andrew .

Vivid imagination at work there JR.......hope you get it sorted out so we know which direction this build is going. ;) Rick H.
Hi Rick , thanks .

Hi John
I like your collapsed bridge idea.
Jim
Thanks Jim, I've been searching the web and found a great photo of a KV 1 in the exact position I'd been thinking .
Sounds like a great plan John, with lots of scope to put your stamp on it.
Thanks Paul , hope so , been cutting out some ply to fill in a frame for the base , hoping to get more done later .
Whatever you choose I'm sure you'll make a great job of it John.
Pete
Thank you Peter . This is the best part of the process for me .

Sounds like another classic JR dio.
Thanks Mick, looking fwd to getting on with the base .

Thanks guys, bit slow today as been watching you know what :cold-sweat: such a shame .
 
Thread owner
Gerry .
Well a photo of the bench covered in cardboard and other debris only upsets Jim and his members of the Tidy Bench Club so just dialogue is safer.:smiling3::smiling3::smiling3:.
 
Thread owner
Greetings.
A good day at the bench over the last couple of days in-between news watching.

A good few photos, but they might help some to understand the use of Foam Board

The first thing to note here is the use of the cheaper board, its the one with the white core. This is the one that is a devil to peel even when using a hair dryer. As its not going to be scribed and the paper left on perfect for this application.

Having used quite a lot of Foam Board now I invested in the cutter and the cutter, well worth obtaining if you going to use it a lot.

2022.jpg
As you can see the blade which is adjustable for differing thickness of board runs in a track.Easy to line up and using a sacrificial section underneath the cut can be quickly made and perfectly cut.

2022_2.jpg
Decided to use this side as the top, checking that the idea would work I cut up some scrap carboard for test pieces.

2022_3.jpg
Front section will be like this.

2022_4.jpg
On with the glue.

2022_8.jpg
Then the board.

2022_5.jpg

This was weighted and left in the warm to dry.

Meanwhile I cut out the corners, removing the center foam at an angle so it will fold. Here it is marked out.

2022_6.jpg
Weights removed and the corners glued and pinned .

2022_10.jpg
Once tacky I cut out the 2 front pieces and glued and pinned to the uprights. Leaving in the warm of the house to dry fully overnight.
Then I'll apply some filler to the outer edges of the uprights and coat the base and faces with the first coat of Sculptamold.

Hope this is of help to any one thinking of using Foam Board for a diorama base.

Thanks for looking in.
John.
 

Attachments

  • 2022_11.jpg
    2022_11.jpg
    5.5 KB · Views: 0
Back
Top