Theme editor

Scale Model Shop

Neil's Italeri 1/35 LCVP Landing Craft

WOW Ensign Merryweather!!! That is some mighty fine scratchy, scrapy, rusty, and chippy you have accomplished there!!! It looks the part for sure and at the rate and skill you're going, you might even get promoted too...

I've never tried the hairspray method, but you seem to have had good success with it Neil. I also bet you hair stays perfectly in place now on those windy days too!!! A really great job, my friend...

Prost
Allen

Oh come on Allen! Surely Neil doesn't waste a perfectly good chipping medium by putting it on his hair! That's gotta be as bad as putting Klear on the floor!
 
Thread owner
sorry guys, but there's only one hair product a veteran jiver such as myself could possibly consider....john-travolta-in-grease (1).jpg

Grease Ilford 1978 (3).jpg
and this really is me aged 19.....
 
Hell Paul, I didn't know John Travolta was Neil's older Brother....
:tears-of-joy:
:tears-of-joy::tears-of-joy::tears-of-joy::tears-of-joy:
 
Thread owner
Today has been a day for the last bit of bling, in the form of two .30 cal Brownings. The Eduard set provides a flat sheet of perforated PE to bend and a tiny ring for the barrel, but I was having none of that, thank you very much!

IMG_20240704_141219385.jpg

I bought a pair of lovely turned brass ones from Master-models , shown here with the, admittedly very poor, Italeri offering.

IMG_20240704_181138724.jpg

I was a bit nervous of all the etch, to the extent that I sourced a 3D-printed version for if it all went horribly wrong. It's not up to @scottie3158 's or @Scratchbuilder 's standards, no chains or padlocks or locking pins or any of that malarkey, but I am happy enough.

IMG_20240705_150828413.jpg

I’m keeping the components separate for painting, and there’s an ammo box as well but that’s another colour again(green)
So I’ll paint these bits and that will be the landing craft finished, and next up will be either the crew or the CITF (Crap In The Front)
Cheers chaps
Neil
 
Jewels doth not maketh the woman - it's the class that tells, and you have plenty of it...
 
Thread owner
So I sprayed it all with Klear and gave it some washes and a bit of rust streaking with GW Agrax Earthshade ( one of their less exotic names) before going for the decals. I was agonising over which was the correct markings for which beach, with a view to making sure I have the correct unit insignia for the GI’s when they arrive.
This is further complicated by the fact that some units (but not all) wore an anti-gas impregnated denim HBT uniform over their regular uniform (the smell from which is possibly the cause of many of them throwing up), and I don’t want that; so accuracy in this regard would further dictate which unit I represent and at which beach . I have already weeded out those figures that are wearing this HBT (Herring-Bone Twill, for the uninitiated), so in the end I just thought ‘Who cares? - Artistic Licence’ and made up a number from the available decals and I will decide at a later date which unit to represent, based on which shoulder flash I fancy at the time.
I haven’t done decals for a long time but they went ok.
Then I started to think about the CITF. Here’s some of the inspiration
anchor rope & life preserver.jpgcrap inthe front.jpgg45686.jpgstuff all over the floor.jpg


First up is rope. The kit provides a small amount for the fenders but I want a lot more. Luckily, for some reason I don’t remember, I have a large amount of proper model boat-type rope which really looks the part. It appears to be made in the same way as real rope, it’s not just a beige-coloured thread.
I started with the ropes for the sides

midship ropes.jpg
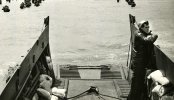
(these guys are clearly wearing the HBT over their regular uniforms)

IMG_20240710_172909543.jpg
This is very much an experiment but after my success with the Klear on the bow door cable I just tied a length of rope around the various stanchions, drowned it in Klear and weighted it to try and replicate the lumpy effect of the real thing.
Again, if I hadn’t seen the pictures I would expect the rope to hang in smooth curves, but clearly it didn’t.

And then I found a contemporary justification for the anchor in the correct type of Higgins boat -WOO HOO!

d-day.jpg
So that was next

IMG_20240711_115039340.jpg
Again I just drowned the rope in Klear and stuffed it into place with tweezers.
More the other side

IMG_20240711_115025155.jpg

And some on the stern -with at least a nod to ‘ship-shape and Bristol-fashion’

IMG_20240711_115017841.jpg
What’s nice about the model rope is that it frays very realistically.

So that's where we are today. Next it's tarpaulins.
Cheers
Neil
 

Attachments

  • CITF 1.jpg
    CITF 1.jpg
    6 KB · Views: 0
Very impressive work Neil. The front bulge (no sniggering at the back please) looks perfect and a very clever way of achieving it. Paint work is very nice indeed. A really first class build altogether.
 
Back
Top