
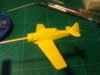
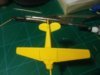
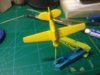
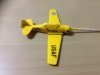
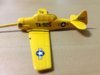
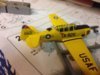
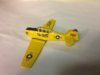
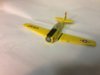
This is the 1/144 double kit by Valom of the North American T6G Texan . Its a nicely moulded kit of not too many parts , two kits are included as is a tiny block of resin with aerials on . There are four decal options for German , Israeli , American and French machines . Ive started the cockpit but the insert is just two square blocks to represent the seats so Ive added seat backs and an instrument panel for the rear seat. Ill be adding control columns and painting on some belts and instrument faces too, it should be seen through the very clear canopy. Heres the sprue shots and where Im at now , cheers tony
View attachment 122527
View attachment 122528
View attachment 122529
View attachment 122530
View attachment 122531
View attachment 122532
View attachment 122533
View attachment 235418
View attachment 235419
View attachment 235420
View attachment 235421
View attachment 235422
View attachment 235423
View attachment 235424
Attachments
-
![DSCN1344 [Desktop Resolution].JPG](/data/attachments/46/46290-38a7ebeb5e0c9085b35aae6734a6fc96.jpg?hash=d_bMpgGgfa) DSCN1344 [Desktop Resolution].JPG2.6 KB · Views: 0
DSCN1344 [Desktop Resolution].JPG2.6 KB · Views: 0 -
![DSCN1345 [Desktop Resolution].JPG](/data/attachments/46/46298-baa001d1a37fed2c37118c2f5f397333.jpg?hash=IBE8TM_17o) DSCN1345 [Desktop Resolution].JPG2.7 KB · Views: 0
DSCN1345 [Desktop Resolution].JPG2.7 KB · Views: 0 -
![DSCN1346 [Desktop Resolution].JPG](/data/attachments/46/46307-b174fcbda302b4f4afde0c21f554f678.jpg?hash=6TDjrOpEch) DSCN1346 [Desktop Resolution].JPG3 KB · Views: 0
DSCN1346 [Desktop Resolution].JPG3 KB · Views: 0 -
![DSCN1347 [Desktop Resolution].JPG](/data/attachments/46/46315-06d590557eaa12ba0954e02c1ae4f802.jpg?hash=mHWKmiM3yt) DSCN1347 [Desktop Resolution].JPG2.7 KB · Views: 0
DSCN1347 [Desktop Resolution].JPG2.7 KB · Views: 0 -
![DSCN1350 [Desktop Resolution].JPG](/data/attachments/46/46323-7dbe53ed053c4d51e153644f0c050cb8.jpg?hash=KdKYt25M9E) DSCN1350 [Desktop Resolution].JPG2.4 KB · Views: 0
DSCN1350 [Desktop Resolution].JPG2.4 KB · Views: 0 -
![DSCN1351 [Desktop Resolution].JPG](/data/attachments/46/46332-327910490950e0c9ee47aac62859f1b5.jpg?hash=fXVv690pKe) DSCN1351 [Desktop Resolution].JPG2.4 KB · Views: 0
DSCN1351 [Desktop Resolution].JPG2.4 KB · Views: 0 -
![DSCN1352 [Desktop Resolution].JPG](/data/attachments/46/46341-05904e8eb0a02e5874cbf4cbd9cd87a9.jpg?hash=aOvTke1ywQ) DSCN1352 [Desktop Resolution].JPG3 KB · Views: 0
DSCN1352 [Desktop Resolution].JPG3 KB · Views: 0

")
")

![DSCN1394 [Desktop Resolution].JPG](/data/attachments/48/48198-783f1325e5707f6432da826ffb60e1bf.jpg?hash=11ZgrdxMGS)
![DSCN1402 [Desktop Resolution].JPG](/data/attachments/48/48205-28bc2711fa881ee6b939978fdf5f079a.jpg?hash=HQarsPGRWY)
![DSCN1403 [Desktop Resolution].JPG](/data/attachments/48/48211-975787f67acb6d7d7d6388d865639ea1.jpg?hash=qiLHmg3poR)
![DSCN1404 [Desktop Resolution].JPG](/data/attachments/48/48216-ef0b94bc5950328c28239e3fca4eddc3.jpg?hash=L6zYO60ajg)
![DSCN1409 [Desktop Resolution].JPG](/data/attachments/50/50371-5265aed4ff0e84ed30fd48ca3389a041.jpg?hash=heMklV9ZMD)
![DSCN1410 [Desktop Resolution].JPG](/data/attachments/50/50377-3534f5f943a12d32a8ed4fa1015069f5.jpg?hash=EcFUmm0qJL)
![DSCN1467 [Desktop Resolution].JPG](/data/attachments/51/51413-66b7ee4100bc89be8fefdf14688aecc2.jpg?hash=aVJWmublva)
![DSCN1464 [Desktop Resolution].JPG](/data/attachments/51/51427-5d242d4c1f019a487a68f633e75d1a63.jpg?hash=okR0QT69RC)
![DSCN1466 [Desktop Resolution].JPG](/data/attachments/51/51444-a7f0024014458b974665be452a1c4517.jpg?hash=gQm8PCaH0f)