
You are using an out of date browser. It may not display this or other websites correctly.
You should upgrade or use an alternative browser.
You should upgrade or use an alternative browser.
1/32 HKM Do335 B-2 Zerstorer
- Thread starter BarryW
- Start date
G
Guest
Guest
Take photos before they get dusty ")
I dont Steve, not really. I do have a Tamiya anti-static brush but I use it only rarely.superb work, as to be expected. how do you combat the dust on all your superbly built models ?

Hi Barry
As always a great build. All neat and sorted. Looks good under primer - shows how well the construction was done. The lights issue is rather a big mistake by the instruction writer and the proof reader :rolling:
Jim
As always a great build. All neat and sorted. Looks good under primer - shows how well the construction was done. The lights issue is rather a big mistake by the instruction writer and the proof reader :rolling:
Jim
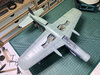
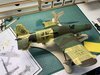
That underside looks excellent so far Barry View attachment 416407
Attachments
Hi Barry, wow that is different, have to agree not a bad looking aircraft, I reckon we would of being in trouble, was that aircraft used as a in the tank buster roll with those huge canons on the wing give a good punch. TonyRLM82
There is a bigger cannon firing through the propeller Tony. .Hi Barry, wow that is different, have to agree not a bad looking aircraft, I reckon we would of being in trouble, was that aircraft used as a in the tank buster roll with those huge canons on the wing give a good punch. Tony
G
Guest
Guest
The intention behind the big guns on German fighters was mostly to shoot down Allied bombers, not to kill tanks.was that aircraft used as a in the tank buster roll with those huge canons on the wing
The wing guns on the B-2 should be the same as the engine gun: 3 cm MK 103’s.There is a bigger cannon firing through the propeller
Hi Barry, if you are doing the one visible in the instructions (M14, RP+UQ) the instructions have got the demarcation of the underside colours wrong at the back in the area of that ventral fin. The underside colour stopped just in front of the fin/back of the radiator intake bulge and gave way to the camouflage colour.

There are a few photos that show this.
M13, RP+UP, which I did with the extended wing tips, was the same.
There are a few photos that show this.
M13, RP+UP, which I did with the extended wing tips, was the same.
Thanks Steve. I will adjust accordingly.Hi Barry, if you are doing the one visible in the instructions (M14, RP+UQ) the instructions have got the demarcation of the underside colours wrong at the back in the area of that ventral fin. The underside colour stopped just in front of the fin/back of the intake bulge and gave way to the camouflage colour.
There are a few photos that show this.
M13, RP+UP, which I did with the extended wing tips, was the same.
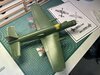
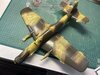
There is a mismatch with the camo pattern in the instructions. Having masked the wings, tail and nose I went up the sides and found that there was no way to carry on the pattern over the fuselage to reflect the plan view iIt was just impossible to reconcile. I suspect that the actual pattern is speculative anyway so I just worked it over the top is the best way I could. This means the fuselage behind the cockpit does not match but the rest does.
View attachment 416613
RLM81 done
View attachment 416614
Masks removed
View attachment 416615
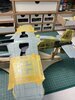
I have a couple of corrections to do, the intake sides in particular. Then a little touching up and detail painting before I mask, to do the markings.
View attachment 416613
RLM81 done
View attachment 416614
Masks removed
View attachment 416615
I have a couple of corrections to do, the intake sides in particular. Then a little touching up and detail painting before I mask, to do the markings.
Attachments


Thanks Steve. The port side is close but the starboard totally different leading to the mismatch.
Now, to correct or not to correct?..... I will think it over. It is still somewhat speculative for this aircraft though.
Now, to correct or not to correct?..... I will think it over. It is still somewhat speculative for this aircraft though.
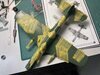
I decided not to change the camo pattern in the end and got on with some detail painting and then masked up for markings. In the process one of the cannons broke and I have decided to replace them with brass tube, two sizes ordered from John as I am not certain which will fit best.
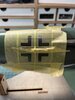
There really is no excuse not to use masks on these kits. The masking job is so easy, straight lines and just black and white....
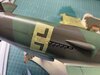
I cut up the side crosses to fit around the exhausts.
View attachment 416763
View attachment 416764
View attachment 416765
View attachment 416766
If you have not used masks do try them. I find masks a lot easier to use than decals with a better result.
There really is no excuse not to use masks on these kits. The masking job is so easy, straight lines and just black and white....
I cut up the side crosses to fit around the exhausts.
View attachment 416763
View attachment 416764
View attachment 416765
View attachment 416766
If you have not used masks do try them. I find masks a lot easier to use than decals with a better result.
Attachments
Legal Notice
scalemodelling.co.uk is a privately operated online discussion forum. All content posted by members reflects their own views and opinions and does not necessarily represent those of the forum owners or administrators. While reasonable efforts are made to moderate content, no responsibility is accepted for user-generated material. By using this site, you agree to comply with UK law and the forum rules.