Theme editor

Scale Model Shop

1/32 HKM Do335 B-2 Zerstorer

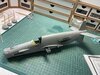
It's a very good kit.

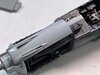
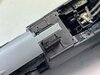
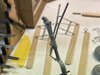
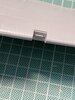
The only place I added detail was the wiring behind the IP which is a visible area.

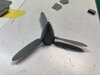
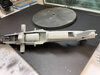
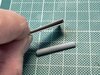
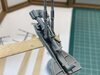
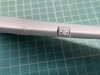
The only place I had trouble was the front of the front engine which was too long and had to be 'adjusted' to fit the cowling/propeller etc. It was probably something that I did wrong and had to fix rather than the kit but might be something to keep an eye on :)
 
This unusual aircraft might be called the ‘push me pull you’ due to its usual engine configuration. It was also nicknamed the ‘anteater’ based on its unusual look.

HKM have four versions of this aircraft in 1/32 and Zoukie Mura 2 versions. Yet only about 40 Do335’s were produced with only a few of those seeing action. Yes, I know it’s an unusual looking aircraft, but I just don't get why so many kits of it are available in 1/32 specially given the rather boring limited camo scheme. I know Luftwaffe aircraft are ‘cool’ and popular but when there is not one single new tool 1/32 Hurricane from a mainstream manufacturer it seems very odd.

That said, I have wanted this kit since reading some reviews but did not really want to spend over £150 on it. But then my Missus had a problem finding something to get me for my birthday...... now I have it....

Let’s look at what we have.
The box


Two slightly different versions neither of which saw action. I decided on 14, with the clipped wings and a few other modifications.


Plenty of plastic well packed in the box.


Some aftermarket


There is a nose weight, a little etch and here are the decals.


I have ordered some Maketar masks so the decals won’t be used.

The surface detailing is superb.


It was nice to build the Trumpy Hurricane with its very traditional engineering. HKM though use the latest methods of tooling including slide moulding and innovative engineering. It really benefits from this, I love it.


Finally my bench, cleaned up and ready for this build...
Definately the sort of model I’d pick up although at £150 I’d probably need a pretty good excuse. Look forward to the build Barry.
 
Thread owner
i have sprayed RLM66 in the pit and wheel well and the seatbelts came together well.

55BBFAA1-8A6A-4AD3-817F-1377898C3477.jpeg

19E55117-5860-4242-8156-83BF437DC65D.jpeg
I will start some detail painting in the pit tonight.
 
Thread owner
More progress to report

cockpit dry brushed with metal powder
FFE2A9C3-9CAE-4B2C-8F36-734966EE41D9.jpeg

Wheel well. Drybrushing metal powders really works well in bringing out highlights and giving a painted metal appearance.
B21B6848-CD60-48EA-8796-C891ECA901BC.jpeg
Front engine cemented into place.
99361B8D-4C48-425E-8540-F7F96B49DEB8.jpeg
Rear engine
FEBD46CB-A96A-4510-B07D-BFF931ECF61F.jpeg

I am working on the i.p. and will use lead wire to show some wiring behind.
94018D87-6A6F-44C9-96CD-C1B2185EB213.jpeg

Clamps, clamps and yet more clamps...
CA74C0F5-F6D6-41F8-A984-2632FC444D37.jpeg

Despite the number of clamps the fit is really quite good.
 
Hi Barry
Those metal powders really work. Do they come in different metal finishes? The two engines look very nice.
Jim
 
Thread owner
Hi Barry
Those metal powders really work. Do they come in different metal finishes? The two engines look very nice.
Jim
Yes they have three types. Iron, steel and chrome. I mostly use the chrome as it is a little brighter for bringing our highlights but the other two are great when you want contrast. I have used them to provide small areas of natural metal finish as well as dry brushing.
 
Those harnesses look the bees knees. The engines look to be well detailed as well.
 
Thread owner
Some more progress. A little filler is needed along the fuselage joins.
View attachment 415283

Pulling together fin and tail sections.
View attachment 415284

The i.p.
View attachment 415285

Some very nice fit but some trimming and adjustment will be needed for panels.
View attachment 415287

View attachment 415288

Rear prop
View attachment 415289

Main canopy. I decided to use Mr Cement S to glue the bulge sections in. Yes, it is safe, carefully applying small drops to the framing and allowing capillary action to do its job.

View attachment 415290

Fuselage top in place
View attachment 415291

Some interesting and thoughtful engineering show her making good use of slide moulding and panel lines. No leading edges to sand...
View attachment 415286
 

Attachments

  • D36984C3-440B-45A6-8345-0F477E524914.jpeg
    D36984C3-440B-45A6-8345-0F477E524914.jpeg
    3.3 KB · Views: 0
  • 28B6C633-C676-4429-897E-B4DB357E061E.jpeg
    28B6C633-C676-4429-897E-B4DB357E061E.jpeg
    2.9 KB · Views: 0
  • 2364E92D-0CF4-4B73-B0DB-4DBE2D24AA6B.jpeg
    2364E92D-0CF4-4B73-B0DB-4DBE2D24AA6B.jpeg
    2.7 KB · Views: 0
  • 3E24513A-8A65-4CAF-B486-8C135EDDBB06.jpeg
    3E24513A-8A65-4CAF-B486-8C135EDDBB06.jpeg
    3.3 KB · Views: 0
  • 33CC786B-76E3-46BD-B2A3-1D6C1F667037.jpeg
    33CC786B-76E3-46BD-B2A3-1D6C1F667037.jpeg
    3.7 KB · Views: 0
  • 9266F269-E5D5-40E2-A65C-C0EFA12E4A8B.jpeg
    9266F269-E5D5-40E2-A65C-C0EFA12E4A8B.jpeg
    2.7 KB · Views: 0
  • 7FF06AA4-13E0-4864-A395-2ACCE820AC84.jpeg
    7FF06AA4-13E0-4864-A395-2ACCE820AC84.jpeg
    2.8 KB · Views: 0
  • 97507724-3EAC-4514-BC96-4AA2734299AD.jpeg
    97507724-3EAC-4514-BC96-4AA2734299AD.jpeg
    3.8 KB · Views: 0
  • 7610A145-5B43-40F0-A2DA-280C14A8D31A.jpeg
    7610A145-5B43-40F0-A2DA-280C14A8D31A.jpeg
    3.3 KB · Views: 0
Thread owner
Like so many Chinese brands HKM seem to assume that we want to have all the panels open. In my view that is not realistic and I want the panels closed to show off the lines of the aircraft. At least HKM include closed options in the instructions and ‘enable’ closed panels unlike some. But they nevertheless don’t take as much care over fit as they think most people won’t close them up. Consequently rather more filling and sanding is required than expected. Pity, with the exception of the panels the fit has been outstanding. It’s not a massive problem though, just a lot of work as it cannot be hurried.

Some pics.
View attachment 415824
View attachment 415825
View attachment 415826
View attachment 415827
View attachment 415828
View attachment 415829

I went to dry fit the front wing light and noticed this.

View attachment 415830

That cannot be right and this will just look odd. I checked the instructions and there is nothing about a fitting in the gap. So I checked the sprues and found this.
View attachment 415831

Twin light bulbs, perhaps and the parts fits perfectly in the gap. I will paint the area black and the bulbs silver.
View attachment 415832
 

Attachments

  • 2C226592-DA6C-49F5-B12F-4A9B0369ADCD.jpeg
    2C226592-DA6C-49F5-B12F-4A9B0369ADCD.jpeg
    3.7 KB · Views: 0
  • AA7630B5-8AF9-4D86-8D51-74B4DB6E684E.jpeg
    AA7630B5-8AF9-4D86-8D51-74B4DB6E684E.jpeg
    3.3 KB · Views: 0
  • 4E727C90-3F98-4B7F-9171-2C47A71AD2EB.jpeg
    4E727C90-3F98-4B7F-9171-2C47A71AD2EB.jpeg
    4.8 KB · Views: 0
  • 94FE4B1B-85C0-4099-BAA4-CBB1335371F4.jpeg
    94FE4B1B-85C0-4099-BAA4-CBB1335371F4.jpeg
    3.2 KB · Views: 0
  • EDB31449-D59B-44CF-9C65-D8FD2628FC20.jpeg
    EDB31449-D59B-44CF-9C65-D8FD2628FC20.jpeg
    3.9 KB · Views: 0
  • 62778DCF-7080-464F-AE42-3CC522023465.jpeg
    62778DCF-7080-464F-AE42-3CC522023465.jpeg
    4.1 KB · Views: 0
  • 6978FD74-94A1-4178-B07C-0FD2EC6BED87.jpeg
    6978FD74-94A1-4178-B07C-0FD2EC6BED87.jpeg
    2.9 KB · Views: 0
  • 682AA9F9-24E8-4807-B5EE-32B6D5C42CCA.jpeg
    682AA9F9-24E8-4807-B5EE-32B6D5C42CCA.jpeg
    3.8 KB · Views: 0
  • F3A4ACAE-60C8-4508-B369-D2C61ABAB687.jpeg
    F3A4ACAE-60C8-4508-B369-D2C61ABAB687.jpeg
    2.7 KB · Views: 0
Thread owner
I have painted the wheels. I masked them using this Maketar set. If you don’t have all the Maketar utility sets then you are missing a trick. Very useful indeed.

View attachment 415892
 

Attachments

  • 942EA78E-BEC4-4073-B845-FFB09E71217D.jpeg
    942EA78E-BEC4-4073-B845-FFB09E71217D.jpeg
    4 KB · Views: 0
I had a look back at my build of this model, and the lights were definitely missed in the instructions!

"Incidentally the space in the front of the port wing is for a light. The instructions don't mention the lights at all, just the clear cover (part R6). The lights are actually part N12 which took me a while to find, but which I can now fit once painted."

So for anyone else following in our footsteps N12 is the part you need :)
 
Thread owner
I had a look back at my build of this model, and the lights were definitely missed in the instructions!

"Incidentally the space in the front of the port wing is for a light. The instructions don't mention the lights at all, just the clear cover (part R6). The lights are actually part N12 which took me a while to find, but which I can now fit once painted."

So for anyone else following in our footsteps N12 is the part you need :)
Spot on.
 
Back
Top