On to the harness. A decent harness is about the only after market 'must have' item in my opinion. In any scale, but certainly 1/48 and larger, it is something that can make or break a cockpit. Some kits do come with a photo-etch affair, which is okay, but I prefer something more realistic. I'm a big fan of RB Productions paper and photo etch system, though there are other nice ones out there, HGW do some nice harnesses for example. These types are much more compliant and poseable that anything in PE.
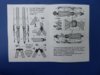
With the RB harnesses you get a little fret of photo etch accoutrements and some precut paper for the material of the harness, along with a seemingly complicated but easy to follow set of instructions.
View attachment 152020
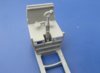
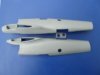
Here's the etch and paper parts with the one shoulder strap so far completed. The No.11 blade gives an idea of scale.
View attachment 152021
There's no point in pretending that assembling these isn't a fiddle, but it's not difficult. Good tweezers, a good maginifier and a wide vocabulary of expletives and you are good to go!
I've done many of RB's Luftwaffe belts in my models and they always look good, so the fiddle is well worth it
")
Cheers
Steve