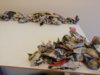
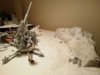
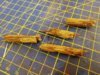
just started this to see how the gun and figures will be placed !

You are using an out of date browser. It may not display this or other websites correctly.
You should upgrade or use an alternative browser.
You should upgrade or use an alternative browser.
1/35, 88mm flak gun diorama
- Thread starter shovelhead 1977
- Start date
G
Guest
Guest
Ray .
Seen plaster bandage used on railways, but not on a dio as yet .
Will take notes.
Seen plaster bandage used on railways, but not on a dio as yet .
Will take notes.
Hi Raymond
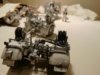
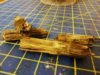
Very nice looking start to the dio. I missed the gun build but just had a catch up on that. Beautifully done. So nice to see the figures. I am building the Tamiya 1/48 version at the moment so the photos of your super detailed Dragon kit will be great for reference.
Jim
Very nice looking start to the dio. I missed the gun build but just had a catch up on that. Beautifully done. So nice to see the figures. I am building the Tamiya 1/48 version at the moment so the photos of your super detailed Dragon kit will be great for reference.
Jim
Ray .
Seen plaster bandage used on railways, but not on a dio as yet .
Will take notes.
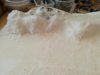
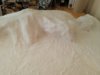
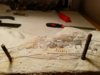
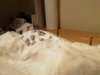
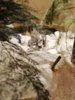
hi john, its a plaster cloth from hobbycraft on offer a pound for 10 cm by 3mtr, thought I would give it a try. not so messy as plaster of paris, you dip this in water , cut to size and put on diorama ! not quite sure what I wanted to do, but it had to be a snow scene as the crew have winter uniforms on. was thinking about a few rocks a couple of trees and maybe an old fence ! got some snow powder so everything will be lightly covered [ to cover any mistakes ! ] have to see how it goes as this is my first ever diorama !
G
Guest
Guest
Thanks Ray.
Does look ok, sounds a you have it covered scene wise.A few trees to give it some height, fence sounds another good move.
Plenty of good videos on U Tube from Precision Ice and Snow if you need any pointers.
Does look ok, sounds a you have it covered scene wise.A few trees to give it some height, fence sounds another good move.
Plenty of good videos on U Tube from Precision Ice and Snow if you need any pointers.
G
Guest
Guest
I found that the adhesive layering is the hardest part. Putting on the snow as they show is great, esp the angle one for a wind swept scene.
G
Guest
Guest
Posts crossed there Ray. Just wondering are you going to spray a coat of white over that bandage first to give it a sealing coat, might help ?
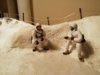
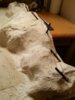
Looks good set up, the wire placement is damned good, looking fwd to seeing the snow on it :thumb2:
Looks good set up, the wire placement is damned good, looking fwd to seeing the snow on it :thumb2:
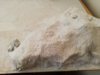
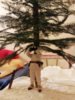
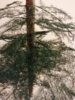
started doing the trees, apparently pine trees in 1/35 scale would be about 11 inches, for a 60 foot tree, mine are going to be a little shorter ! but still tall enough to be the right size for the figures, then given a light dusting of snow, thats what i'm hoping anyway
Attachments
G
Guest
Guest
Ray those branches are very realistic could you say what you used please ?
hi john, they are 1/35 pine boughs from panzer models,the trunk is balsa dowling, tried a few different things but they never looked right , either to big or to small but these are perfect ! cut them to what size you want, drill small holes in the trunk and glue them in, will have a light dusting of snow when completed. about 12 quid for 15 boughs , i have ordered some more as i want to put a few more trees on the one side. also if you run a wire brush up and down the balsa dowel it creates a bark like finish !

1/3
Ray,
Looking good really taking shape.
Looking good really taking shape.
Legal Notice
scalemodelling.co.uk is a privately operated online discussion forum. All content posted by members reflects their own views and opinions and does not necessarily represent those of the forum owners or administrators. While reasonable efforts are made to moderate content, no responsibility is accepted for user-generated material. By using this site, you agree to comply with UK law and the forum rules.