Theme editor

Scale Model Shop

1/72 Airfix Junkers Ju 52

Status
Not open for further replies.
Thread owner
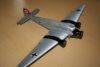
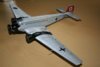
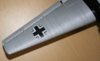
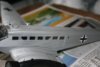
Thanks Trey. The corrugations are a real pain. There was seepage when painting and now the decals are on after a battle and a few cups of coffee. Humbrol Decalfix is my best friend. These decals are over 20 years old, they came from an old He111 I started as a kid and thankfully had the foresight to stash them away. So more progress:

View attachment 58185View attachment 58186View attachment 58187View attachment 58188View attachment 58189

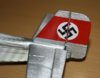
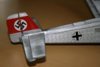
The swastika will need to be painted in, it came in parts as they are sometimes supplied.

View attachment 60066

View attachment 60067

View attachment 60068

View attachment 60069

View attachment 60070

View attachment 173092

View attachment 173093

View attachment 173094

View attachment 173095

View attachment 173096
 

Attachments

  • IMG_1355.jpg
    IMG_1355.jpg
    1.9 KB · Views: 0
  • IMG_1361.jpg
    IMG_1361.jpg
    2.4 KB · Views: 0
  • IMG_1358.jpg
    IMG_1358.jpg
    2 KB · Views: 0
  • IMG_1357.jpg
    IMG_1357.jpg
    2 KB · Views: 0
  • IMG_1356.jpg
    IMG_1356.jpg
    1.8 KB · Views: 0
Thread owner
The wheels are now on and the swastika filled in. A final varnish tomorrow followed by props on and then the glazing. I didn't mask the glazing as Airfix did not provide any guide lines, so it's going to have be hand painted with reference to books. Wish me luck on that!
 
Some nice smooth work there Joe.

Fantastic work with those decals, looks like they hug the corrogated grooves nicely. Not too bad after 20 years. :terrific:
 
Great work on the painting Joe, it could have gone oh so wrong with the black paint running down those ridges looking good
 
It looks really good. If anyone wants a model with plenty of surface detail - JU52.
 
Thread owner
We are nearly there! The aircraft received a final varnish to dull the black slightly, and the windows were unmasked. It has been a while since they were masked and I was apprehensive about what would happen when the tape was removed given the layers of filler, paint and varnish they had received.

The sides: all good, just a minor clean up required

View attachment 58244View attachment 58245

The nose area, not such a good result, but at least it didn't pull any of the filler out:

View attachment 58246

A touch up with the paint and the dreaded job of hand painting the canopy framing completed. I had to refer to a three view diagram from profile out of an old magazine and cross-referenced it to a book I have with a colour feature of a Swiss Ju52:

View attachment 58247View attachment 58248

And in true fashion one of the wheels decided to come off, I'm sure there is a wheel or propeller gremlin in my model space! So the wheel has been reattached and once dry the kit is complete. I will post the final pics in the completed section in due course.

View attachment 58249

Thanks for following the build. Next off the desk will be another old Airfix kit, a 1/72 P-38 Lightning.

View attachment 60109

View attachment 60110

View attachment 60111

View attachment 60112

View attachment 60113

View attachment 60114

View attachment 173135

View attachment 173136

View attachment 173137

View attachment 173138

View attachment 173139

View attachment 173140
 

Attachments

  • IMG_1369.jpg
    IMG_1369.jpg
    2.4 KB · Views: 0
  • IMG_1368.jpg
    IMG_1368.jpg
    2.3 KB · Views: 0
  • IMG_1364.jpg
    IMG_1364.jpg
    3 KB · Views: 0
  • IMG_1363.jpg
    IMG_1363.jpg
    2.5 KB · Views: 0
  • IMG_1362.jpg
    IMG_1362.jpg
    2.4 KB · Views: 0
  • IMG_1366.jpg
    IMG_1366.jpg
    2.8 KB · Views: 0
Thread owner
And we are complete: http://www.scale-models.co.uk/aircraft-pictures/18063-airfix-1-72-junkers-ju52-3m.html#post155675
 
I was lucky enough to get myself one of these a year or two ago very cheap on eBay. Yours is a great example and I hope mine comes out half as well. Another good old kit with a new lease of life breathed into it.
 
Status
Not open for further replies.
Back
Top