Theme editor

Scale Model Shop

1/72 Airfix P-38H Lightning

Status
Not open for further replies.

flyjoe180

Active member
SMF Supporters
Joined
Jan 18, 2012
Messages
13,317
Reaction score
1,115
Points
113
Location
Earth
1/3
Thread owner
The Junkers 52 is complete, so with the modelling mojo in a good place, I have made a start on the next kit. It's another old 'Aircraft of the Aces' kit, the P-38H of Major Thomas McGuire. The decals look to be usable, I will have to hang them in a window for a while though to whiten them up a bit.

View attachment 58315

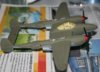
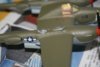
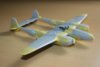
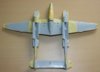
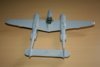
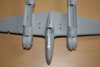
A reasonable fit so far, but she does require a fair amount of filling to make the joins smooth. All taped up.

View attachment 58316View attachment 58317
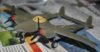
Filler on:

View attachment 58318View attachment 58319

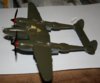
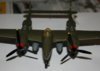
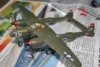
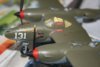
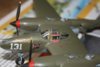
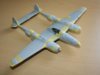
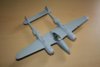
Smoothed over with various shaped files, rubbed down with 800 and 1000 grit sandpaper, and the tape protecting the panel detail removed:

View attachment 58320View attachment 58321View attachment 58322

Thanks for looking in again, next up is some more construction with landing gears and cowls.

View attachment 60180

View attachment 60181

View attachment 60182

View attachment 60183

View attachment 60184

View attachment 60185

View attachment 60186

View attachment 60187

View attachment 173206

View attachment 173207

View attachment 173208

View attachment 173209

View attachment 173210

View attachment 173211

View attachment 173212

View attachment 173213
 

Attachments

  • IMG_1272.jpg
    IMG_1272.jpg
    1.9 KB · Views: 0
  • IMG_1284.jpg
    IMG_1284.jpg
    1.8 KB · Views: 0
  • IMG_1283.jpg
    IMG_1283.jpg
    1.7 KB · Views: 0
  • IMG_1290.jpg
    IMG_1290.jpg
    2 KB · Views: 0
  • IMG_1289.jpg
    IMG_1289.jpg
    1.7 KB · Views: 0
  • IMG_1335.jpg
    IMG_1335.jpg
    1.7 KB · Views: 0
  • IMG_1337.jpg
    IMG_1337.jpg
    1.6 KB · Views: 0
  • IMG_1338.jpg
    IMG_1338.jpg
    1.8 KB · Views: 0
Nice start Joe i did the Academy 1/72 P38j for the Twin boom GB not half as much filler needed on that one compared to yours
 
Thread owner
Thanks guys. Yes Ian, I am accepting filling as standard ops for now while I reduce my old stash. I have some more modern kits for the day when the oldies are all made. Look forward to new kits with good fits!
 
I know what your saying Joe but i do like an old kit now and again keeps you on your toe's
 
Blimey, you don't hang about !! They don't go overboard on the detailing on these old Airfix kits do they......plenty of, er, "scope for additional investment" I think the term is ! Are you going to add anything, or do as I do and just not pick it up once it's finished ??? ;)

Cheers, Neil
 
I remember making this kit went it came out in my youth.I think it was one of Airfix's better offerings which actually had some cockpit detail!.Ive got the 1/48 Monogram kit of similar vintage in my stash.It is covered I raised rivet detail just like this one.Look forward to seeing more of your build.
 
You're cranking them out at the moment Joe, nice job. I did the Academy one recently interesting to see how this kit compares, great stuff Joe. M
 
Thread owner
Cheers guys. Yep Ian, I agree mate, it's good to get back to basics sometimes. Neil, I probably won't pick it up again! If I don't have anything to add from my box of spare parts or suitable plastic bits, then it doesn't get anything new or extra. Dave, yes it does have a tiny amount of detail behind the pilot seat headrest, I presume it was a radio or something of that nature. Michael, I'm sure the Academy one will eat this oldie for detail, but I'll see to it that it turns out to a respectable finish for what it is.

No pics today, but I have added the landing gear struts. They have been painted neutral grey, as have the landing gear bays and the aircraft underside. I have read that a particular feature of the P-38H is the neutral grey all over the underside, it was even a recognition point for that version.

I think I am going to have issues with the landing gear posture however. With a dry-fit of the wheels it seems to be sitting a little nose low compared to photographs of the real thing. I am also of the opinion I have not put enough weight into the nose which is now all sealed up. Uh oh!
 
Thread owner
I have been progressing with this build quite slowly due to work. Unfortunately my fears regarding the nose weight have come true, it is a tail-sitter. Unsure how I can deal with that other than displaying it with a subtle tail stand. A fault of the kit has been the length of the nose oleo, which is a little short giving the aircraft a slightly higher tail posture than it should when resting. Which is strange considering I cannot find such issues elsewhere on build threads for this kit online. I also have had to do some more work on the upper boom joins as they were not quite right in the way I had blended them after filling. The drop tanks have received neutral grey coats and the first coat of olive drab has been applied to the upper surfaces. No pics today sorry, but thanks for looking in. Back to it, I have some thinking to do regarding the stance issues with this one.
 
Will be following this with interest Joe. I have one awaiting paint and another in the stash. Just out of interest how much lead did you put in the nose? I used half a church roof and it still only just balances! Baz
 
It's always great to see really old kits given a new lease of life with an up to date build. I remember building this in the seventies, probably the same moulding as the one you have here, and considered to be quite a sophisticated kit at the time. I seem to remember giving up on trying to get enough weight into the front and ended up proping up the back with a stand! I wasn't allowed to play with things such as lead in those days.

We have had a few really old kits built on here with suitable modern processes being used and the results are so good compared to what we had available when they first came out. I've got an original Airfix P1127 in the stash that I would love to build but then I read it was worth about a hundred quid so I've not decided what to do with it yet!
 
Thread owner
Hi Baz. I went by feel for the nose weight and I was a bit out; make sure you get as much of that stuff in there as you can. When you fit the forward lower nacelles (where the intakes are situated), it would be possible to also pack some in there too, so I recommend that for your build. I considered some surgery but the main paint work is now done. The propellers and wheels and superchargers are now on. When you build your Airfix P-38 Baz, be sure to put the nose aerial mast on before painting. The aerial has a lug to fit into a hole but the hole is not present in the fuselage nose. It would be best to clear the proposed hole prior to fuselage assembly. For the same reason be aware the pitot tube does not have a home; it also was so huge and out of scale that I have left mine off intentionally.

Richard, thanks. Nearly all of my builds on the forum so far have been oldies. I am simply depleting my stash. The old kits are fun, frustrating but rewarding all at the same time. I quite like all those little rivets and the weighty plastic. I don't so much enjoy old decals and filling gaps the size of the Pacific Ocean. That P1127 kit, a hard call, but if it's worth that much I would be tempted to not build it. I have a few very old Airfix kits which I am reluctant to build.
 
Gotta love the old kits Joe,looks like you've got a handle on the fit issue. I've been trying to do the same and clear some of the old kits out,and the challenge is always fun with these as well. Looking forward to seeing the next update,cheers Trey
 
Thread owner
I've been rather slack with the photos due to work getting in the way, but here is the latest pictorial progress.

As I said in my previous posts, everything except the landing light is fitted, and yes it is a tail sitter (see above). I have found a small piece of clear acrylic which can act as a subtle tail stand. The only other solution I could think of was to rip the landing gear out and fit the retracted parts to position the model on a stand.

Olive drab over neutral grey with the propeller spinners painted with a red strip with black spinner caps. Some references refer to OD spinner caps, but others including the Airfix instructions, indicate black:

View attachment 58591View attachment 58592

The canopy was fitted and masked off. The canopy framing requires glossing as there are four tricky thin red 'no step' decals to go on them later.

Gloss varnish coat applied:

View attachment 58593View attachment 58594View attachment 58595

Decals will go on tomorrow followed by the final varnish coats. I am away for a few days from Sunday so this has to be completed soon.

View attachment 60453

View attachment 60454

View attachment 60455

View attachment 60456

View attachment 60457

View attachment 173479

View attachment 173480

View attachment 173481

View attachment 173482

View attachment 173483
 

Attachments

  • IMG_1428.jpg
    IMG_1428.jpg
    2.7 KB · Views: 0
  • IMG_1429.jpg
    IMG_1429.jpg
    2.3 KB · Views: 0
  • IMG_1427.jpg
    IMG_1427.jpg
    2.5 KB · Views: 0
  • IMG_1426.jpg
    IMG_1426.jpg
    2.8 KB · Views: 0
  • IMG_1425.jpg
    IMG_1425.jpg
    2.3 KB · Views: 0
Looking very nice Joe pity its a tail sitter, could you not make a base and superglue the wheels onto it
 
Thread owner
Thanks Ian. I'm unsure what I will do, but it's looking likely it will just get a clear tail stand. I am not a happy camper at present, it has come close to getting some air time.

Decals were on:

View attachment 58638View attachment 58639View attachment 58640View attachment 58641

The canopy decals went on okay, but the canopy framing requires a touch and the rear-view mirror needs to be painted.

Which is all just as well, because the OD will not be put away just yet. I use Tamiya TS80 flat clear for my models, I have since I returned to the hobby. I have had this happen once before, when I started and thought it was something that I did wrong. But knowing what I know now, and using the same technique as always, on a dry surface and in ideal weather conditions, the varnish has bubbled up on one section of the paint work:

View attachment 58642

This has to be sanded back, repainted and varnished again to match the rest of the model. I'm going away in a few days and wanted this to be done.

Tamiya TS80 flat spray, forget it unless you enjoy a gamble and paint touch ups. I will be trying alternatives from now on.

View attachment 60500

View attachment 60501

View attachment 60502

View attachment 60503

View attachment 60504

View attachment 173526

View attachment 173527

View attachment 173528

View attachment 173529

View attachment 173530
 

Attachments

  • IMG_1434.jpg
    IMG_1434.jpg
    3 KB · Views: 0
  • IMG_1435.jpg
    IMG_1435.jpg
    2.5 KB · Views: 0
  • IMG_1436.JPG
    IMG_1436.JPG
    1.9 KB · Views: 0
  • IMG_1437.jpg
    IMG_1437.jpg
    2.5 KB · Views: 0
  • IMG_1432.jpg
    IMG_1432.jpg
    2.5 KB · Views: 0
That's a great shame Joe and demoralising to have to remove it all again. It looks like the same effect you get when you spray over fibre glass resin and you don't degrease the wax off first so it is obviously simply not adhereing to the primer for some reason. Sometimes a change in temperature can do this when you suddenly move the model from one room to another of a much warmer temperature and you get a very fine condensation on the primer layer which prevents to top coat from sticking.

We seem to be having a few paint problems this week. Traditionally, in my younger days of course, if I got to that stage it would probably end up as a crash diorama or hanging from the clothes line as an air rifle target!!
 
Thread owner
Thanks Richard. I have managed to salvage the area concerned and am waiting for the paint to dry. Then I will try again. The model was on the bench where I sprayed the varnish on, it just started to bubble up. I have never seen such a big reaction before. It's simply matt varnish onto gloss varnish as I have always done.
 
Thread owner

Attachments

  • IMG_1432.jpg
    IMG_1432.jpg
    2.5 KB · Views: 0
  • IMG_1458.jpg
    IMG_1458.jpg
    2.4 KB · Views: 0
Status
Not open for further replies.
Back
Top