Theme editor

Scale Model Shop

1/72 Italeri P-51D Mustang

Status
Not open for further replies.

flyjoe180

Active member
SMF Supporters
Joined
Jan 18, 2012
Messages
13,317
Reaction score
1,120
Points
113
Location
Earth
1/3
Thread owner
View attachment 94184

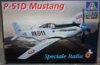
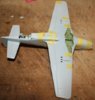
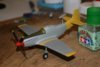
This kit had been sitting at the bottom of my stash for some time. Kit No.6807 is one of a very small range of 'Italian Special' kits and I got it cheap in a sale. I'd read bad things about the Italeri P-51D, and comparing it to new-tool Airfix Mustangs, it certainly has some obvious pitfalls.
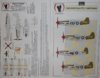
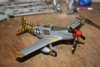
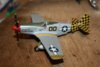
I didn't want an Italian Mustang, so I looked at options and, via another previous purchase, discovered I had some Eagle Strike decals for the 'Checker Tail Clan' (325th FG USAAF). I selected Major Grant Smith's 'Double Nuthin'' as I had read about him already.

View attachment 94185


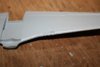
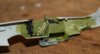
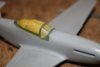
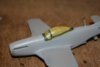
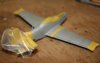
The build started with the wings and cockpit. One of the well known negatives of this kit are the ill-fitting machine gun panels, which come as inserts into the leading edge. Required a lot of cleaning up and work to make them flush and tidy again:

View attachment 94186


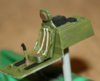
The cockpit was actually quite nice, albeit with absent sidewall detail. I wanted an easy build, so kept it simple here. This was perhaps the most enjoyable part of the build:

View attachment 94187


View attachment 94188


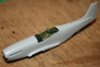
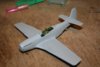
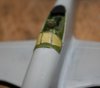
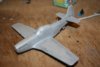
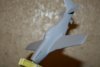
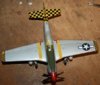
The fuselage went together nicely, no problems here with minimal fuss with the exception of the underside area around the mid-fuselage:

View attachment 94189


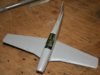
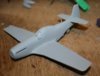
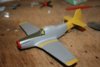
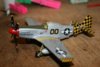
Then the wings were fitted. You can see some filling would be required here, and those awful gun panels:

View attachment 94190
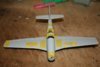
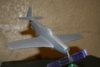

Filling time:

View attachment 94191

View attachment 94192
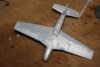

Aftermath:

View attachment 94193


More to come...

View attachment 207207

View attachment 207208

View attachment 207209

View attachment 207210

View attachment 207211

View attachment 207212

View attachment 207213

View attachment 207214

View attachment 207215

View attachment 207216
 

Attachments

  • IMG_2545.JPG
    IMG_2545.JPG
    2.7 KB · Views: 0
  • IMG_2568.JPG
    IMG_2568.JPG
    2.4 KB · Views: 0
  • IMG_2547.JPG
    IMG_2547.JPG
    1.9 KB · Views: 0
  • IMG_2548.JPG
    IMG_2548.JPG
    2.3 KB · Views: 0
  • IMG_2552.JPG
    IMG_2552.JPG
    1.9 KB · Views: 0
  • IMG_2555.JPG
    IMG_2555.JPG
    2.2 KB · Views: 0
  • IMG_2556.JPG
    IMG_2556.JPG
    2.3 KB · Views: 0
  • IMG_2557.JPG
    IMG_2557.JPG
    2.1 KB · Views: 0
  • IMG_2559.JPG
    IMG_2559.JPG
    2.8 KB · Views: 0
  • IMG_2560.JPG
    IMG_2560.JPG
    2.2 KB · Views: 0
Thread owner
The canopy was masked and pre-painted in interior green:

View attachment 94194


Another pitfall of this kit is the windshield. It comes with part of the nose immediately forward attached. Great idea, but unfortunately it doesn't fit flush:

View attachment 94195


I toyed with the idea of filing the edges down to fit, but a dry test with the rear canopy section shows this is not possible. So I attached the rear part and went about blending the front section into the nose:

View attachment 94196


View attachment 94197


Prime time:

View attachment 94198


And then it was off for painting...

View attachment 207217

View attachment 207218

View attachment 207219

View attachment 207220

View attachment 207221
 

Attachments

  • IMG_2578.JPG
    IMG_2578.JPG
    2.4 KB · Views: 0
  • IMG_2573.JPG
    IMG_2573.JPG
    2 KB · Views: 0
  • IMG_2564.JPG
    IMG_2564.JPG
    2 KB · Views: 0
  • IMG_2561.JPG
    IMG_2561.JPG
    1.6 KB · Views: 0
  • IMG_2562.JPG
    IMG_2562.JPG
    1.9 KB · Views: 0
Thread owner
And this is where the will to continue with this kit was tested to the limit of my patience.

A shot of Humbrol silver, all good at this point in time:

View attachment 94199


The effect of a turpentine spill:

View attachment 94200

View attachment 94201


The turpentine ate the paint in various places, some plastic on the wing surfaces, and also some of my filler. A few days later I lightly sanded it where I could, replaced some lost detail (except the wings, they would just have to remain smooth which is not entirely untrue for some real life P-51D Mustangs) and re primed.

View attachment 94202


The reapplied silver wasn't without flaws, as the turpentine had really eaten the plastic badly in some areas. This was fast becoming one of those builds that you don't want to share. I proceeded anyway. Olive drab cowl area and yellow wing tips and tail section as required for the chosen scheme, then masked off and the silver sprayed on again:

View attachment 94203


The result:

View attachment 94204


View attachment 207222

View attachment 207223

View attachment 207224

View attachment 207225

View attachment 207226

View attachment 207227
 

Attachments

  • IMG_2582.JPG
    IMG_2582.JPG
    1.8 KB · Views: 0
  • IMG_2586.JPG
    IMG_2586.JPG
    2.1 KB · Views: 0
  • IMG_2587.JPG
    IMG_2587.JPG
    2.3 KB · Views: 0
  • IMG_2588.JPG
    IMG_2588.JPG
    1.9 KB · Views: 0
  • IMG_2605.JPG
    IMG_2605.JPG
    2.1 KB · Views: 0
  • IMG_2615.JPG
    IMG_2615.JPG
    2.3 KB · Views: 0
Thread owner
The airframe was then mated with the landing gear and propeller assembly:

View attachment 94205


Then it was a gloss coat followed by decals. The gloss helped to blend the imperfections and hide some of the terrible scars the Mustang had endured. The Eagle Strike decals were very thin, I don't recall any real issues with them except for some confusion over some stencil placements:

View attachment 94206


View attachment 94207


View attachment 94208


View attachment 207228

View attachment 207229

View attachment 207230

View attachment 207231
 

Attachments

  • IMG_2617.JPG
    IMG_2617.JPG
    2.4 KB · Views: 0
  • IMG_2624.JPG
    IMG_2624.JPG
    2.8 KB · Views: 0
  • IMG_2626.JPG
    IMG_2626.JPG
    2.5 KB · Views: 0
  • IMG_2627.JPG
    IMG_2627.JPG
    2.5 KB · Views: 0
Thread owner
Masking removed after a satin coat and the Mustang is almost ready:

View attachment 94209


View attachment 94210


Not my best work by any means, and certainly not the enjoyable build I was seeking. The turpentine issue was my fault, but the kit as a 'simple' build is certainly no winner. The colourful markings help to detract from the terrible paint job and marks left by my mistakes.

Completed thread to follow in due course.

View attachment 207232

View attachment 207233
 

Attachments

  • IMG_2632.JPG
    IMG_2632.JPG
    2.7 KB · Views: 0
  • IMG_2634.JPG
    IMG_2634.JPG
    2.4 KB · Views: 0
You have done a great model Joe.

The final result is really fine, and you have solved all the pitfalls with an excellent result ;)

Very nice!
 
Thread owner
Thanks Polux. I'll try to get some 'glamour' shots of it in the completed section later. I very nearly did not post this build, it's been sitting there looking at me for a few months :oops:
 
I'm glad that you did post this one Joe - the ability to overcome problems is the mark of a good model maker I always think.

And that's a very nice Mustang!
 
Great recovery Joe, how close was it to finding a new home in the bin lol, ;)

nice and clean and do like the making you have picked very well done, :D
 
Nicely recovered and finished Joe;) really like the Mustang and the way you stuck at this and turned it around, nice work.
 
It's turned out nice despite the problems you had. I've made countless mistakes on models myself.Ive learned its best to resist the temptation to throw it at the wall (I did that once!.) and just leave it for a week or two before continuing with the build as you have done.
 
Good job on that one. I too also built this one, and I found it had problems on the machine guns as well. Good to see you managed to work around it though.

JOhn
 
Very nice joe and you showed some good skill there to get it back into shape nice one

If it had been me it would have been a crashed and rusted hulk :D
 
Great recovery Joe, the finished piece looks great, especially considering the turps spill. (If you can face another P-51 build I'd highly recommend the new tool Airfix kit, which is so much nicer than the Italeri kit.)
 
Joe we all have at least one kit that does this to us, but like the rest have said it's how you beat it into something that looks like it went together without any problems, and you have done that. Great perseverance and a great build.
 
Great rescue job joe , i think i would have done what Dave did and thrown it at the wall after the turps spill!! it looks fine now though , although i cant imagine its a kit i'll be getting in a hurry! looking forward to seeing your airfix mustang , cheers tony
 
This doesn't look bad from where iam sitting Joe, a good rescue after the turpentine affair.

scott
 
Status
Not open for further replies.
Back
Top