Theme editor

Scale Model Shop

1975 Tamiya M10 Tank Destroyer

Status
Not open for further replies.

Centurion3RTR

New member
Joined
Jan 1, 2009
Messages
2,093
Reaction score
0
Points
0
1/3
Thread owner
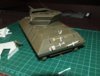
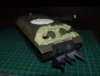
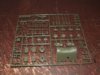
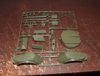
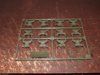
Hi all, i've set myself a challenge. The challenge is, take one old kit and try to bring it up to date. It just so happens it's the old 1975 Tamiya M10 Tank Destroyer, and ideal for the 'Tank Busters SIG' too. So here we go.

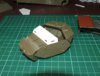
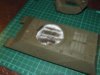
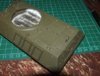
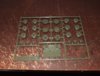
The box and what you get in it. It was battery operated but now selling as a static model, some nice detail in the turret but not upto todays standards. You get a tub to fit in the hull to represent to floor, and it's that tub that spoil it (for me anyway). It's to high because it used to have the batteries but, i have an idea.

View attachment 49002View attachment 49006View attachment 49003View attachment 49004View attachment 49005View attachment 49007

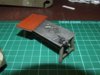
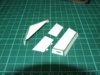
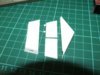
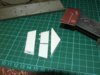
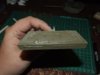
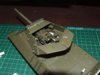
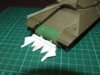
What i'm going to need for the update, ok it's not an update it's styrene sheet. I'm going to get the engineers in to fit a roof in the field, and while they're at it i'll get them to make up a hedgerow cutter too.

View attachment 49008

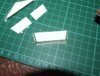
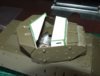
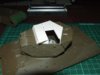
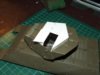
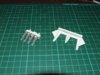
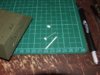
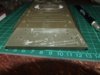
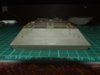
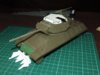
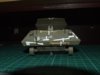
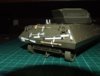
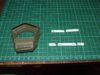
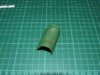
Made a start, parts for the roof, holes filled and casting work going on.

View attachment 49009View attachment 49010View attachment 49011

Have fun, John

View attachment 51812

View attachment 51813

View attachment 51814

View attachment 51815

View attachment 51816

View attachment 51817

View attachment 51818

View attachment 51819

View attachment 51820

View attachment 51821

View attachment 164838

View attachment 164839

View attachment 164840

View attachment 164841

View attachment 164842

View attachment 164843

View attachment 164844

View attachment 164845

View attachment 164846

View attachment 164847
 

Attachments

  • DSCF7459.jpg
    DSCF7459.jpg
    2.7 KB · Views: 0
  • DSCF7460.jpg
    DSCF7460.jpg
    2.3 KB · Views: 0
  • DSCF7461.jpg
    DSCF7461.jpg
    2.4 KB · Views: 0
  • DSCF7462.jpg
    DSCF7462.jpg
    2.4 KB · Views: 0
  • DSCF7463.jpg
    DSCF7463.jpg
    2.2 KB · Views: 0
  • DSCF7464.jpg
    DSCF7464.jpg
    2.1 KB · Views: 0
  • DSCF7465.jpg
    DSCF7465.jpg
    1.3 KB · Views: 0
  • DSCF7466.jpg
    DSCF7466.jpg
    2.3 KB · Views: 0
  • DSCF7467.jpg
    DSCF7467.jpg
    2.4 KB · Views: 0
  • DSCF7468.jpg
    DSCF7468.jpg
    2.3 KB · Views: 0
Nice one John, since I did my first armour kit I've quite gotten into tanks. I'll enjoy watching this come together.

Tony.
 
Thread owner
Well, i'm hoping you can still see some of the detail in the turret and not too much of the floor. As for the roof mod, the crew was complaining they were getting wet but i think it's fragmentation from air bursts. But unlike the M36 the M10 roofs were all field modifcations and never had an "official" roof design authorized, so i can do what ever i what. But i'm working on one i've seen on the net and it's looking good too.

Have fun, John
 
Go that man! Don't you just luuuurve styrene sheets?

You're enjoying this build, me thinks, John boy?

Cheers,

Ron
 
Thread owner
Cheers Ron, i am enjoying this one mate. I just fancied doing some scratch building having seen Andrew (Boldman) and his Scimitar's Bar Armour, so i'm starting off small then see how i go lol. Got to run, the engineers are falling out. Can't take your eye off then.

Have fun, John
 
Thread owner

Attachments

  • DSCF7469.jpg
    DSCF7469.jpg
    2.7 KB · Views: 0
  • DSCF7470.jpg
    DSCF7470.jpg
    2.6 KB · Views: 0
  • DSCF7472.jpg
    DSCF7472.jpg
    2.8 KB · Views: 0
Thread owner
The roof was completed last night, i've only put hinges on one hatch as that will be closed. The hinges were made up from very thin plastic card and stretch sprue, i'll put stretch sprue on the opened hatch but just to make it look right.

View attachment 49127View attachment 49128View attachment 49129View attachment 49130

This is what i'm trying to hide but it still needed painting.

View attachment 49131

Todays job was to put on weld beads, green stuff putty was rolled out and made to look like weld.

View attachment 49132View attachment 49133View attachment 49134

I don't know what to do on the back part of the roof, do i just leave it or do i make a hole so the .50cal can be fitted? What do you lot think?

Have fun, John

View attachment 51935

View attachment 51936

View attachment 51937

View attachment 51938

View attachment 51939

View attachment 51940

View attachment 51941

View attachment 51942

View attachment 164961

View attachment 164962

View attachment 164963

View attachment 164964

View attachment 164965

View attachment 164966

View attachment 164967

View attachment 164968
 

Attachments

  • DSCF7482.jpg
    DSCF7482.jpg
    2.8 KB · Views: 0
  • DSCF7483.jpg
    DSCF7483.jpg
    2.4 KB · Views: 0
  • DSCF7481.jpg
    DSCF7481.jpg
    2.7 KB · Views: 0
  • DSCF7480.jpg
    DSCF7480.jpg
    2.4 KB · Views: 0
  • DSCF7475.jpg
    DSCF7475.jpg
    2.3 KB · Views: 0
  • DSCF7476.jpg
    DSCF7476.jpg
    2.3 KB · Views: 0
  • DSCF7477.jpg
    DSCF7477.jpg
    2.6 KB · Views: 0
  • DSCF7478.jpg
    DSCF7478.jpg
    2.7 KB · Views: 0
Thread owner
Quick update. On the left we have my Mk1 hedgerow cutter, thats what you get when you rush things. On the right is the Mk2 hedgerow cutter, and thats when you take your time and measure things twice. It's not lost for the Mk1 though, it may come in handy for a 1/48 scale Sherman.

View attachment 49135

Have fun, John

View attachment 51943

View attachment 164969
 

Attachments

  • DSCF7488.jpg
    DSCF7488.jpg
    2.5 KB · Views: 0
Looks like you are having fun with this one John.

Ian M
 
Thread owner
I am having fun Ian mate, i have a big update. At the beginning of the week i replaced all the molded on grab handles and fitted lifting points on the hedgerow cutte, gun breech is complete but not glued just yet.

View attachment 49414View attachment 49420View attachment 49421View attachment 49422

Wasn't happy with the molded on tools so they had to go, got the back end all cleaned up and ready for new tools. I started to make new ones as you can see, but luckily i found a few parts, but still had to make the pickaxe handle & head and the axe. Cut up some old PE for the fixing points and now it's looking up to date.

View attachment 49415View attachment 49417View attachment 49418View attachment 49416View attachment 49419View attachment 49423View attachment 49424View attachment 49425

Have fun, John

View attachment 52184

View attachment 52185

View attachment 52186

View attachment 52187

View attachment 52188

View attachment 52189

View attachment 52190

View attachment 52191

View attachment 52192

View attachment 52193

View attachment 52194

View attachment 52195

View attachment 165210

View attachment 165211

View attachment 165212

View attachment 165213

View attachment 165214

View attachment 165215

View attachment 165216

View attachment 165217

View attachment 165218

View attachment 165219

View attachment 165220

View attachment 165221
 

Attachments

  • DSCF7489.jpg
    DSCF7489.jpg
    2.7 KB · Views: 0
  • DSCF7491.jpg
    DSCF7491.jpg
    2.1 KB · Views: 0
  • DSCF7492.jpg
    DSCF7492.jpg
    2.7 KB · Views: 0
  • DSCF7493.jpg
    DSCF7493.jpg
    2.5 KB · Views: 0
  • DSCF7494.jpg
    DSCF7494.jpg
    1.9 KB · Views: 0
  • DSCF7495.jpg
    DSCF7495.jpg
    2.6 KB · Views: 0
  • DSCF7496.jpg
    DSCF7496.jpg
    2.5 KB · Views: 0
  • DSCF7497.jpg
    DSCF7497.jpg
    2.6 KB · Views: 0
  • DSCF7498.jpg
    DSCF7498.jpg
    2.4 KB · Views: 0
  • DSCF7501.jpg
    DSCF7501.jpg
    1.9 KB · Views: 0
  • DSCF7502.jpg
    DSCF7502.jpg
    2.3 KB · Views: 0
  • DSCF7503.jpg
    DSCF7503.jpg
    2.2 KB · Views: 0
Thread owner
Well, the comment i got of the wife today was "you can make tools but you don't know how to use them". It's a bit harsh, i know how to use a modeling knife and that a tool.

Thanks guys.

Have fun, John
 
Hi John

Looking good mate, really like the hedge cutter and the replacement tools, coming along a treat.

Tom
 
Looking good John. The tools are a great improvement on the moulded on ones.

Ian M
 
Thread owner
Sorry guys, work has been a little slow on this build. I've been working in the garage so now had the time to do any modeling, but i'll make up for it.

This is where i'm up to, it looked a little boring on the front so added sang bags. As you can see from the photos it's about ready for paint, i'll get some more work done on it and post later.

View attachment 50104View attachment 50105

P.S. My Capri is looking a little worse for wear, but nothing a good welder can't sort out. I'd sooner work on 1/35 scale than 1/1 lol.

Have fun, John

View attachment 52826

View attachment 52827

View attachment 165852

View attachment 165853
 

Attachments

  • DSCF7512.jpg
    DSCF7512.jpg
    2.2 KB · Views: 0
  • DSCF7513.jpg
    DSCF7513.jpg
    2 KB · Views: 0
Status
Not open for further replies.
Back
Top