Theme editor

Scale Model Shop

Academy 1/35 M47 Patton....'Republic of Korea Marine Corps.'

Status
Not open for further replies.
Thread owner
Thanks for posting folks.

Er, a bit of respect for rank 'Boddies' John, if you please.......;)!

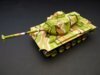
.......and a special thanks to Colin for the cammo info.

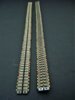
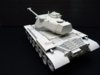
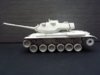
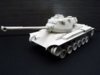
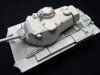
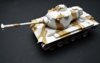
I've painted the tank white, ready for me to attempt to pencil in the pattern. I'll clean up the turret seam before I do, and before I get pulled up for it!

View attachment 274739


View attachment 274740


View attachment 274741

Cheers,
Ron
 

Attachments

  • P1160682.JPG
    P1160682.JPG
    2 KB · Views: 0
  • P1160683.JPG
    P1160683.JPG
    1.9 KB · Views: 0
  • P1160684.JPG
    P1160684.JPG
    1.8 KB · Views: 0
Thread owner
I've penciled in the pattern and painted over the white again where it will show. This also starts to obliterate the pencil lines.

.....a bit of a toughy and a couple of errors, but these will paint over.

I'm not aiming for an exact copy of the box art, but pretty close - and hopefully, close enough for me to be personally happy with the resulting effort.

View attachment 274821

Next I will paint in the next lightest colour - the sand.

Cheers,
Ron
 

Attachments

  • P1160690.JPG
    P1160690.JPG
    2.5 KB · Views: 0
Thread owner
Ooooh, getting interesting now.o_O

Thanks Gavin. I'm glad you're along for the ride. I need all the support I can muster!

I'm starting to get a buzz on too.


First coat of brown /sand added. Wishy Washy and full of blotches. The brush painter's lot.....luvvverly!

The white is acrylic, but the three colours are Humbrol Enamels - simply because these are a closer match than the acrylics I have.

Now I know what's what - almost, I've started to obliterate the pencil marks with more white acrylic

View attachment 274950

Cheers,
Ron
 

Attachments

  • P1160693.JPG
    P1160693.JPG
    2 KB · Views: 0
Thread owner
Thanks boys. It's starting to come together now......

I finished painting the first thin coat yesterday. I tweeked it here and there until I was reasonably happy. I took a fresh look this morning and spotted one or two areas that required attention - O.K., I missed bits! I'll sort those out with the next coat of paint.

Here's where I am at the moment.

Initial coats done(ish) and the wheels painted. I went back to acrylics for the black lines and grey wheels.

View attachment 275038

Cheers,
Ron
 

Attachments

  • P1160696.JPG
    P1160696.JPG
    2.1 KB · Views: 0
I can see this being an excellent build, but for now... brush marks ahoy! ;) something I always struggle with when using a hairy stick. How many coats does it take you to get an even look Ron? Maybe you can point out where I'm going wrong. I'd like to get better at brush painting.
 
I can see this being an excellent build, but for now... brush marks ahoy! ;) something I always struggle with when using a hairy stick. How many coats does it take you to get an even look Ron? Maybe you can point out where I'm going wrong. I'd like to get better at brush painting.

And me!
 
Thread owner
Sorry for the late replies chaps, but I've been away for a few days a'la coach jolly with the 'Blue Rinse Brigade'!

Thanks for the posts everyone.

Patrick and Dave - Because the undercoat was white it took 3 coats to get it where it is now. If it was grey, it would usually take 2.

The main thing to keep in mind is always use thin coats applied with a flat headed brush. As Patrick observed, there will be brush marks with the first coats, but each coat gets smoother. After the first coat, the temptation to thicken the paint is great....DON'T! Just be patient. Thick coats will produce brush marks, no matter what.

Other folks might, and probably do, use a different method, but the above works for me......

Just keep practicing - I do!


Here is the latest stage. close enough to start adding all the bits and bobs. Then I'll paint these in whatever colour crosses them.

View attachment 275423

Cheers all,
Ron
 

Attachments

  • P1160699.JPG
    P1160699.JPG
    2 KB · Views: 0
Thanks for the explanation Ron. I always find that unless I leave the previous coat for at least a couple of days, the next coat interacts with the former. I guess I don't have enough patience for such a long time in painting a model, although I won't give up!

I have to say that your one is looking very good Ron, impressive stuff.
 
Sorry for the late replies chaps, but I've been away for a few days a'la coach jolly with the 'Blue Rinse Brigade'!

Thanks for the posts everyone.

Patrick and Dave - Because the undercoat was white it took 3 coats to get it where it is now. If it was grey, it would usually take 2.

The main thing to keep in mind is always use thin coats applied with a flat headed brush. As Patrick observed, there will be brush marks with the first coats, but each coat gets smoother. After the first coat, the temptation to thicken the paint is great....DON'T! Just be patient. Thick coats will produce brush marks, no matter what.

Other folks might, and probably do, use a different method, but the above works for me......

Just keep practicing - I do!


Here is the latest stage. close enough to start adding all the bits and bobs. Then I'll paint these in whatever colour crosses them.

View attachment 275423

Cheers all,
Ron
Brilliant skills Ron, looking really good!
 
Thread owner
Thanks boys. I'm glad you approve thus far.

Patrick, I just leave the enamel paint to cure overnight. The acrylic, a few hours. So not a long time really.

I brush paint free-hand, so no need to mask up. So compared with using an A.B. and all masking involved, I would suggest there would be little difference in the time taken to complete a model.....I would even be so bold as to suggest that as far as this model's cammo. pattern is concerned, brush painting could well be the easier option.
Either way, as long as the means justifies the end that's all that matters, i'n it?......:)

Thanks again for your input chaps,
Ron
 
Status
Not open for further replies.
Back
Top